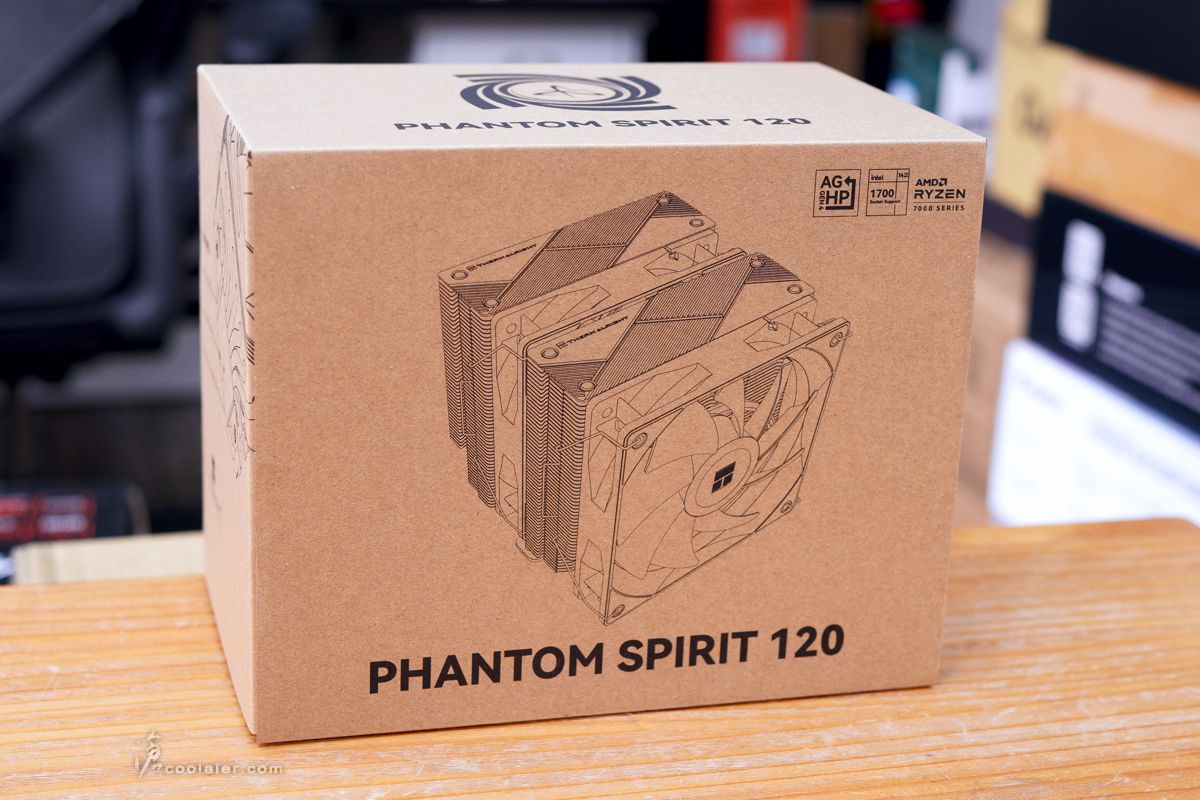
Thermalright Phantom Spirit 系列是效能不錯的 CPU 塔型散熱器,目前也推出了5款型號,全部都是 120mm 雙風扇,基本架構差不多,主要差異在於外觀顏色與風扇差異,有一般版、SE 青春版(簡易版)、SE 青春 ARGB 版、SE BLACK 青春黑化版 、EVO 黑化高風壓版。目前台灣是以一般版與 EVO 兩種為主要販售。
此次開箱就是一般版本,規格如下
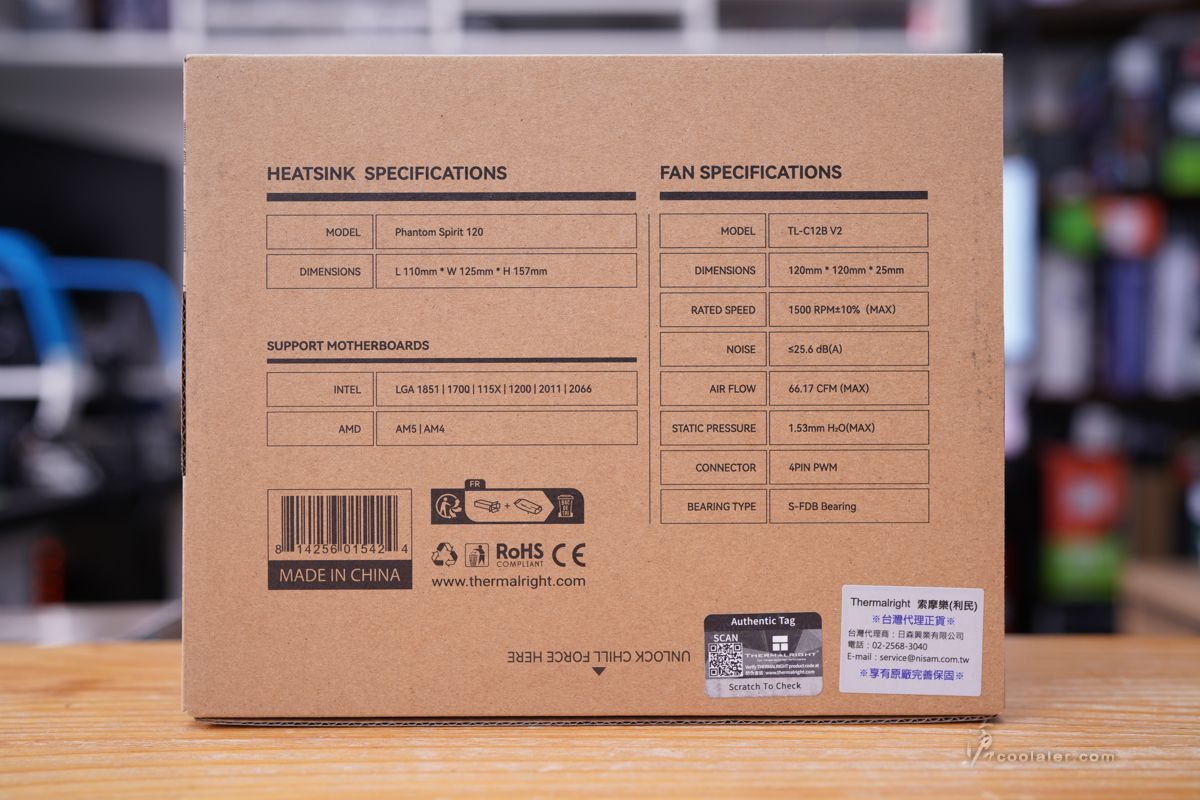
散熱器規格
尺寸:長110 mm ×寬125 mm × 高157 mm
重量:810克(不含風扇)
熱管:6 mm熱管×7支
銅底:C1100 純銅鍍鎳
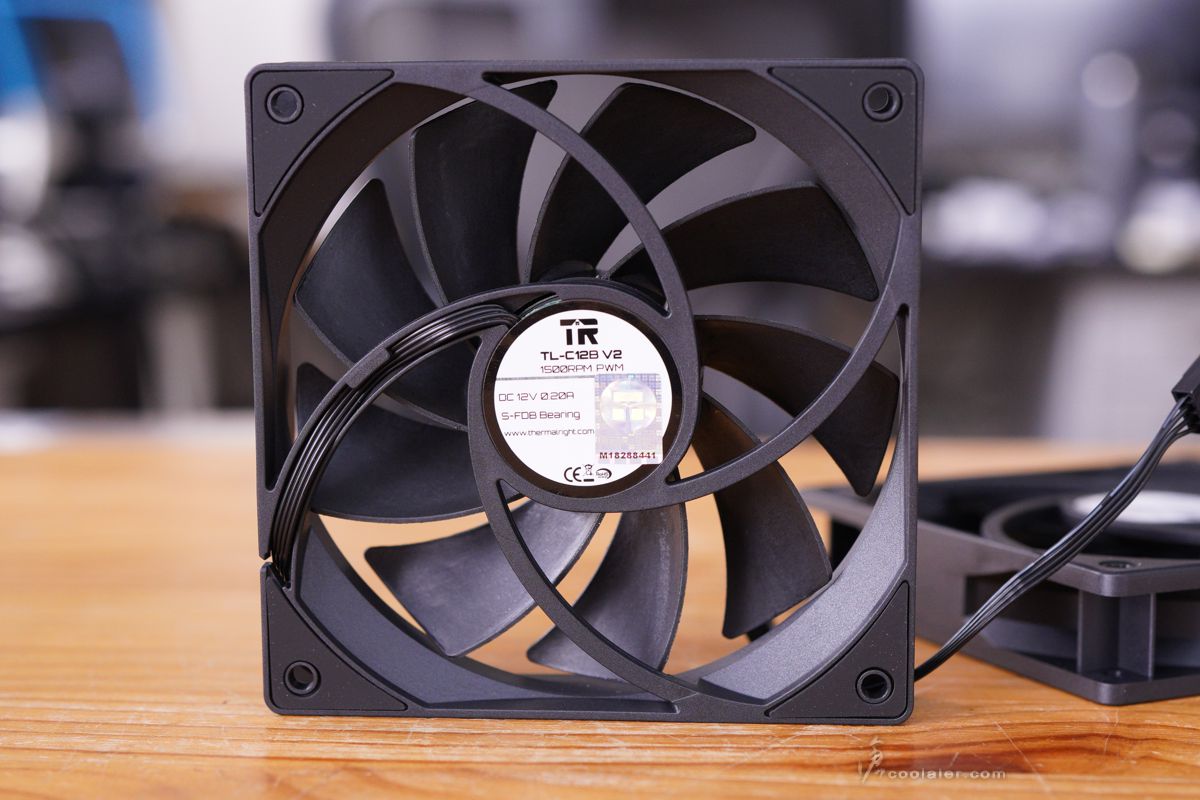
TL-C12B V2 風扇規格
尺寸:長120 mm × 寬120 mm × 高25 mm
重量:135g
風扇轉速:1500 RPM±10% (MAX)
風扇噪聲:25.6 dBA
風量:66.17 CFM (MAX)
風壓:1.53 mm H2O (MAX)
安倍: 0.20 A
接頭類型:4 Pin PWM 接頭
軸承類型:S-FDB 軸承
Phantom Spirit 120 採用環保無彩盒包裝,不過整體設計的質感還不錯。
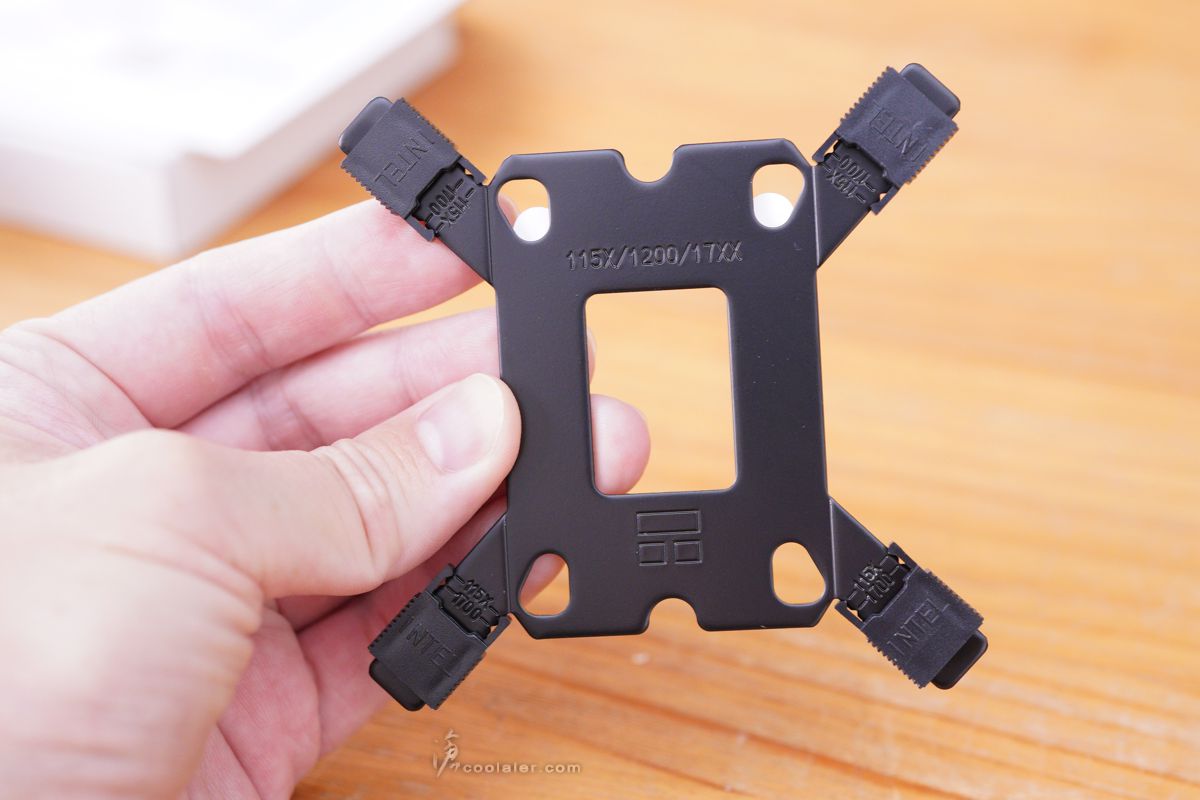
可適用於新舊平台,Intel LGA 2011 / 115x / 1200 / 1700 、AMD AM4 / AM5。
配件有說明書、保固說明、風扇2轉1接頭、風扇扣具、Intel 平台背板扣具、AMD 平台扣具、散熱膏、2顆12公分風扇。

風扇的型號為 TL-C12B V2 ,最大轉速 1500RPM,噪音 25.6 dBA,風量 66.17 CFM ,風壓 1.53 mm H2O ,S-FDB 軸承。
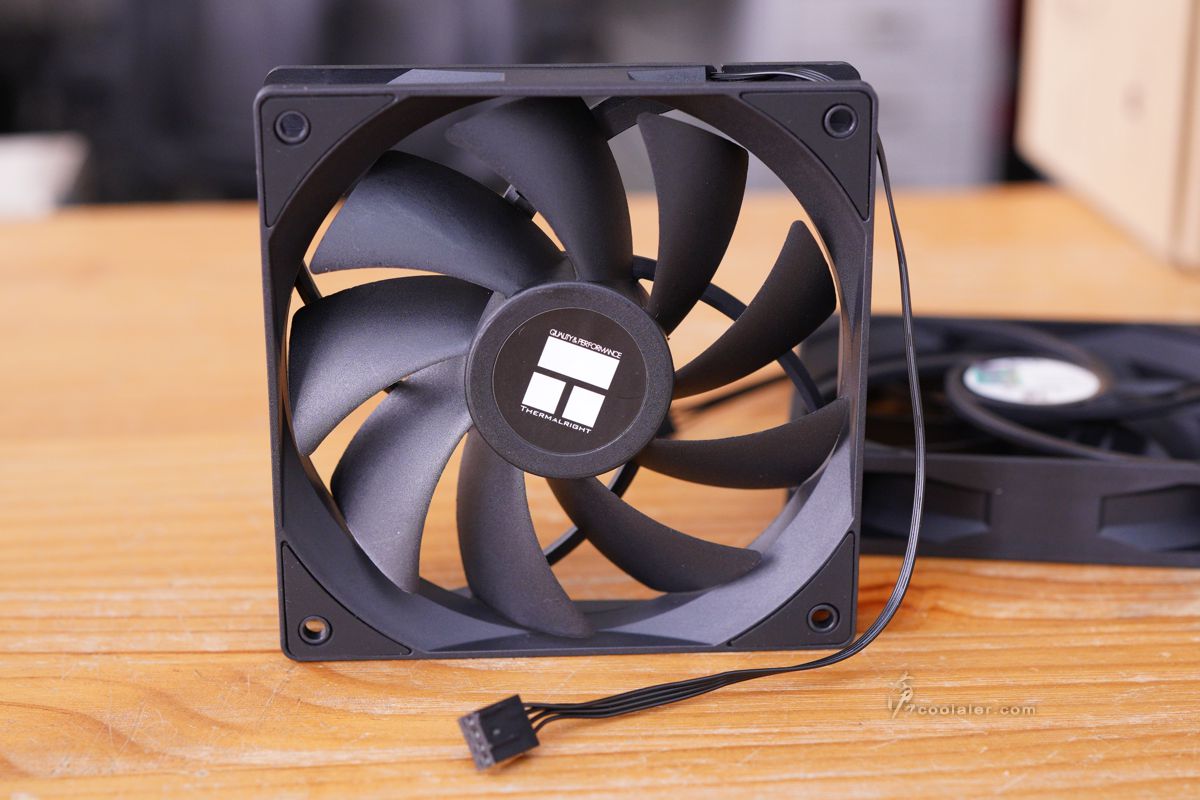
四邊正反面都有軟墊防止共振。
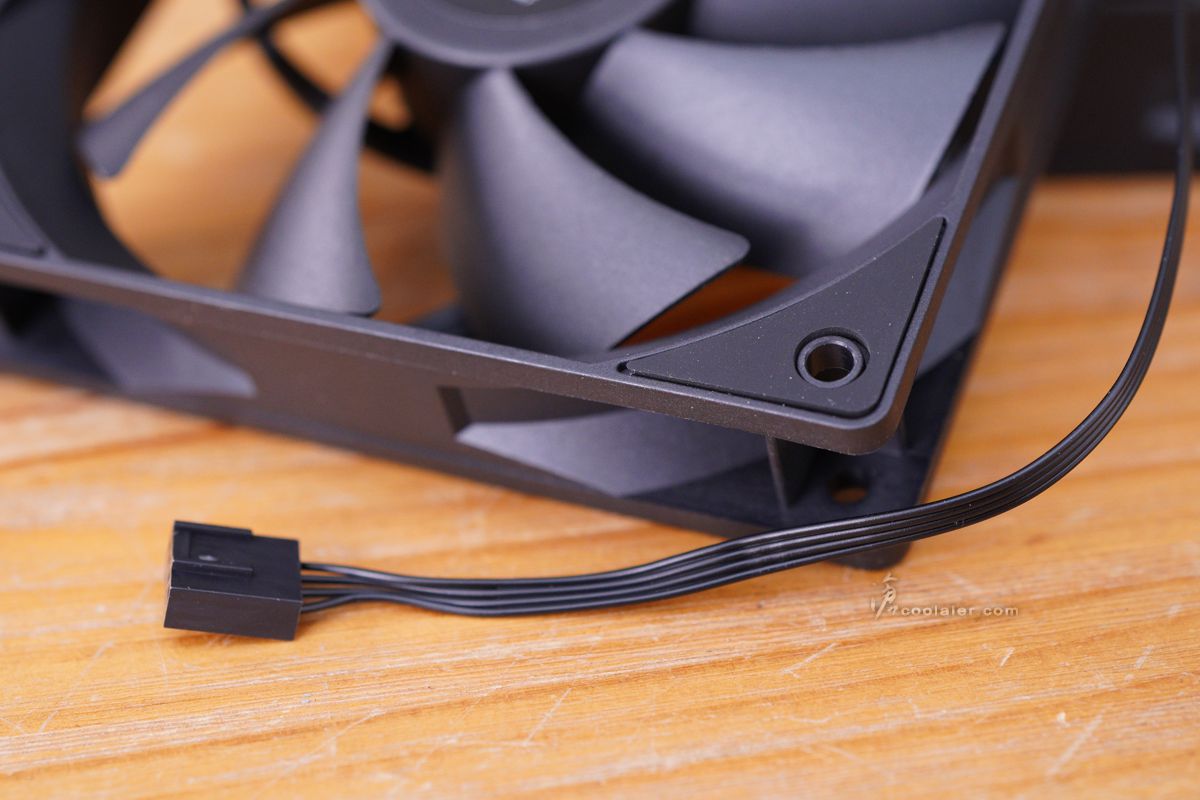
12V 0.2A。
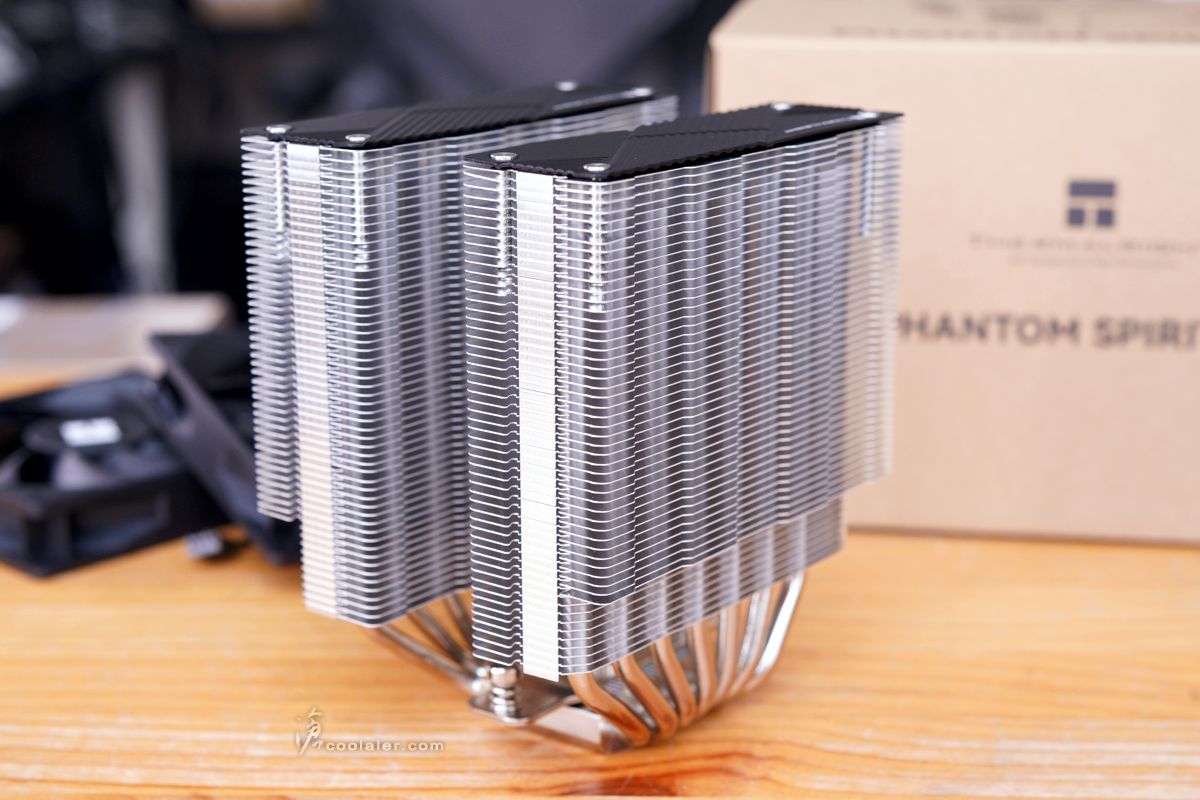
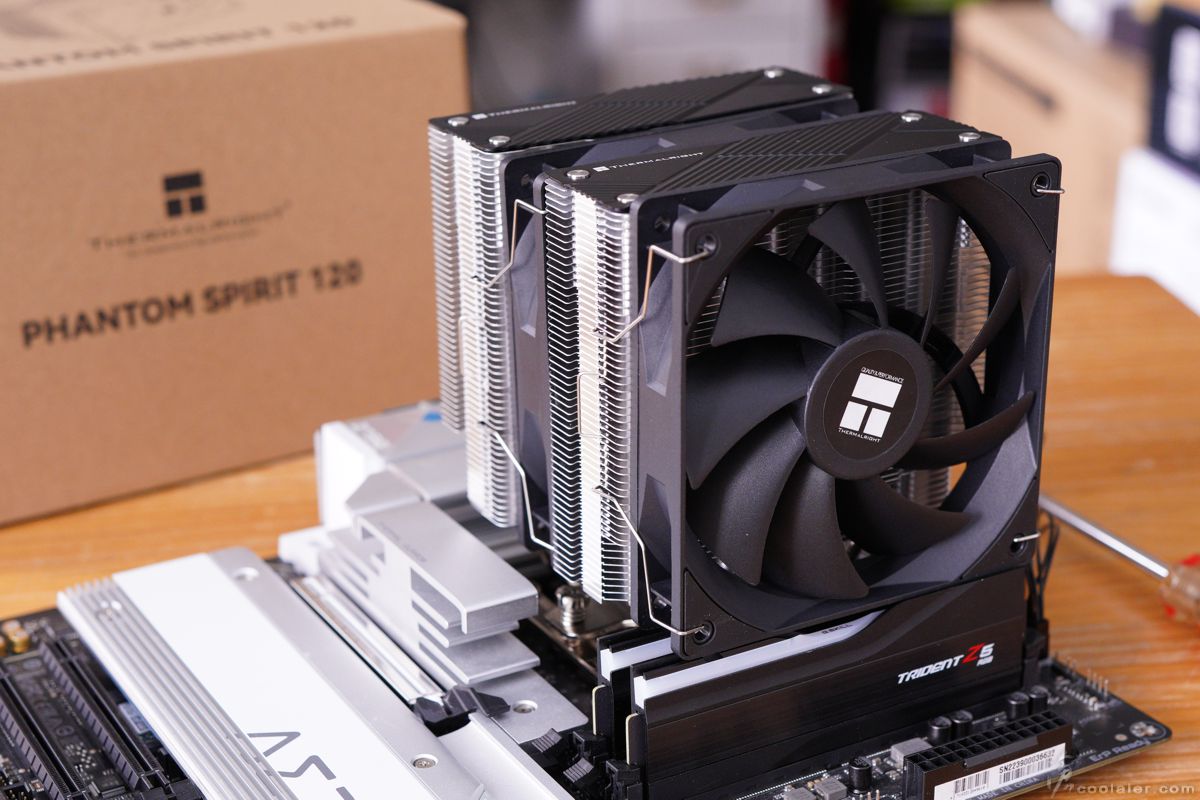
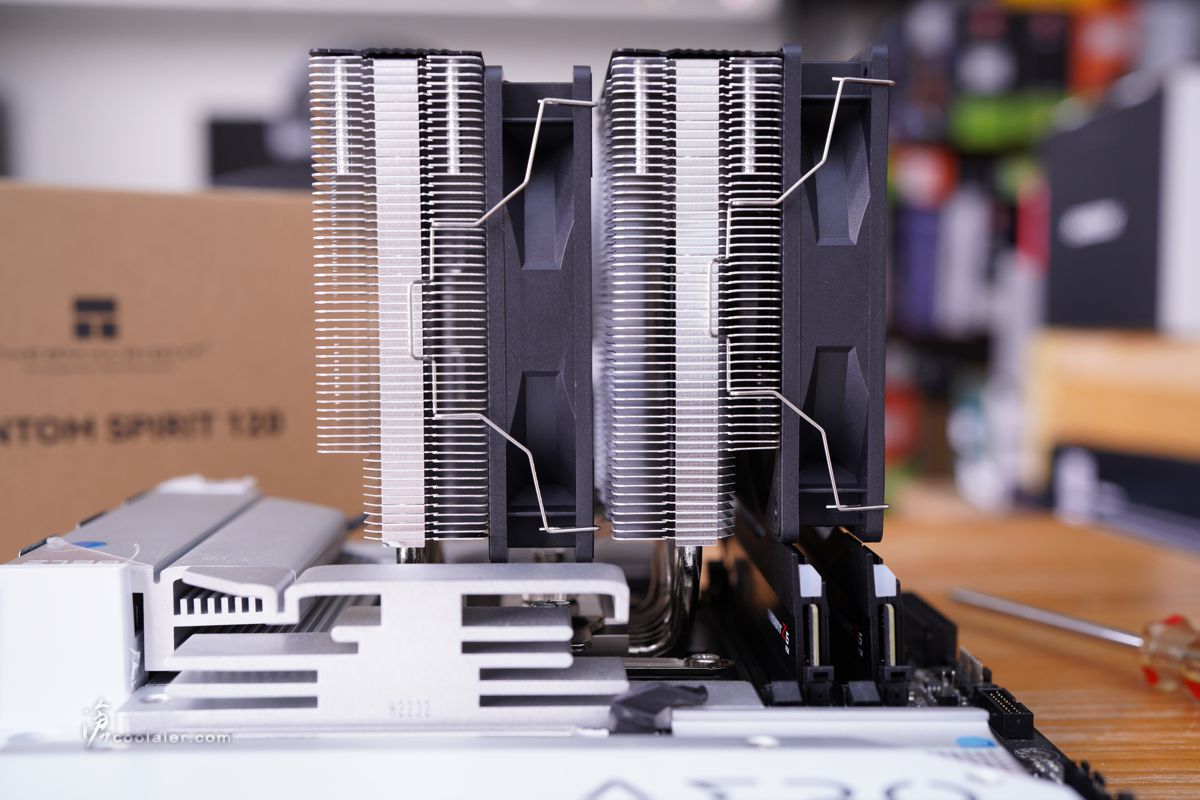
Phantom Spirit 120 採用雙塔型設計,一般版本在散熱鰭片採用常見的銀色,而 EVO 版則是有黑化處理。
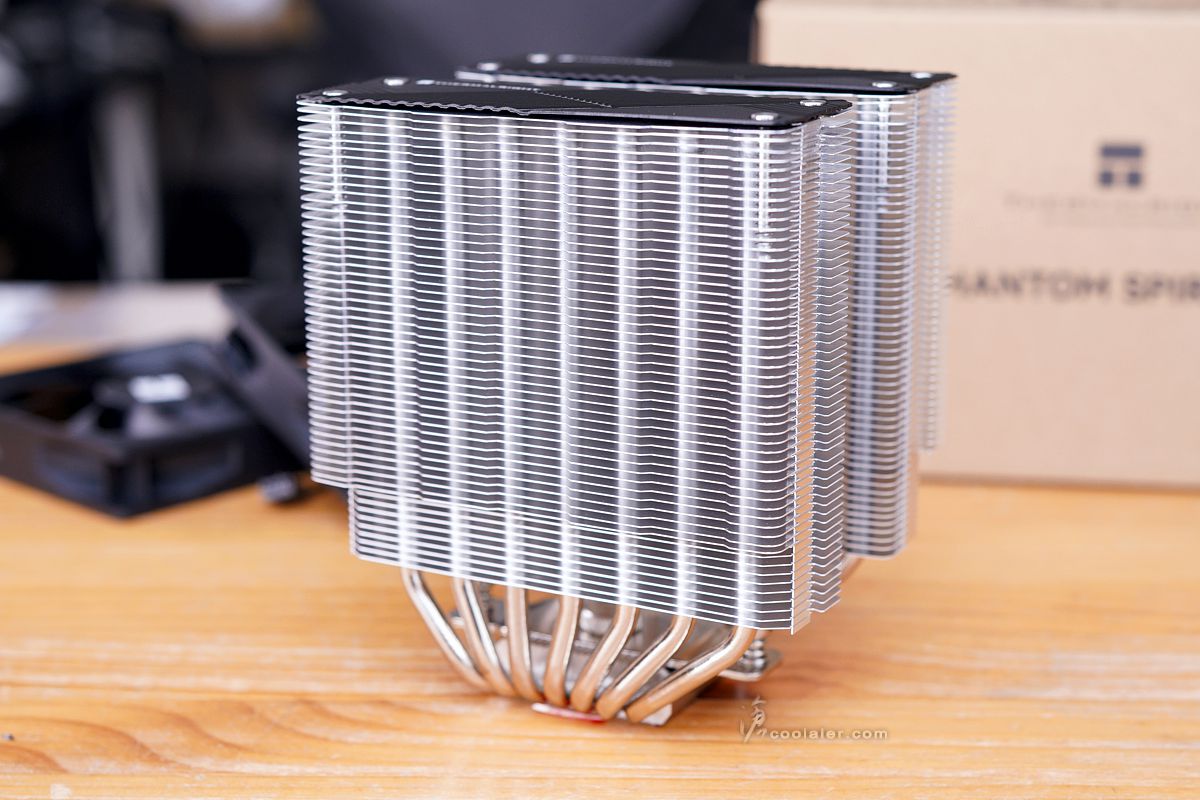
鰭片內側可以看到有熱導管穿插。在熱導管與塔型採用偏移設計,主要是減少對於記憶體散熱片的干涉。即便有干涉也可以移動風扇安裝位置微調。
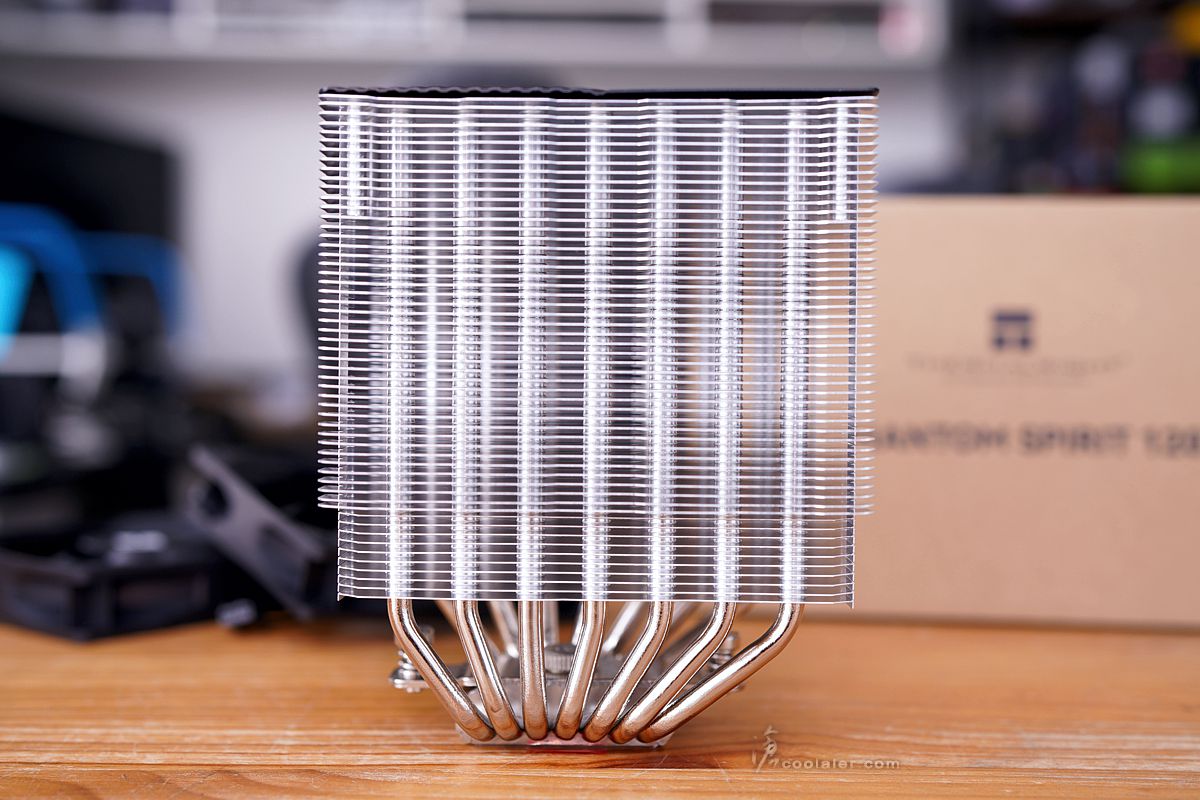
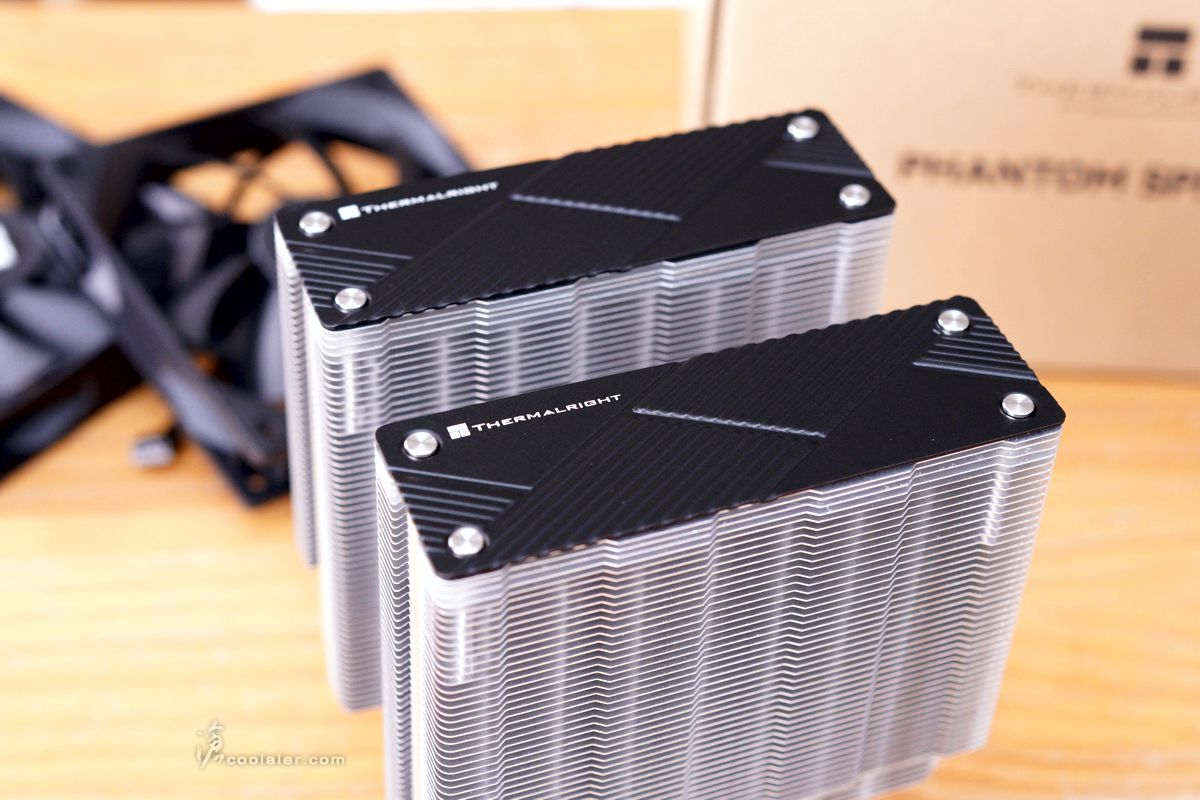
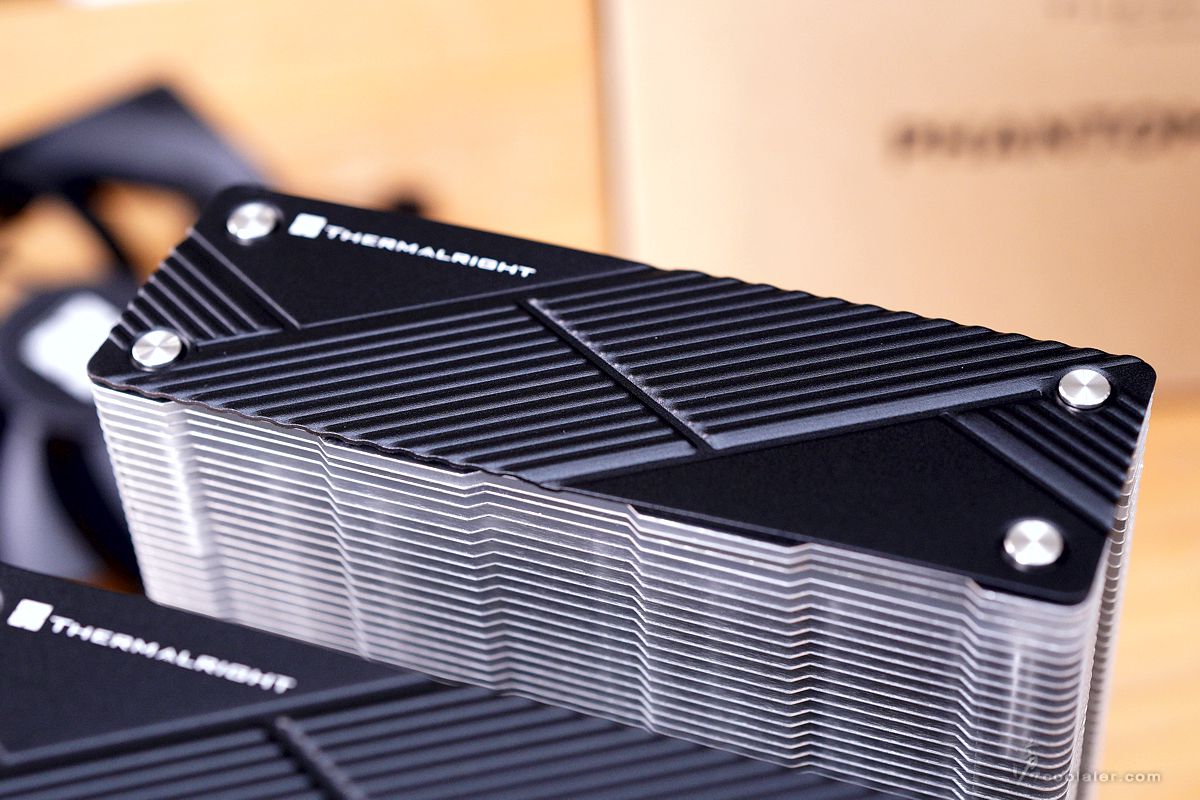
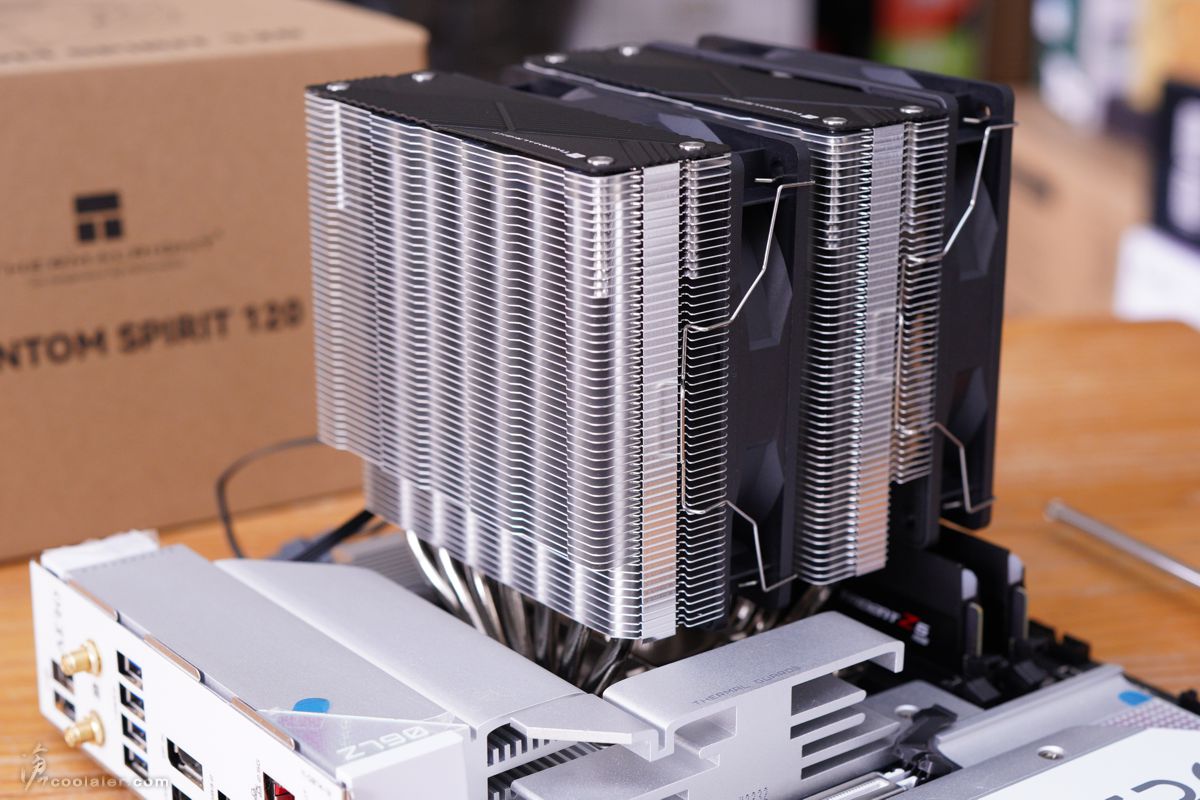
雙塔上有加上頂蓋修飾,表面有陽極黑磨砂處理,四邊採用鉚釘固定,飾蓋上面有一些斜紋線條,左上側則有 Thermalright 的 Logo 與字樣。SE 青春版則是沒有上蓋,外觀是直接裸露的熱導管。
整體高度為 157mm,基本上可相容於多數機殼。在散熱鰭片左右兩側下方也刻意縮減了一些,主要用於避免干涉到記憶體、供電。
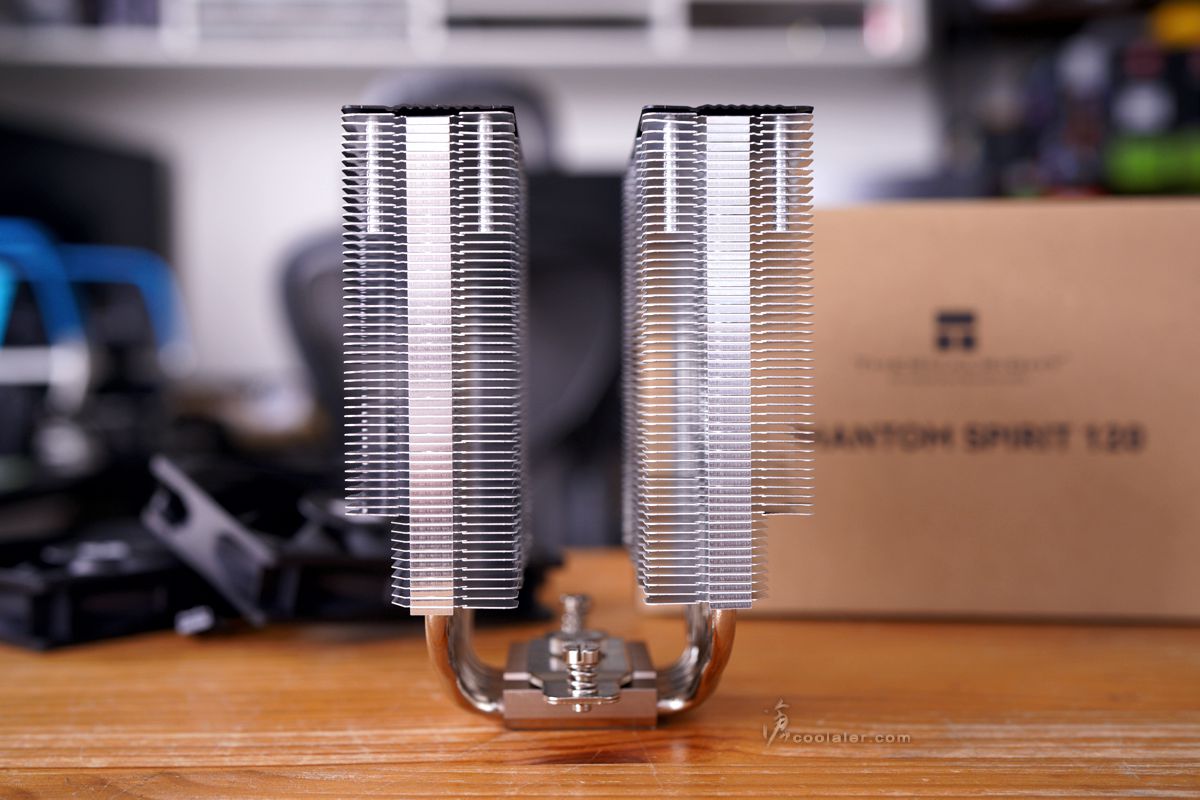
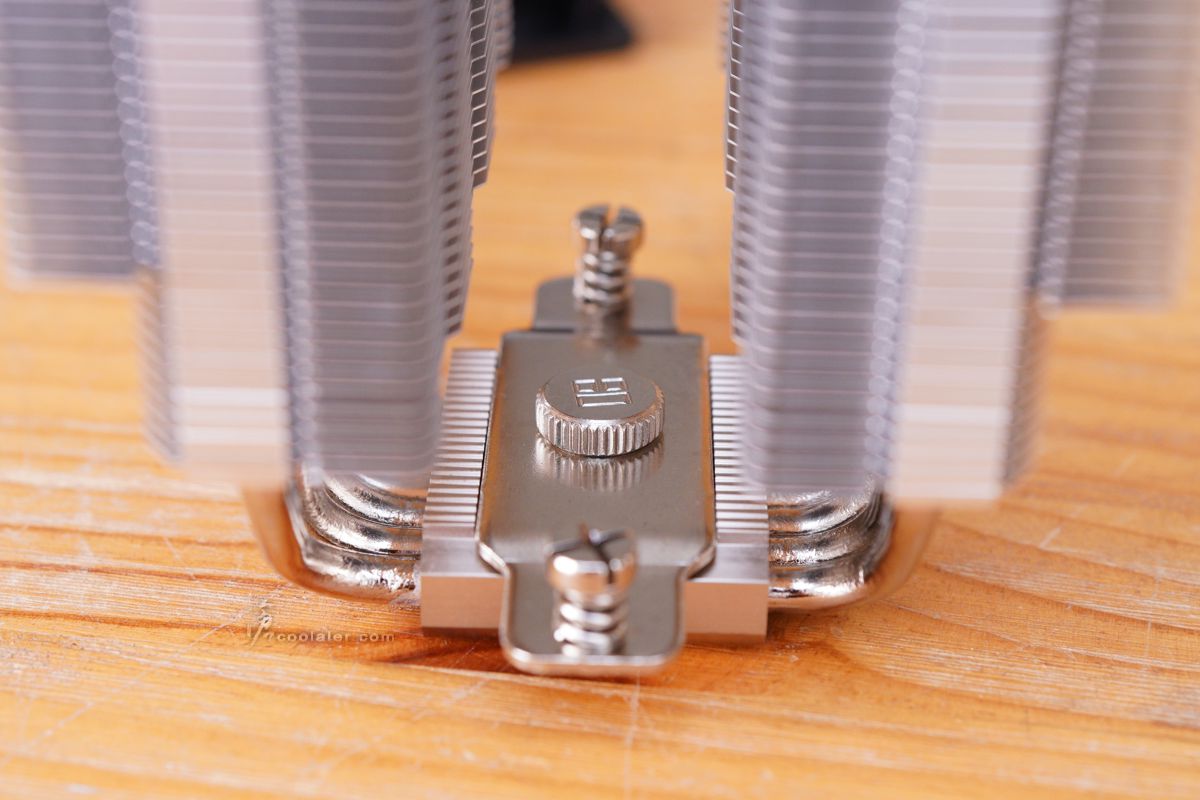
中間的扣具已經有預先安裝。
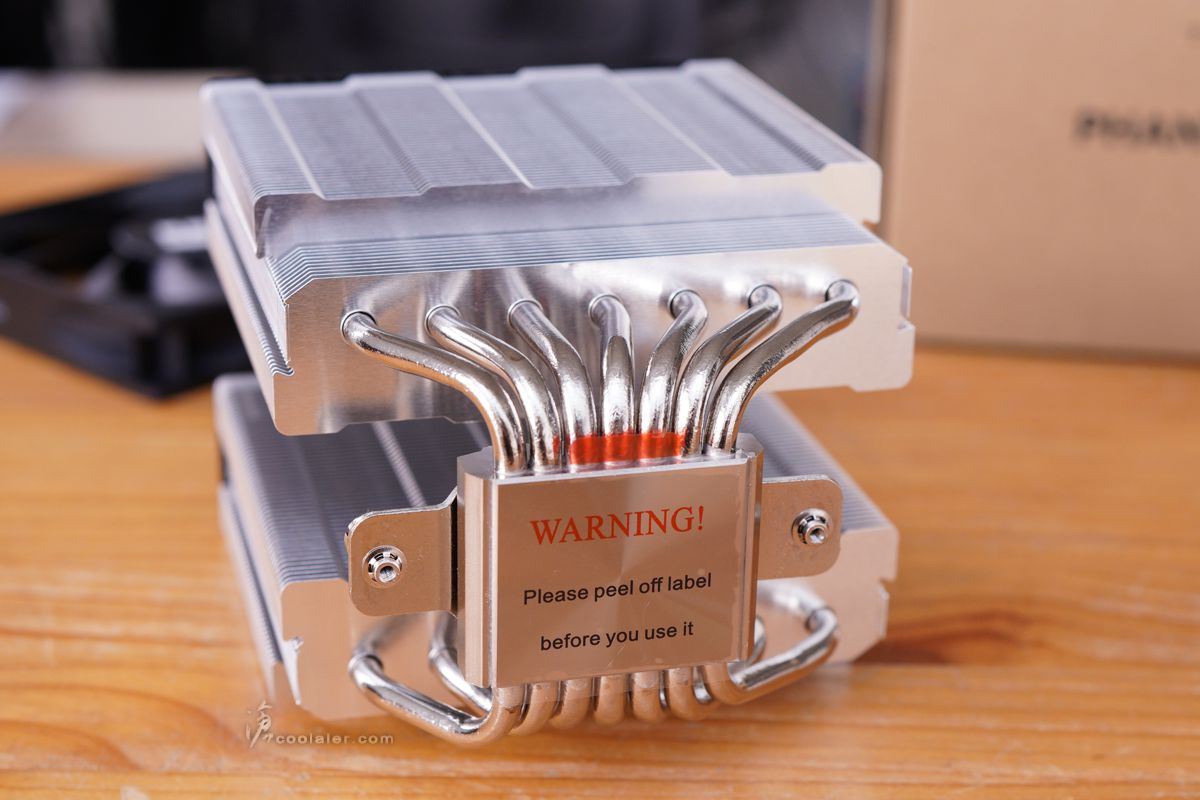
底部可見7根熱導管,外表有採用電鍍處理,為 6mm 尺寸,穿插於底座。採用第四代逆重力熱管 AGHP 4.0,解決平台機殼平放或直立逆重力影響,不會因為重力影響毛細回流緩慢造成效能變低。
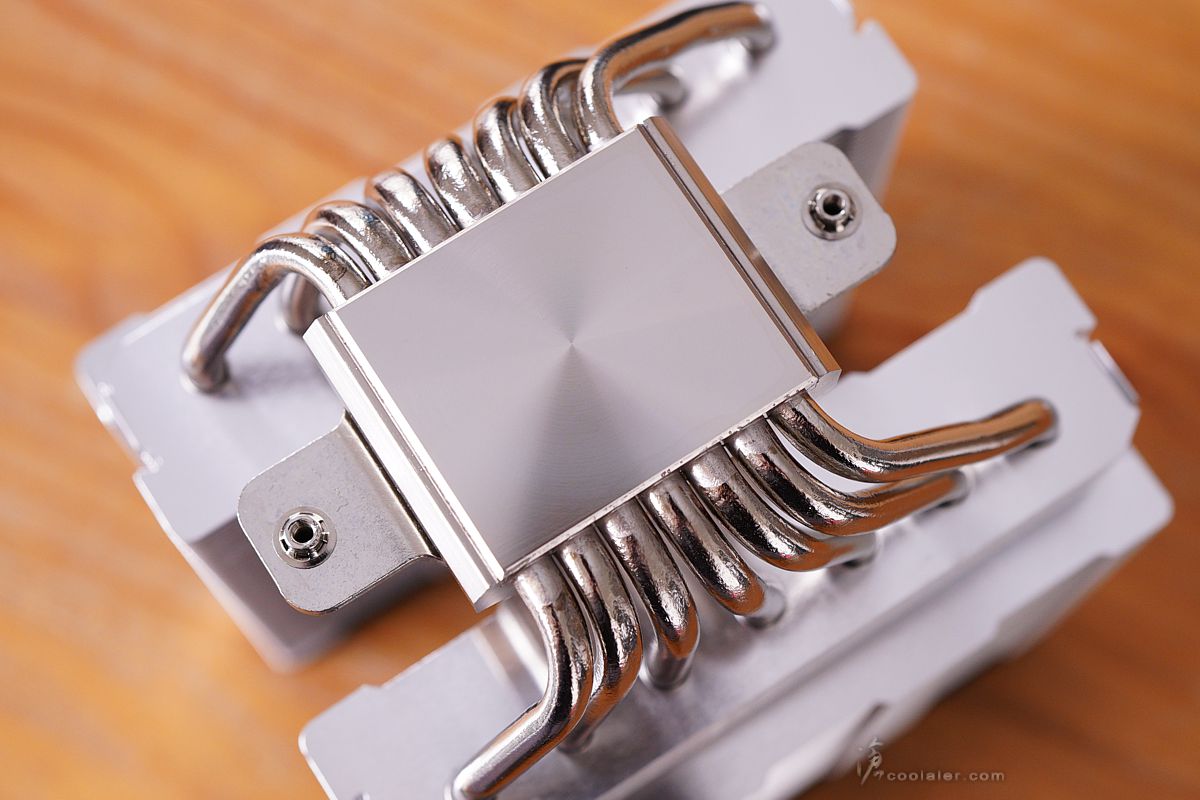
與 CPU 接觸的底座為純銅鍍鎳。
使用 LGA 1700 平台進行測試,以下也記錄一下安裝過程。
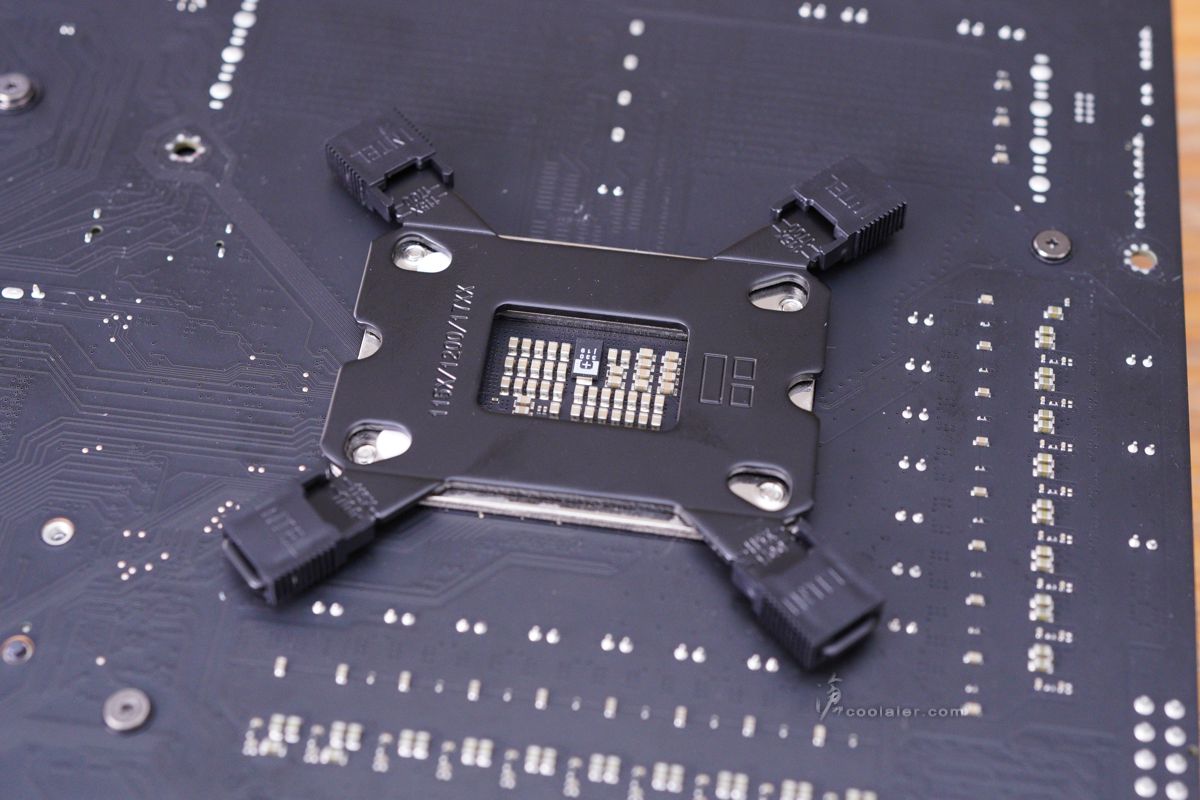
Intel 背板先調整 Intel 平台對應的孔位並套入。
翻回正面,四邊鎖上螺絲柱。
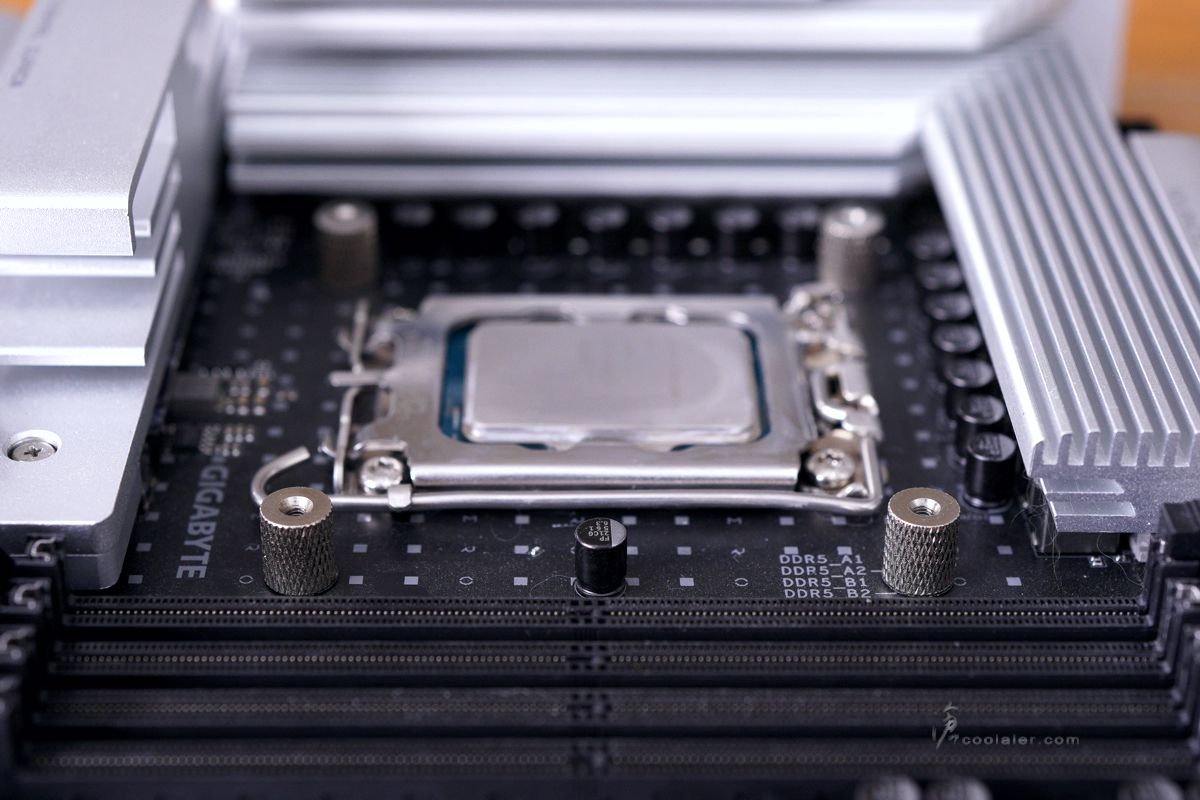
兩側邊套上安裝支架,四邊鎖上螺絲固定。
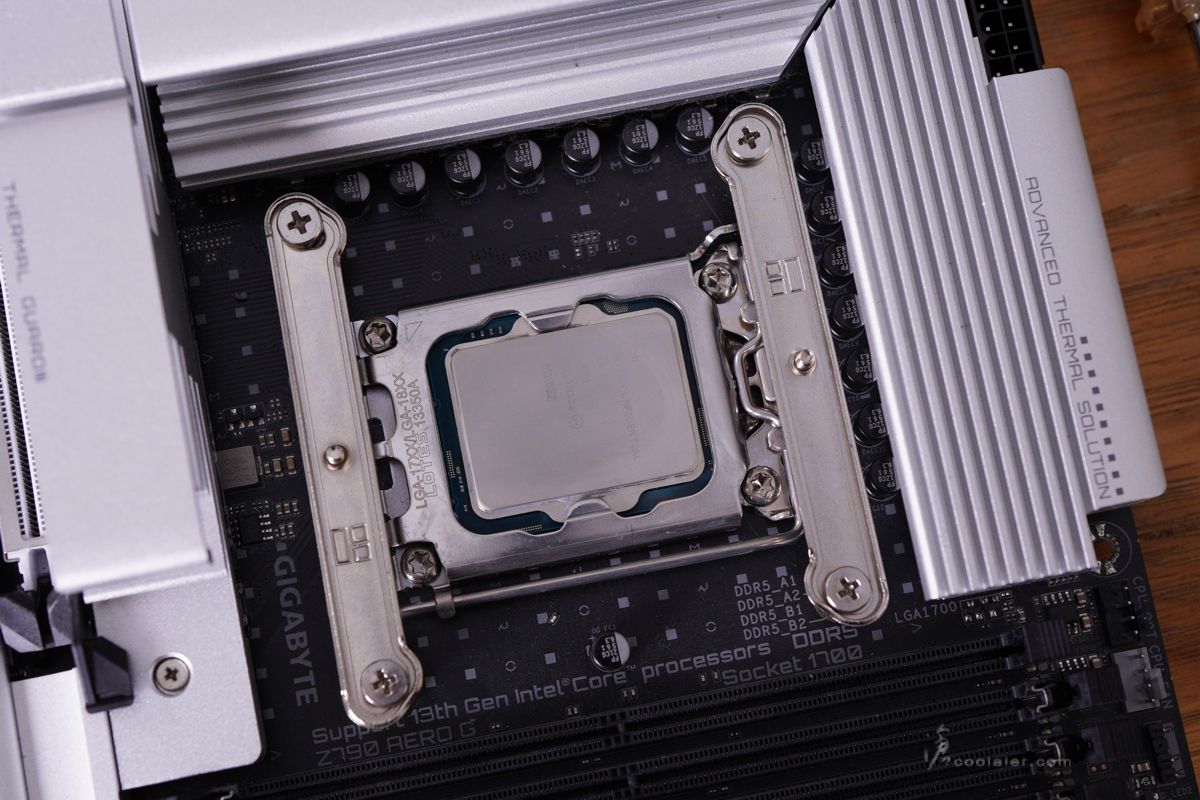
塗點散熱膏。
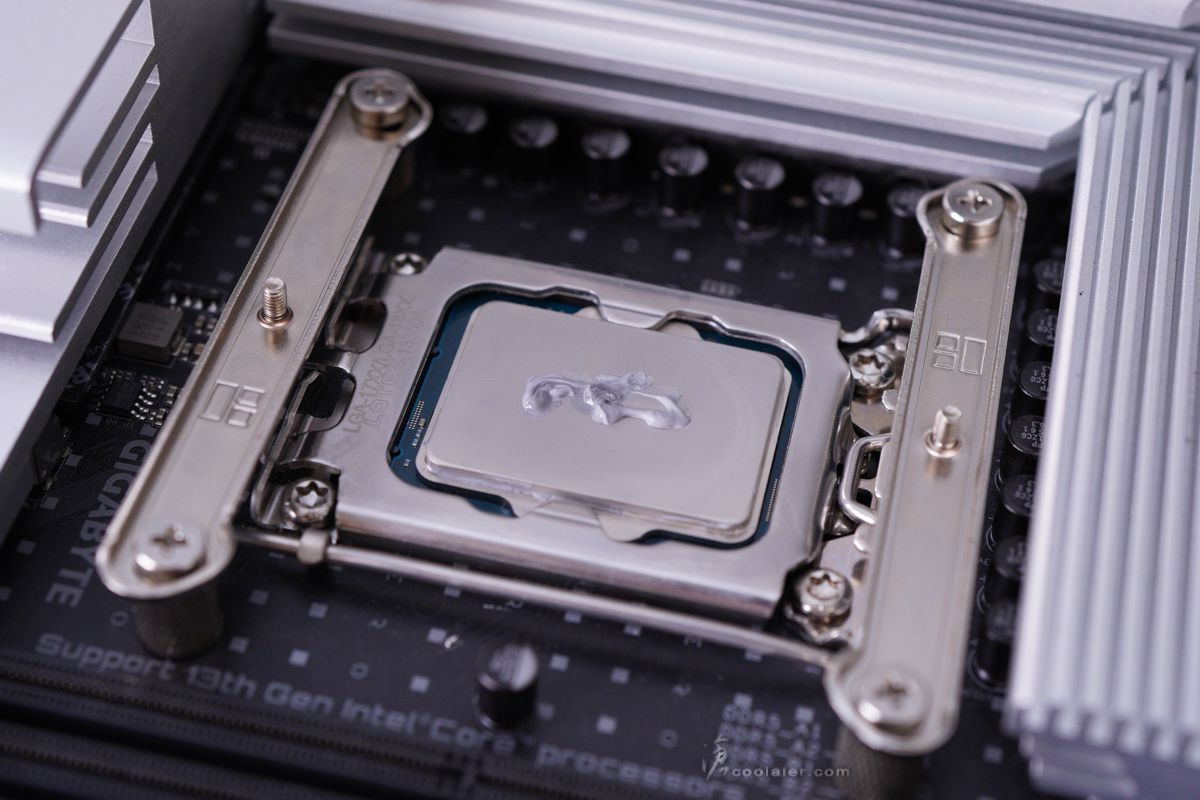
放上散熱器,扣具上對應螺絲孔位並鎖上固定。
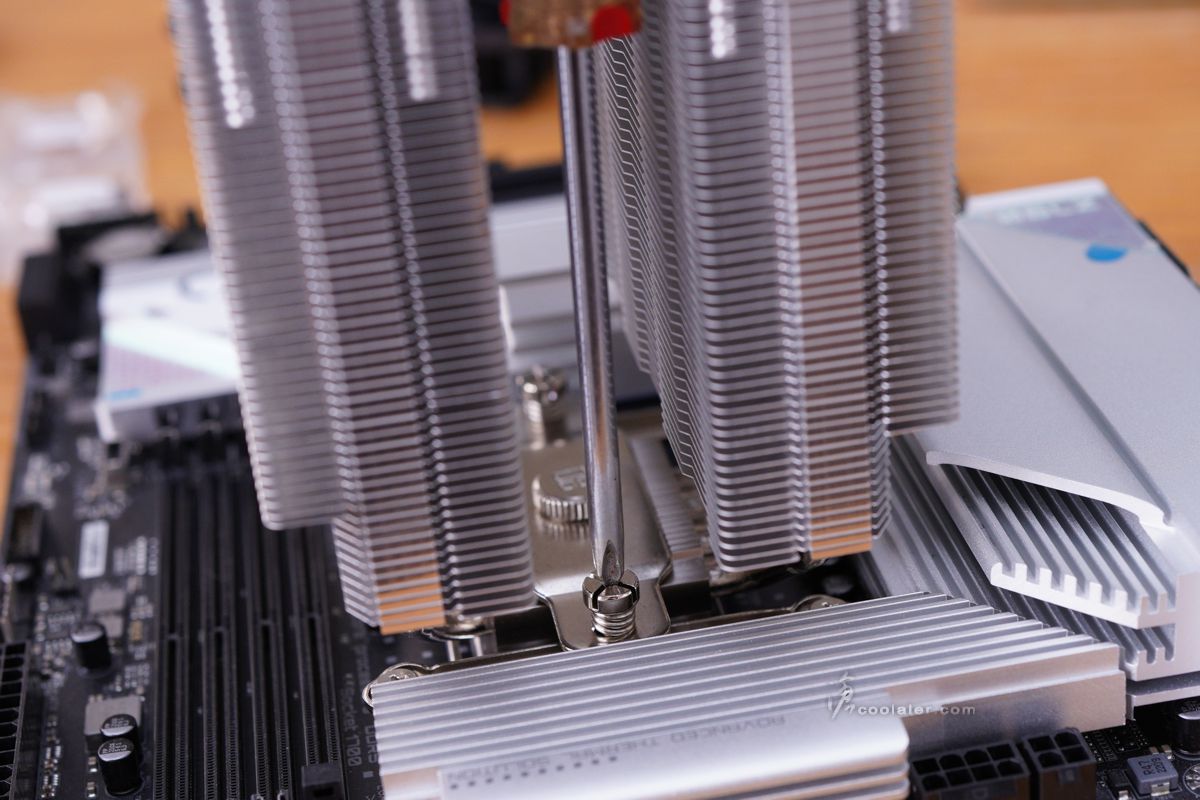
放上風扇,側邊使用風扇鐵線扣卡入散熱器溝槽。
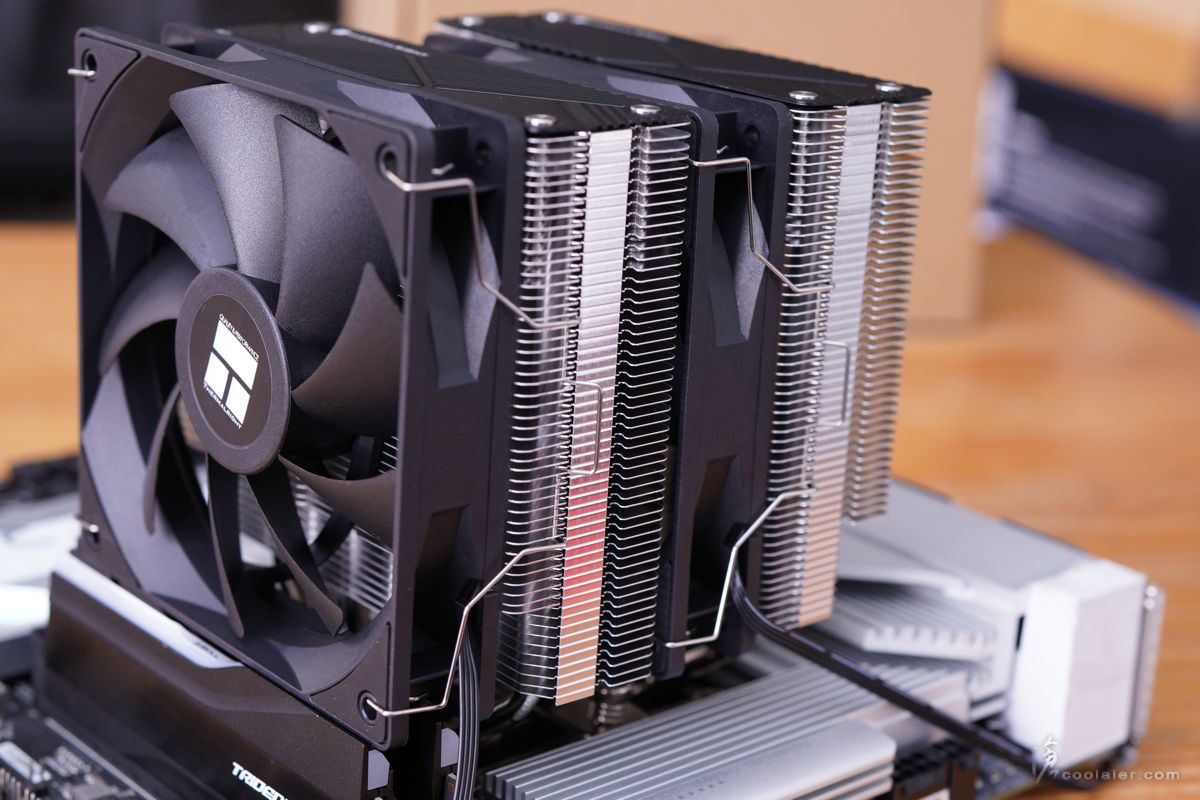
兩顆風扇接線串接單一接頭連到主板。

如果風扇會干涉到記憶體散熱片可以稍微往上移。差一點是不會影響到甚麼散熱效能。
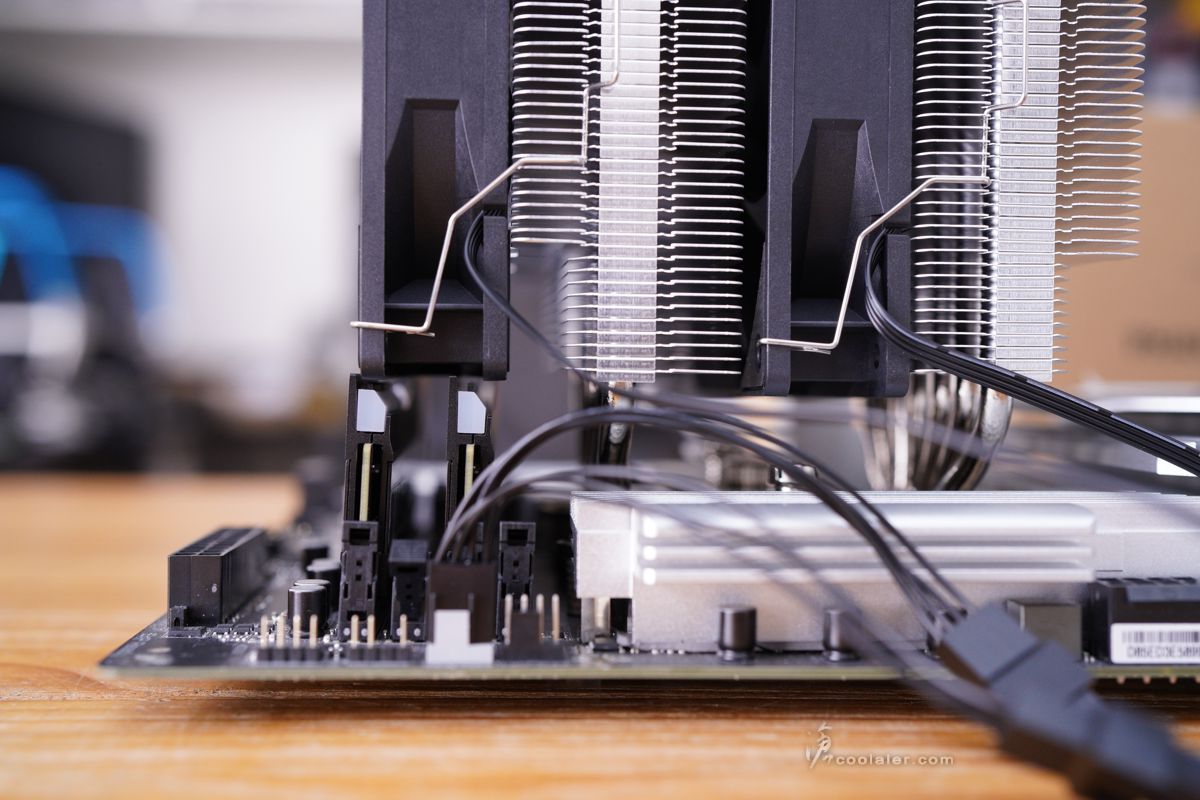
後側可以再安裝一顆風扇應該沒問題。不過通常機殼這邊就會對應一顆散熱風扇,助益可能不大。
測試平台
CPU: Intel Core i9-13900K、Core i5-13600K
CPU Cooler: Thermalright Phantom Spirit 120
RAM: GSKILL DDR5-6800 16GBx2
MB: GIGABYTE Z790 AERO G
VGA: MSI RTX 4060 Ti GAMING X TRIO
SSD: GIGABYTE AORUS RAID SSD 2TB
PSU: InWin 1065W
OS: Windows 11
使用兩款處理器 Core i9-13900K 以及 Core i5-13600K,主板 BIOS 沒有更新到 Intel 建議的設定,主要是之前測散熱器也都是使用同一版 BIOS ,在電壓與設定上比較一致性。
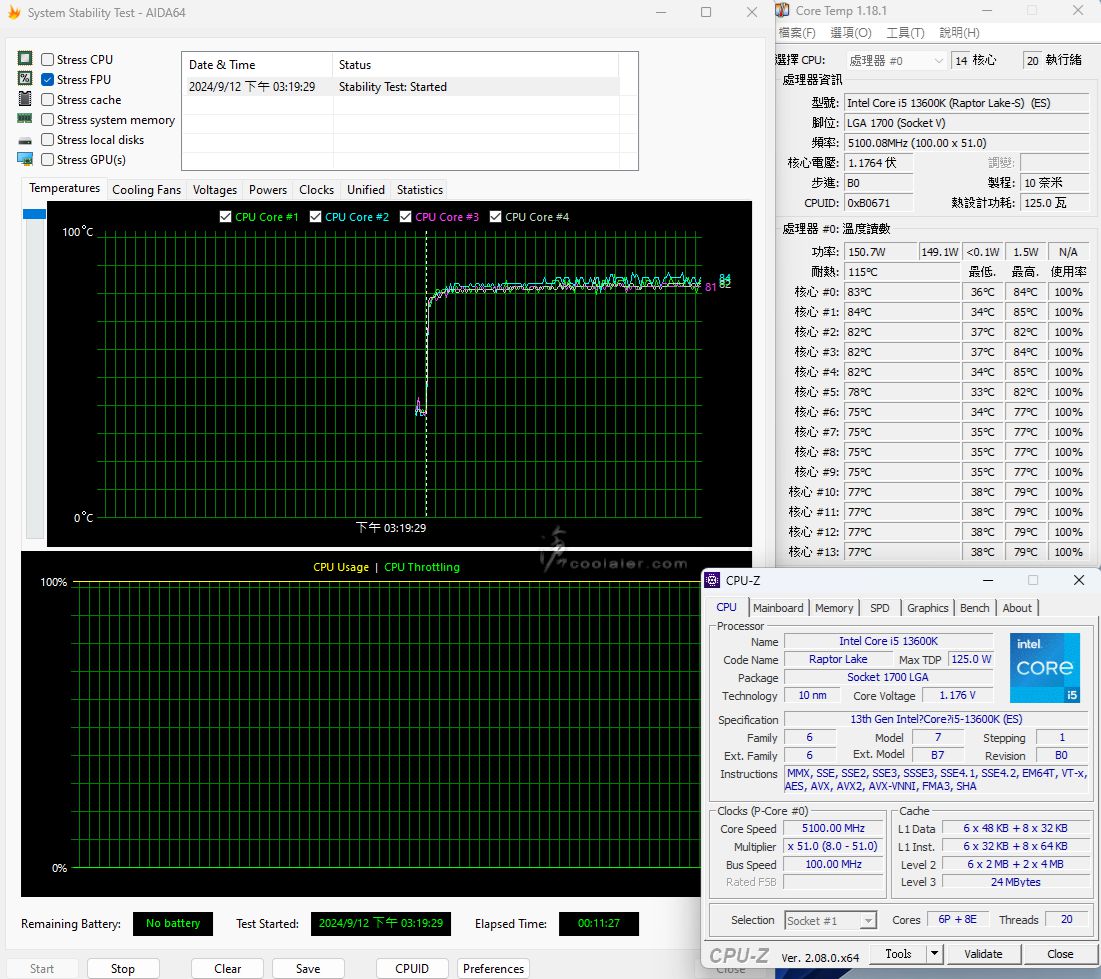
13600K 就直接 FPU 燒機測試
大核心待機:37度
大核心最高:85度
小核心待機:38度
小核心最高:79度
換上 13900K ,分別測試兩種 BIOS 設定,一種是全 Auto(溫度上限100度) ,一種是溫度上限115度。後者主要是避免頂到溫度牆降速,畢竟全 Auto 的溫度牆是100度,只要頂到 CPU 就會降速,基本上也測不出來散熱器差異。
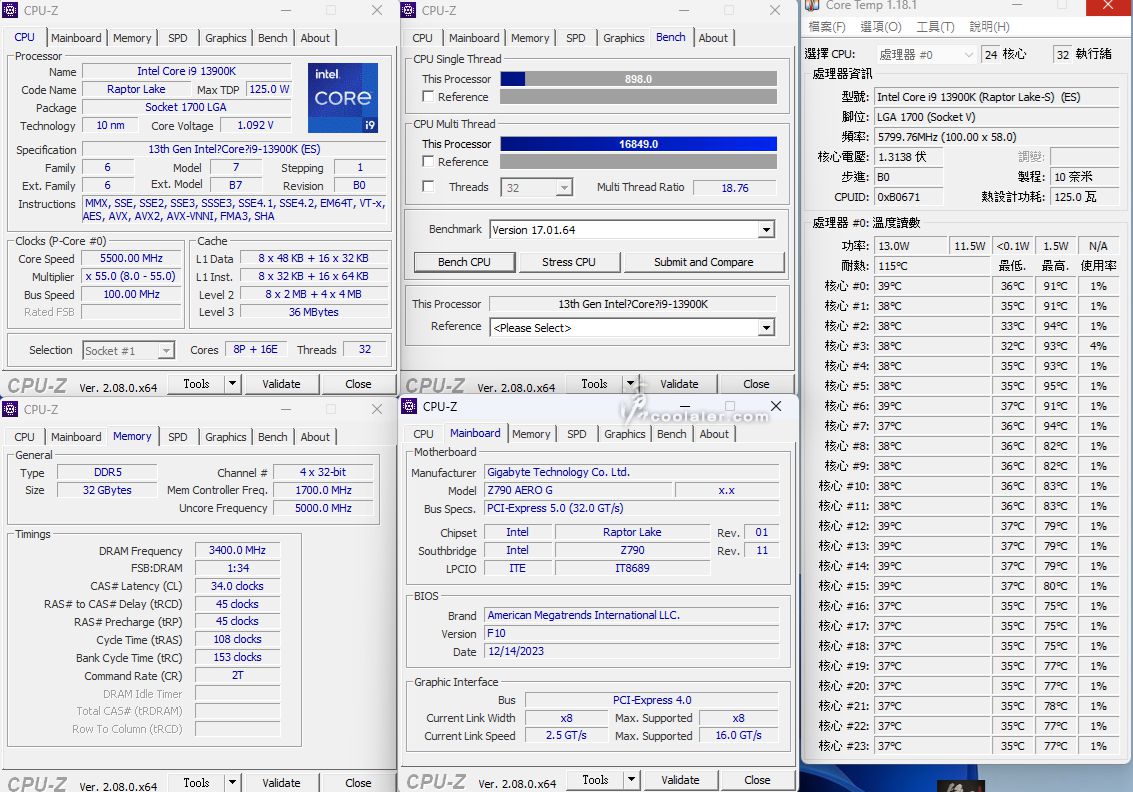
CPU-Z
Auto 溫度上限100度:16810.7
最高溫:94度
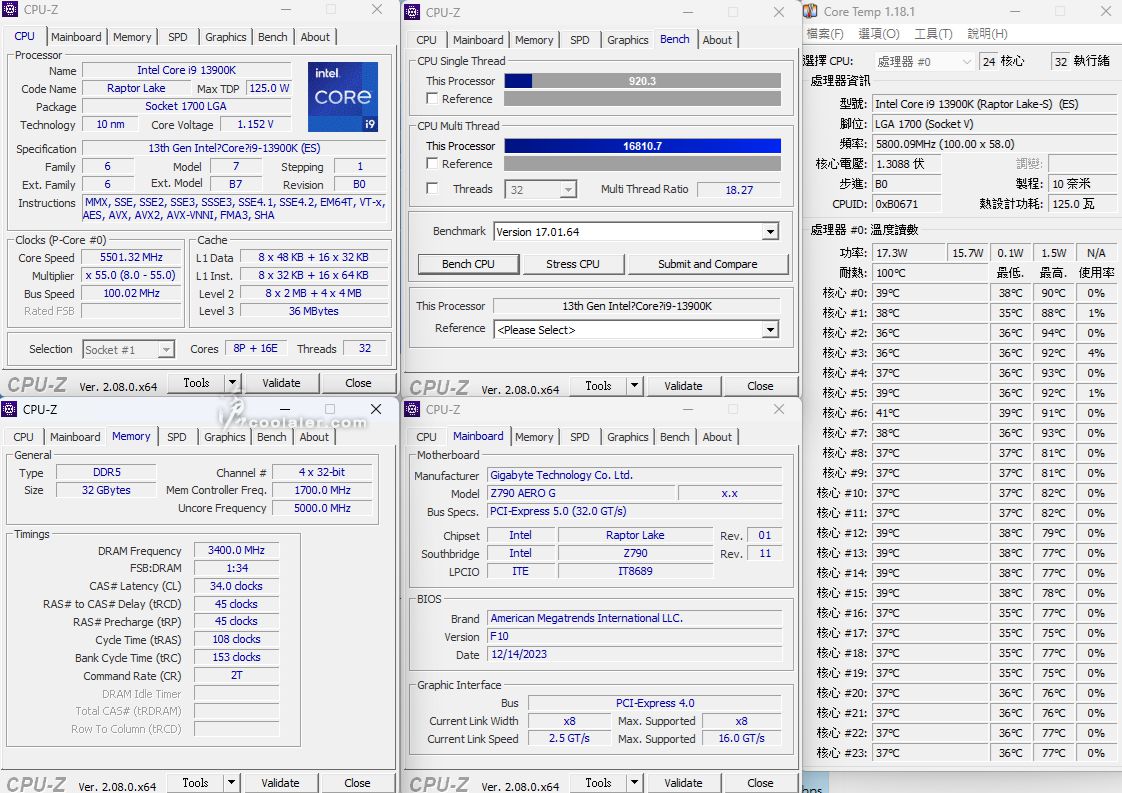
溫度上限115度:16849.0
最高溫:95度
POV-Ray
Auto 溫度上限100度:20.19s
最高溫:100度
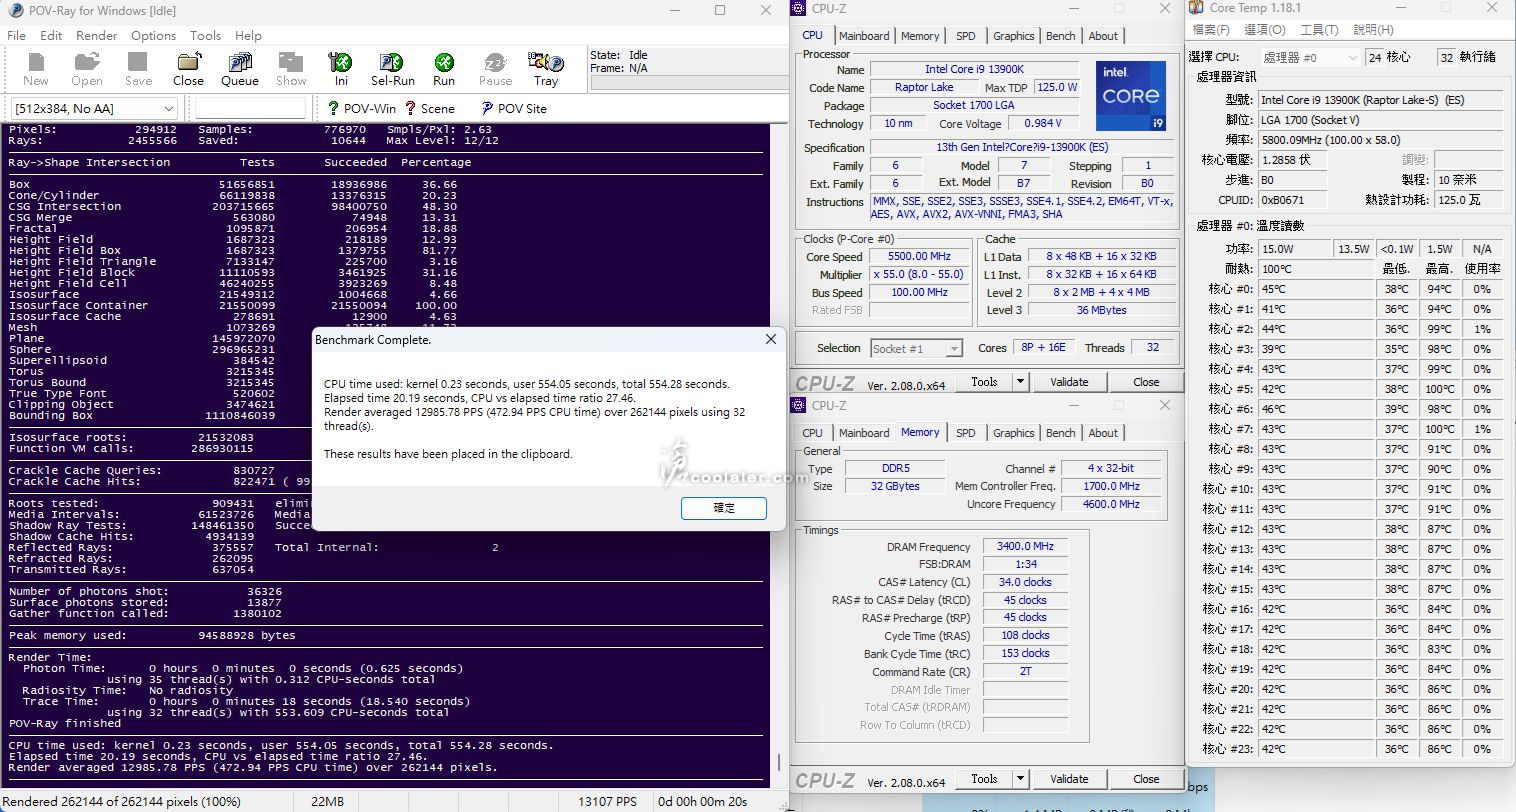
溫度上限115度:20.08s
最高溫:111度

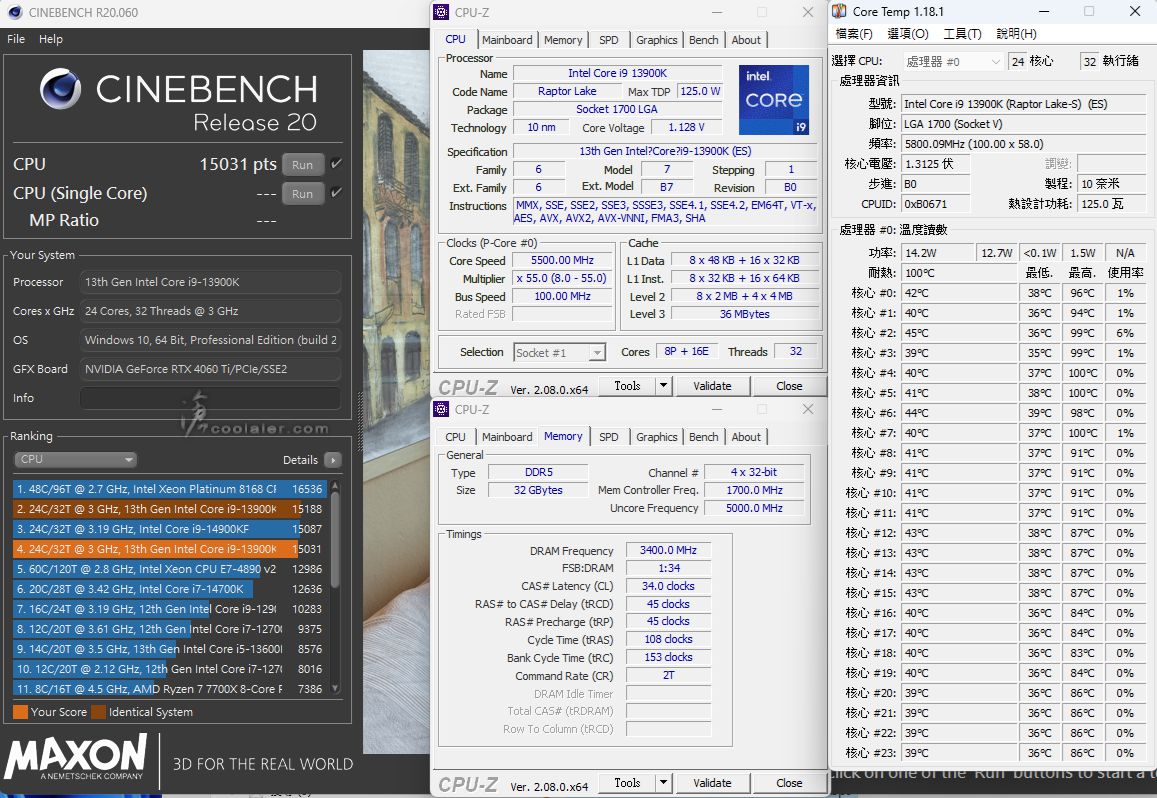
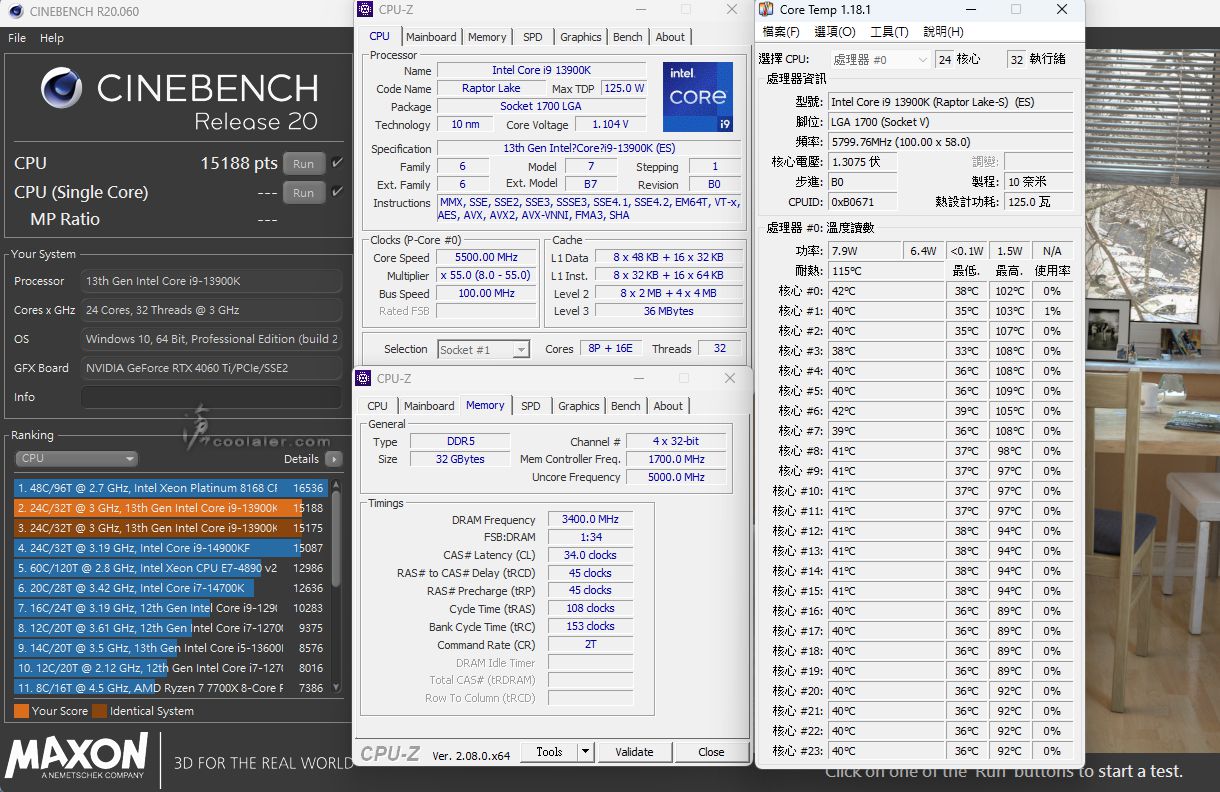
CINEBENCH R20
Auto 溫度上限100度:15031
最高溫:100度
溫度上限115度:15188
最高溫:109度
CINEBENCH R23
Auto 溫度上限100度:39410
最高溫:100度
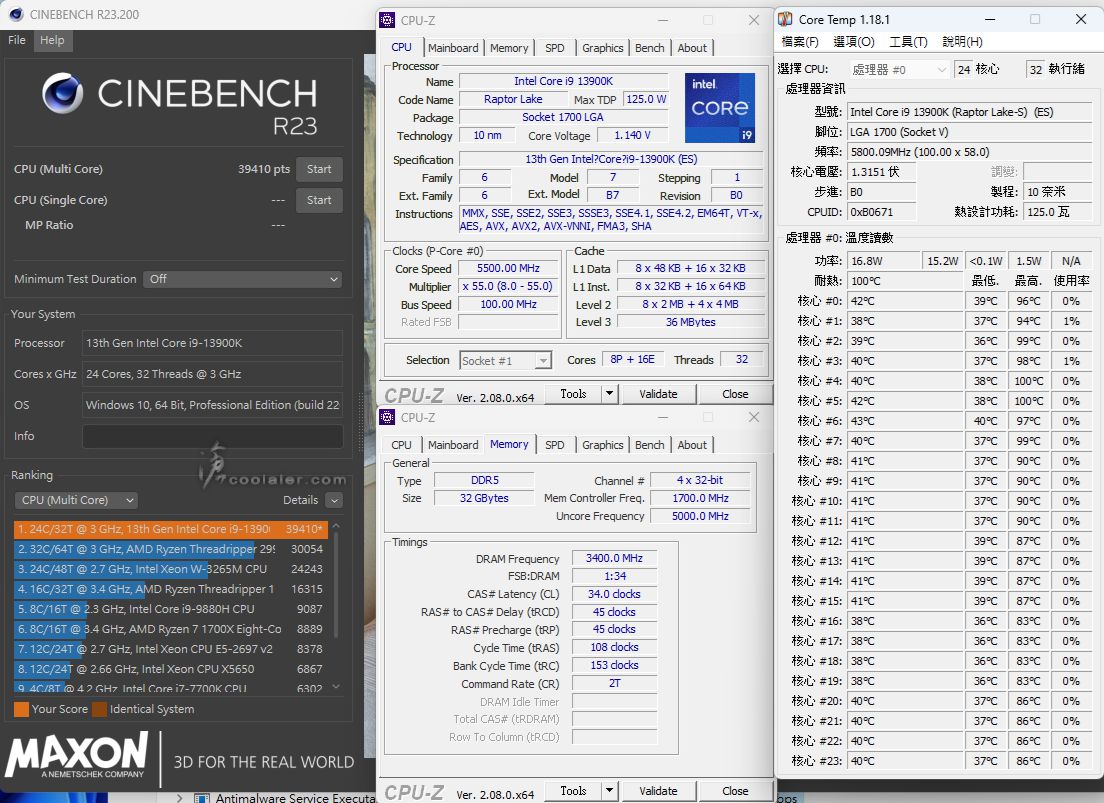
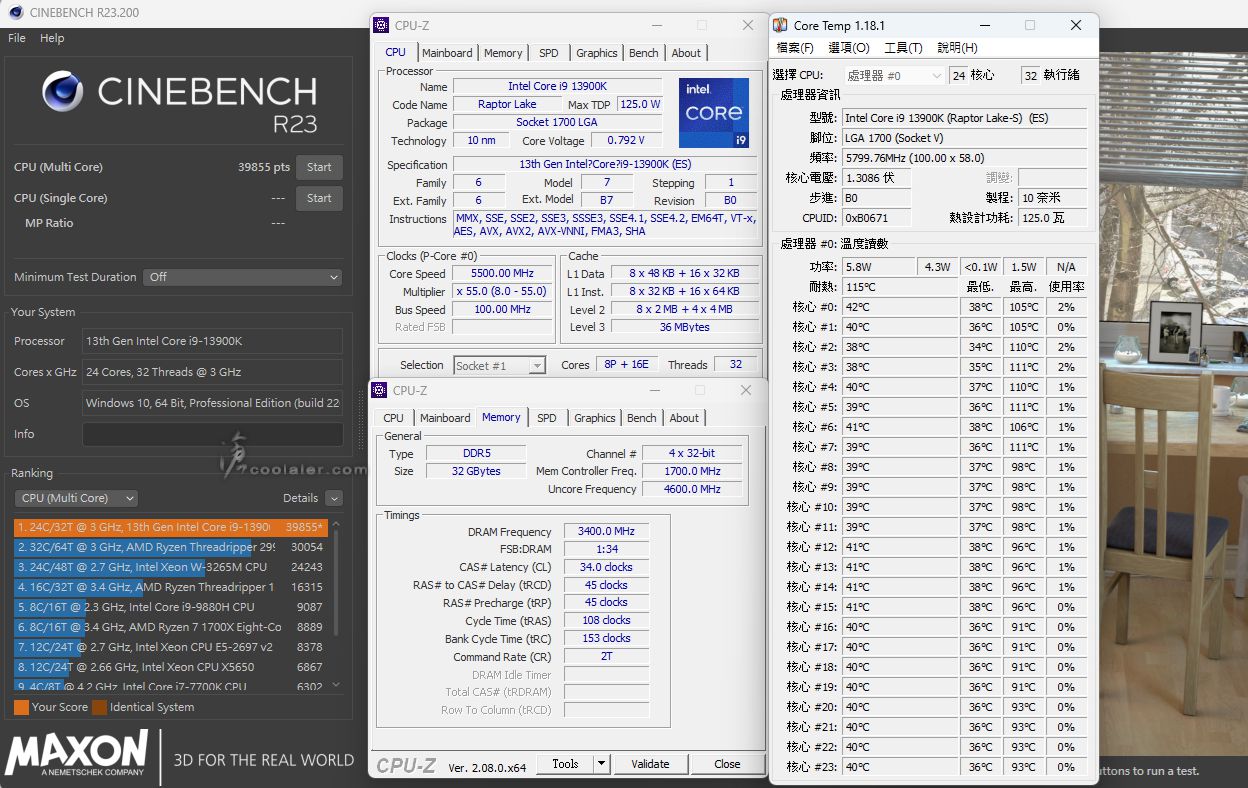
溫度上限115度:39855
最高溫:111度
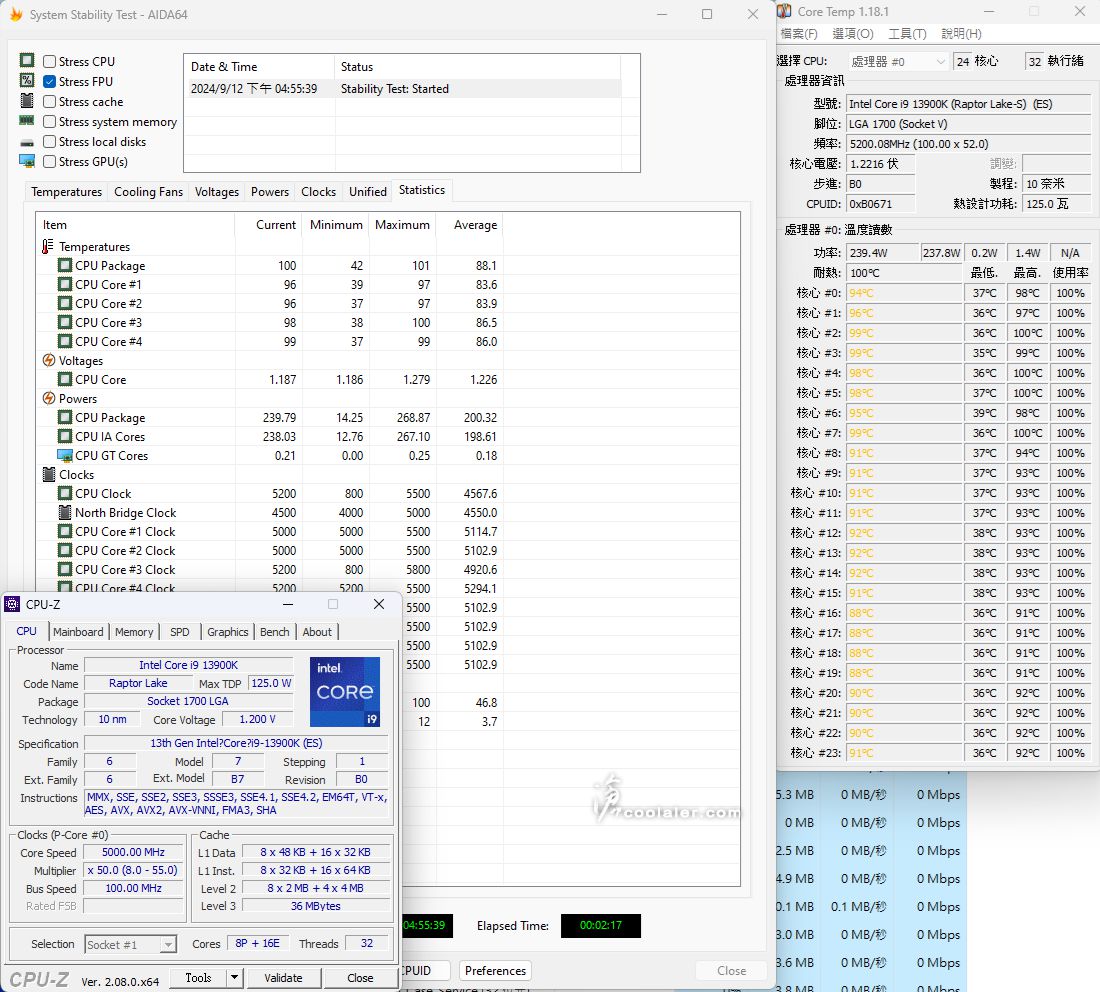
AIDA FPU 燒機
Auto 溫度上限100度
最高溫:101度
CPU 最大功耗:268W
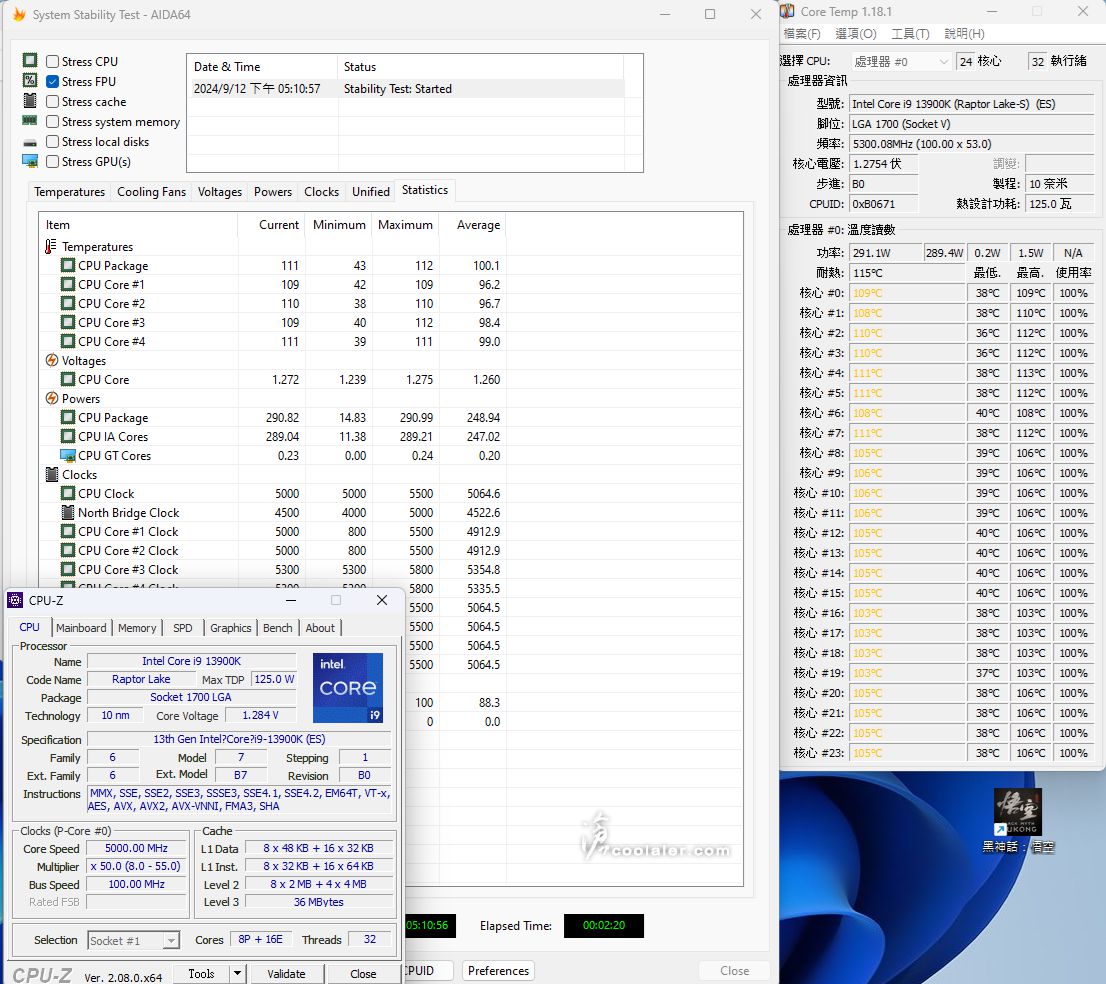
溫度上限115度
最高溫:112度
CPU 最大功耗:290W
小結
Thermalright Phantom Spirit 120 用於 Core i5-13600K 是完全沒有問題,一般非K版本的 Core i7、i9 應該也是能夠輕鬆勝任。另外可以看到上方 Core i9-13900K 的測試,在 Auto 100度的溫度牆上限下,測得的效能也並不會低於115度溫度牆多少,不過測試都並不是長時間就是,如果是很常跑渲染或是多工滿載的應用,i9 K 版使用還是建議搭配水冷才能獲得較高的效能。
此次開箱就是一般版本,規格如下
散熱器規格
尺寸:長110 mm ×寬125 mm × 高157 mm
重量:810克(不含風扇)
熱管:6 mm熱管×7支
銅底:C1100 純銅鍍鎳
TL-C12B V2 風扇規格
尺寸:長120 mm × 寬120 mm × 高25 mm
重量:135g
風扇轉速:1500 RPM±10% (MAX)
風扇噪聲:25.6 dBA
風量:66.17 CFM (MAX)
風壓:1.53 mm H2O (MAX)
安倍: 0.20 A
接頭類型:4 Pin PWM 接頭
軸承類型:S-FDB 軸承
Phantom Spirit 120 採用環保無彩盒包裝,不過整體設計的質感還不錯。
可適用於新舊平台,Intel LGA 2011 / 115x / 1200 / 1700 、AMD AM4 / AM5。
配件有說明書、保固說明、風扇2轉1接頭、風扇扣具、Intel 平台背板扣具、AMD 平台扣具、散熱膏、2顆12公分風扇。
風扇的型號為 TL-C12B V2 ,最大轉速 1500RPM,噪音 25.6 dBA,風量 66.17 CFM ,風壓 1.53 mm H2O ,S-FDB 軸承。
四邊正反面都有軟墊防止共振。
12V 0.2A。
Phantom Spirit 120 採用雙塔型設計,一般版本在散熱鰭片採用常見的銀色,而 EVO 版則是有黑化處理。
鰭片內側可以看到有熱導管穿插。在熱導管與塔型採用偏移設計,主要是減少對於記憶體散熱片的干涉。即便有干涉也可以移動風扇安裝位置微調。
雙塔上有加上頂蓋修飾,表面有陽極黑磨砂處理,四邊採用鉚釘固定,飾蓋上面有一些斜紋線條,左上側則有 Thermalright 的 Logo 與字樣。SE 青春版則是沒有上蓋,外觀是直接裸露的熱導管。
整體高度為 157mm,基本上可相容於多數機殼。在散熱鰭片左右兩側下方也刻意縮減了一些,主要用於避免干涉到記憶體、供電。
中間的扣具已經有預先安裝。
底部可見7根熱導管,外表有採用電鍍處理,為 6mm 尺寸,穿插於底座。採用第四代逆重力熱管 AGHP 4.0,解決平台機殼平放或直立逆重力影響,不會因為重力影響毛細回流緩慢造成效能變低。
與 CPU 接觸的底座為純銅鍍鎳。
使用 LGA 1700 平台進行測試,以下也記錄一下安裝過程。
Intel 背板先調整 Intel 平台對應的孔位並套入。
翻回正面,四邊鎖上螺絲柱。
兩側邊套上安裝支架,四邊鎖上螺絲固定。
塗點散熱膏。
放上散熱器,扣具上對應螺絲孔位並鎖上固定。
放上風扇,側邊使用風扇鐵線扣卡入散熱器溝槽。
兩顆風扇接線串接單一接頭連到主板。
如果風扇會干涉到記憶體散熱片可以稍微往上移。差一點是不會影響到甚麼散熱效能。
後側可以再安裝一顆風扇應該沒問題。不過通常機殼這邊就會對應一顆散熱風扇,助益可能不大。
測試平台
CPU: Intel Core i9-13900K、Core i5-13600K
CPU Cooler: Thermalright Phantom Spirit 120
RAM: GSKILL DDR5-6800 16GBx2
MB: GIGABYTE Z790 AERO G
VGA: MSI RTX 4060 Ti GAMING X TRIO
SSD: GIGABYTE AORUS RAID SSD 2TB
PSU: InWin 1065W
OS: Windows 11
使用兩款處理器 Core i9-13900K 以及 Core i5-13600K,主板 BIOS 沒有更新到 Intel 建議的設定,主要是之前測散熱器也都是使用同一版 BIOS ,在電壓與設定上比較一致性。
13600K 就直接 FPU 燒機測試
大核心待機:37度
大核心最高:85度
小核心待機:38度
小核心最高:79度
換上 13900K ,分別測試兩種 BIOS 設定,一種是全 Auto(溫度上限100度) ,一種是溫度上限115度。後者主要是避免頂到溫度牆降速,畢竟全 Auto 的溫度牆是100度,只要頂到 CPU 就會降速,基本上也測不出來散熱器差異。
CPU-Z
Auto 溫度上限100度:16810.7
最高溫:94度
溫度上限115度:16849.0
最高溫:95度
POV-Ray
Auto 溫度上限100度:20.19s
最高溫:100度
溫度上限115度:20.08s
最高溫:111度
CINEBENCH R20
Auto 溫度上限100度:15031
最高溫:100度
溫度上限115度:15188
最高溫:109度
CINEBENCH R23
Auto 溫度上限100度:39410
最高溫:100度
溫度上限115度:39855
最高溫:111度
AIDA FPU 燒機
Auto 溫度上限100度
最高溫:101度
CPU 最大功耗:268W
溫度上限115度
最高溫:112度
CPU 最大功耗:290W
小結
Thermalright Phantom Spirit 120 用於 Core i5-13600K 是完全沒有問題,一般非K版本的 Core i7、i9 應該也是能夠輕鬆勝任。另外可以看到上方 Core i9-13900K 的測試,在 Auto 100度的溫度牆上限下,測得的效能也並不會低於115度溫度牆多少,不過測試都並不是長時間就是,如果是很常跑渲染或是多工滿載的應用,i9 K 版使用還是建議搭配水冷才能獲得較高的效能。