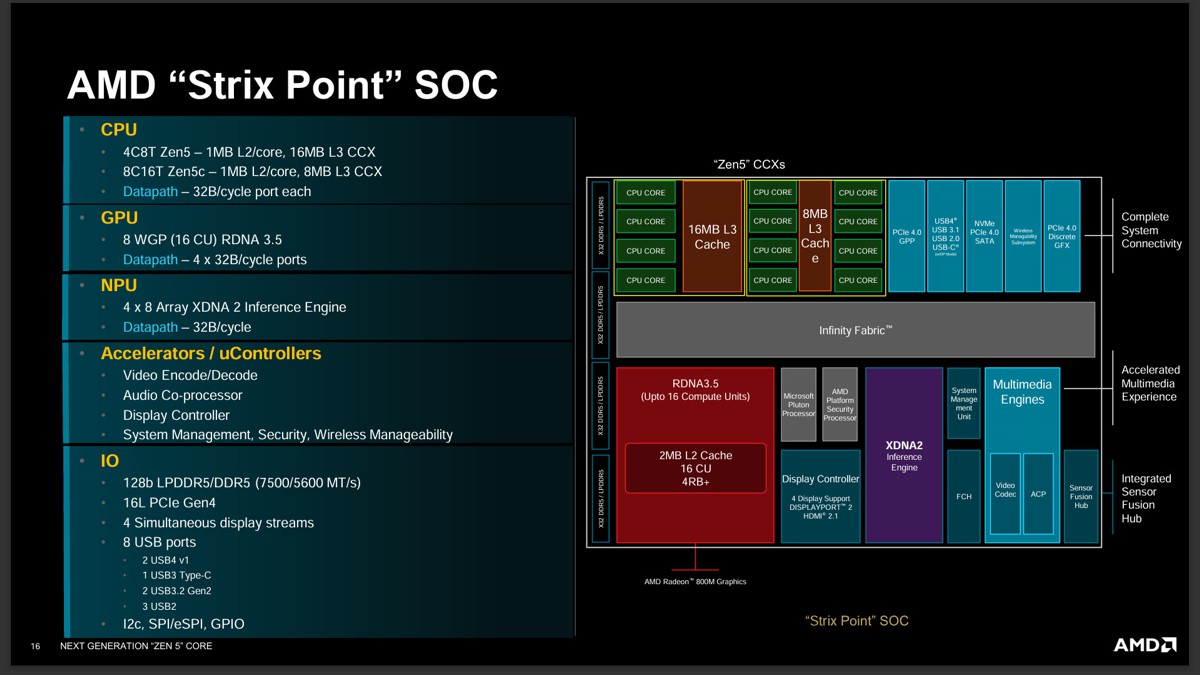
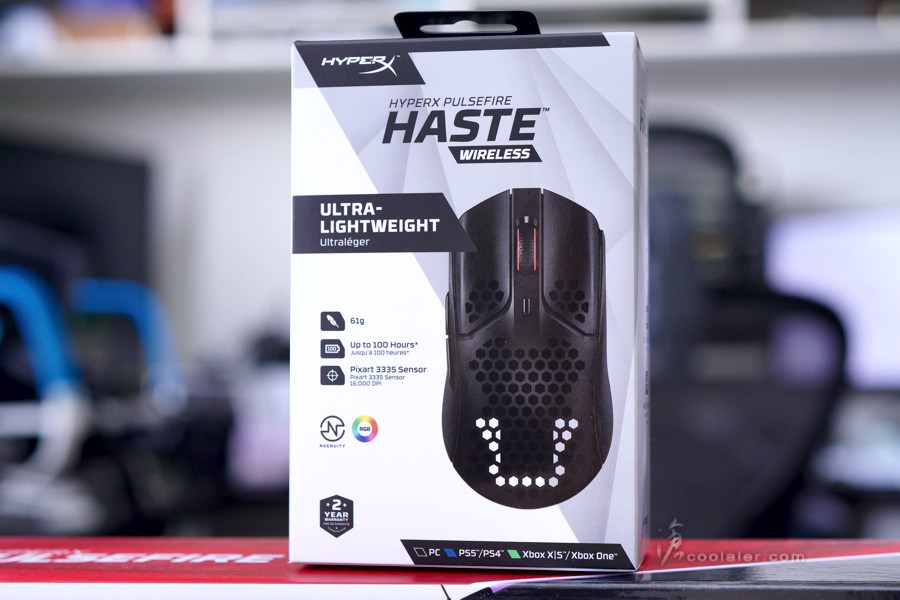
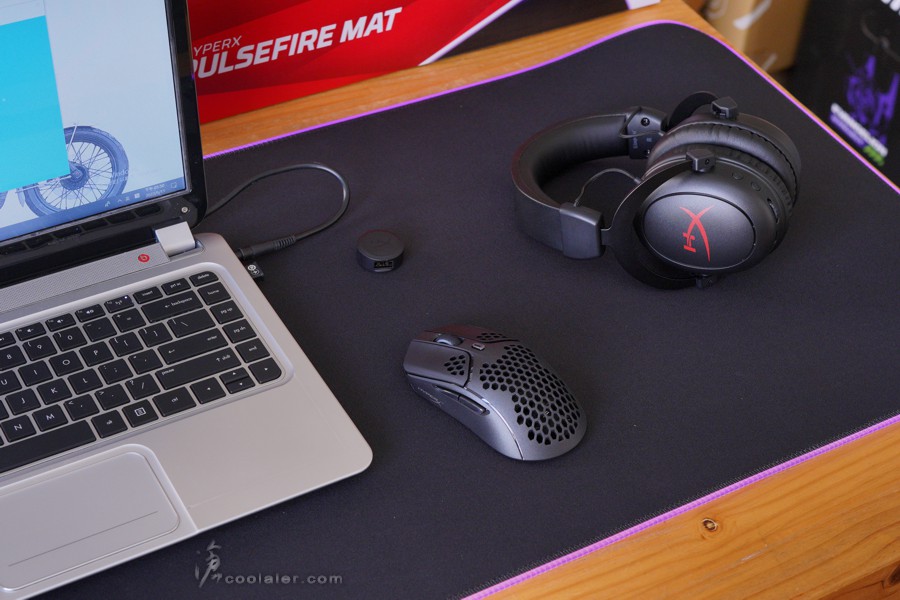
HyperX 最近推出了一隻新的滑鼠,型號 Pulsefire Haste Wireless,也就是先前所推出的 Pulsefire Haste 無線版本,採用 2.4GHz 無線傳輸,電池的續航力可達到100小時,並承襲原本的主要特色,全身輕量化,重量61g,相較於有線版本的59g也僅多出2g而已。
與 Pulsefire Haste Wireless 滑鼠一併開箱的還有 Pulsefire Mat RGB 鼠墊。
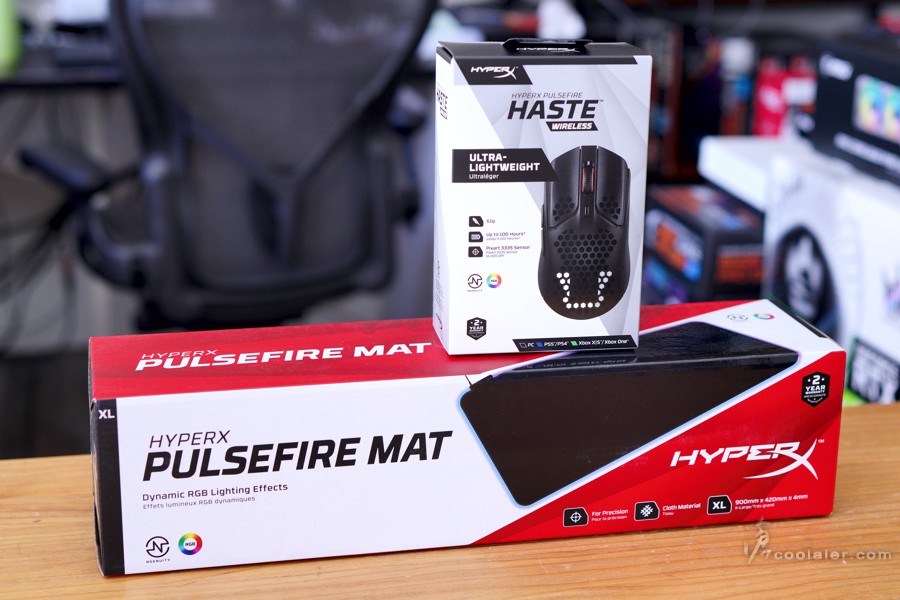
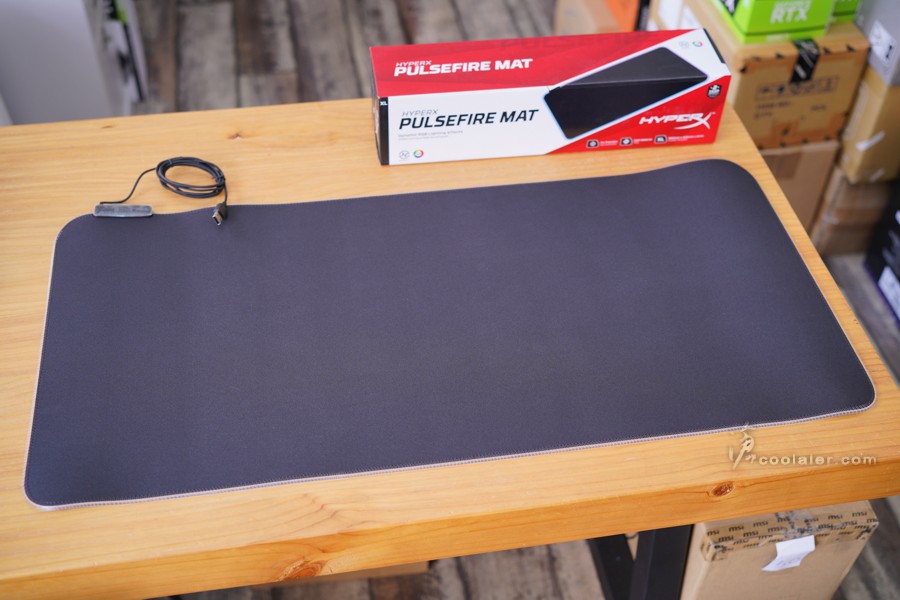
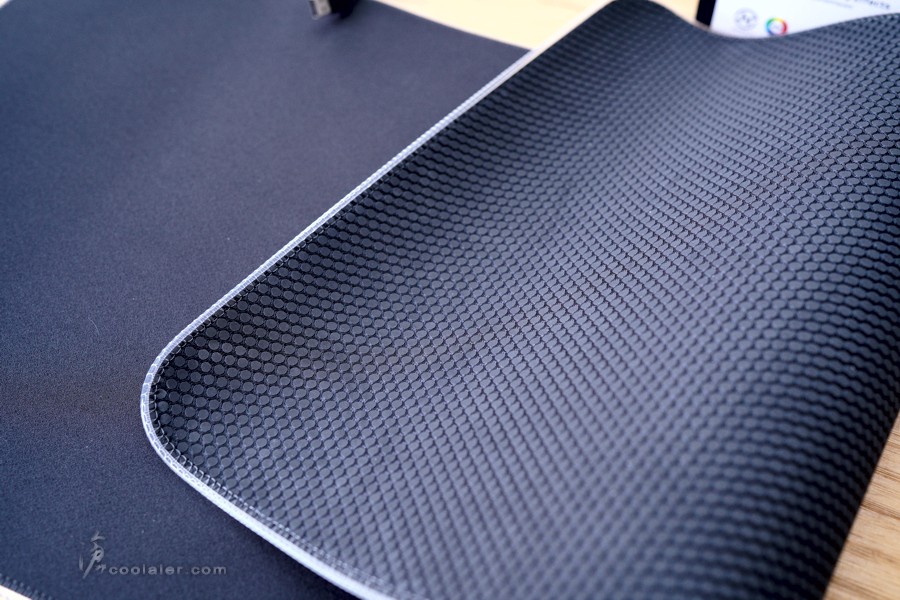
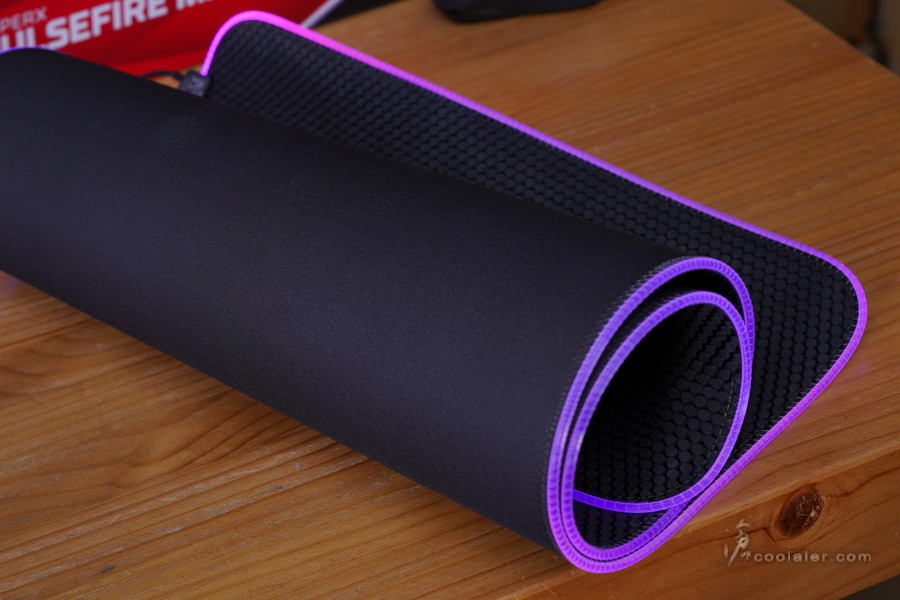
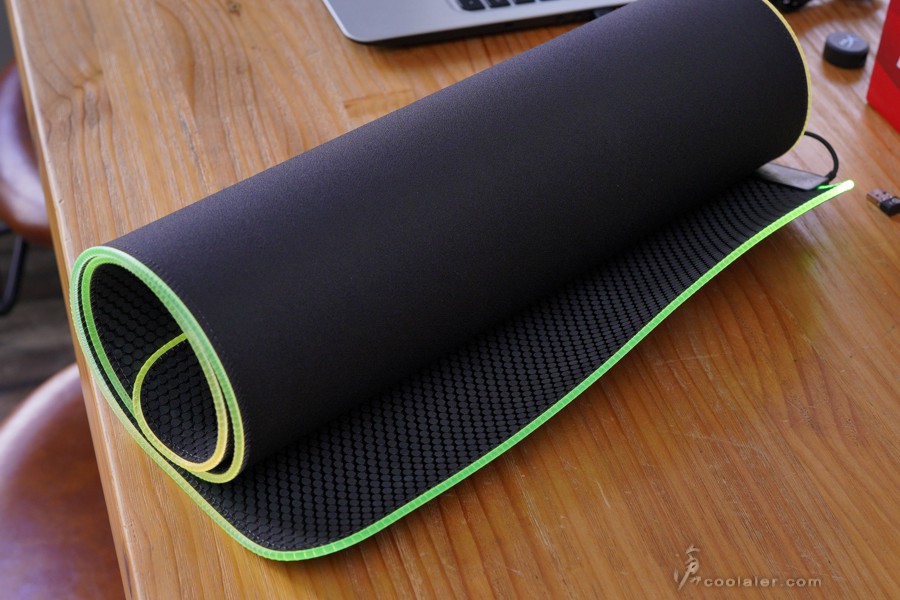
這個 Pulsefire Mat RGB 鼠墊是已經推一段時間,面積相當大,可以涵蓋整個桌面。
主要就是鍵盤、滑鼠使用區域,面積是90x42cm,個人覺得是42公分是有點深,可能會吃到螢幕腳架位置。
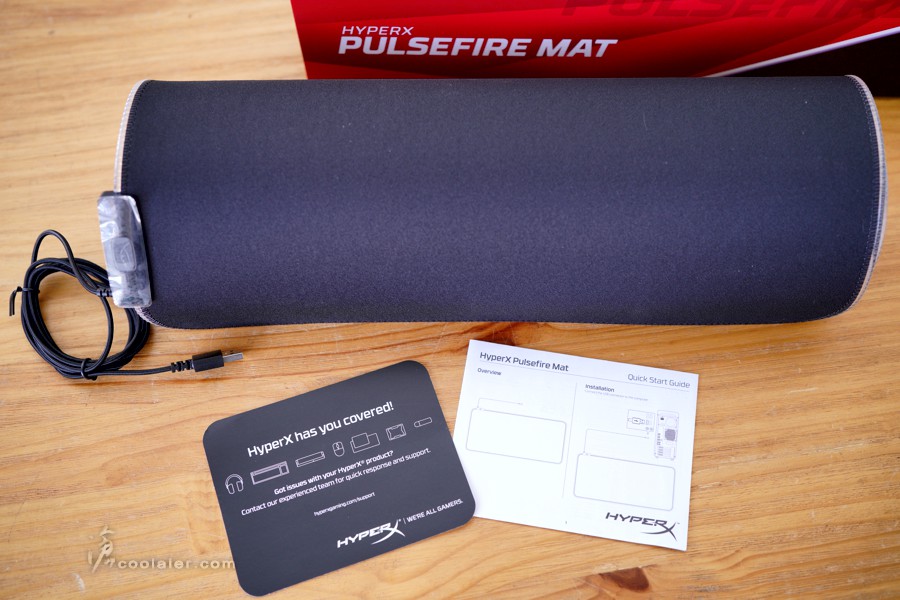
Pulsefire Mat 表面為布質,底部是防滑橡膠,整體做工細節都不錯。
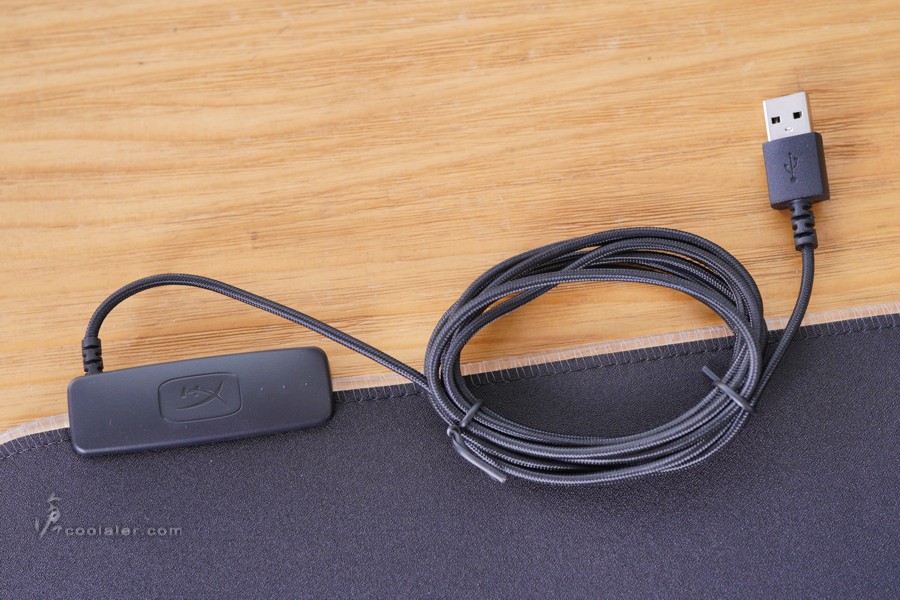
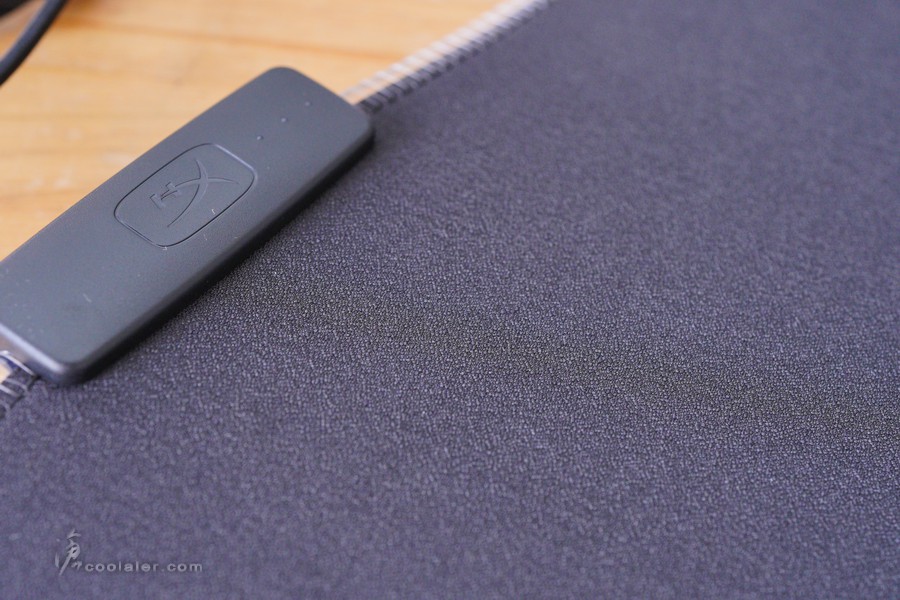
連接的線材在左上位置,線長有180公分。
燈效是在側邊的導光條,導光條與鼠墊採用無縫針織固定。
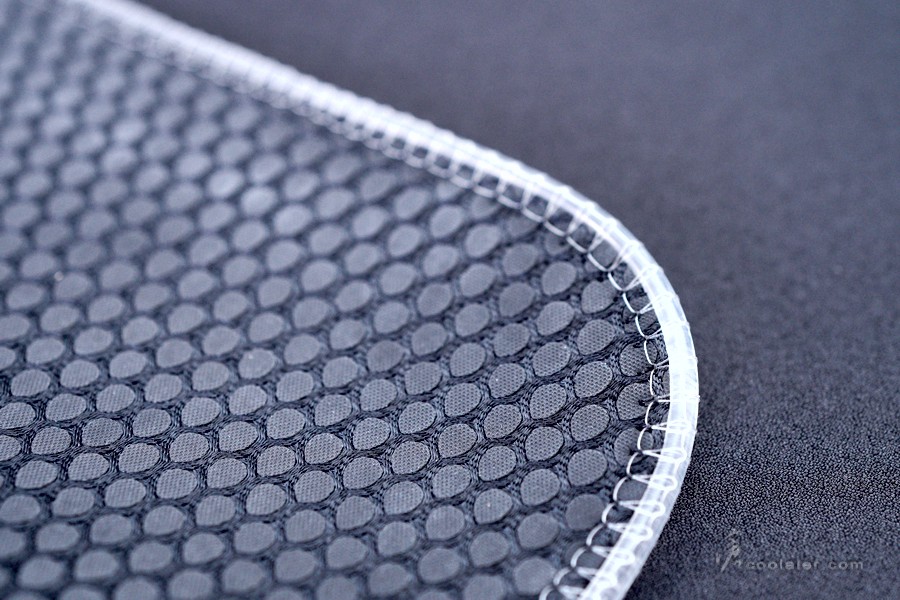
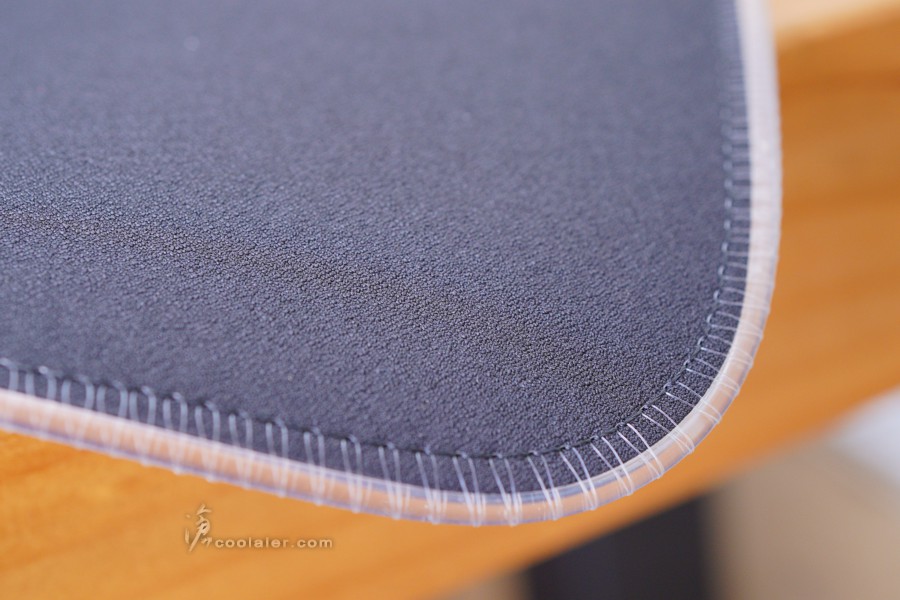
表面是細密編織的布面材質,摸起來有點粗紋,但質感是不錯的。
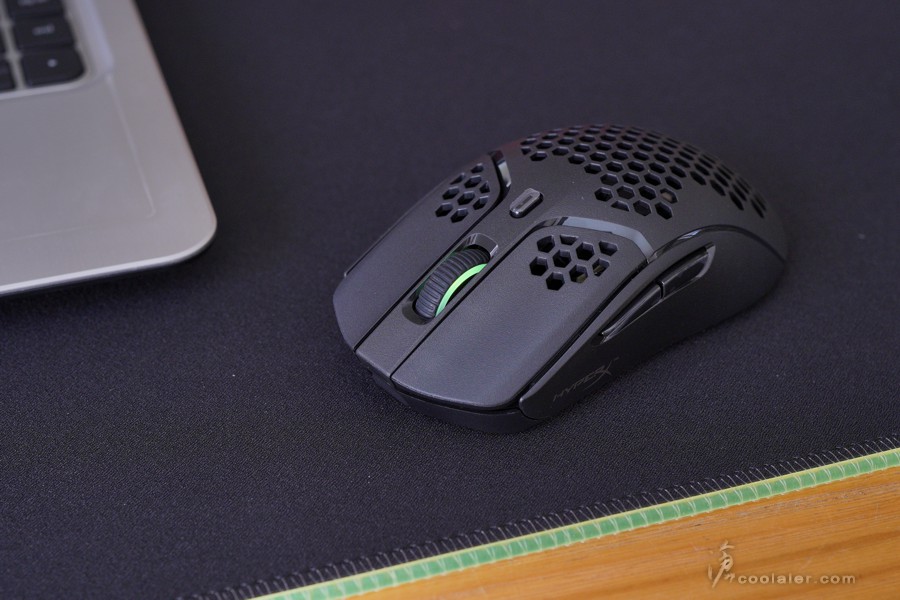
Pulsefire Haste Wireless 滑鼠,輕量化設計,重量61g,充飽電可用上100個小時,採用 Pixart PAW3335 傳感器,最高16000DPI,支援 HyperX NGENUITY 軟體可自定義按鍵功能或巨集以及改變燈效顏色或亮度。
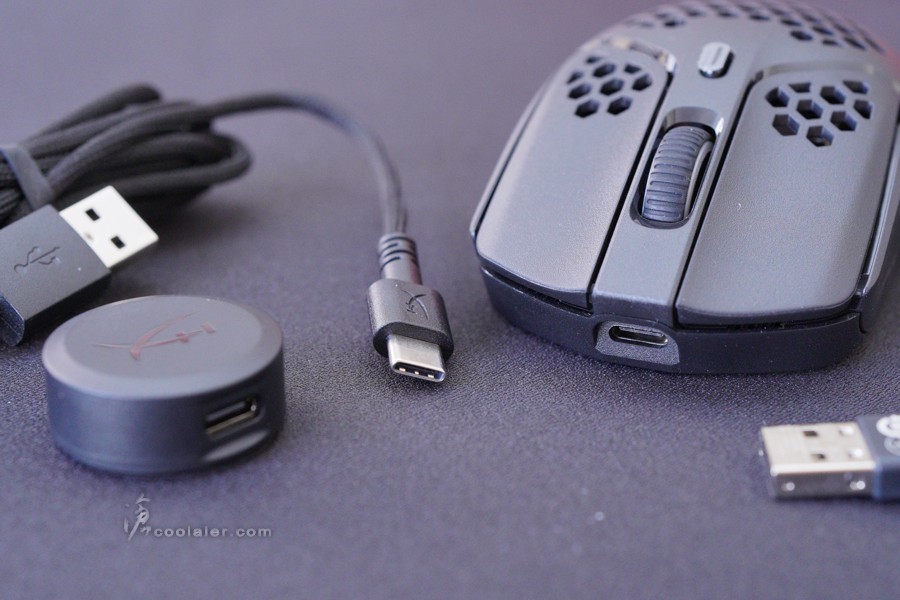
配件有說明書、防滑貼、備用鼠腳、2.4GHz 接收器、充電線。
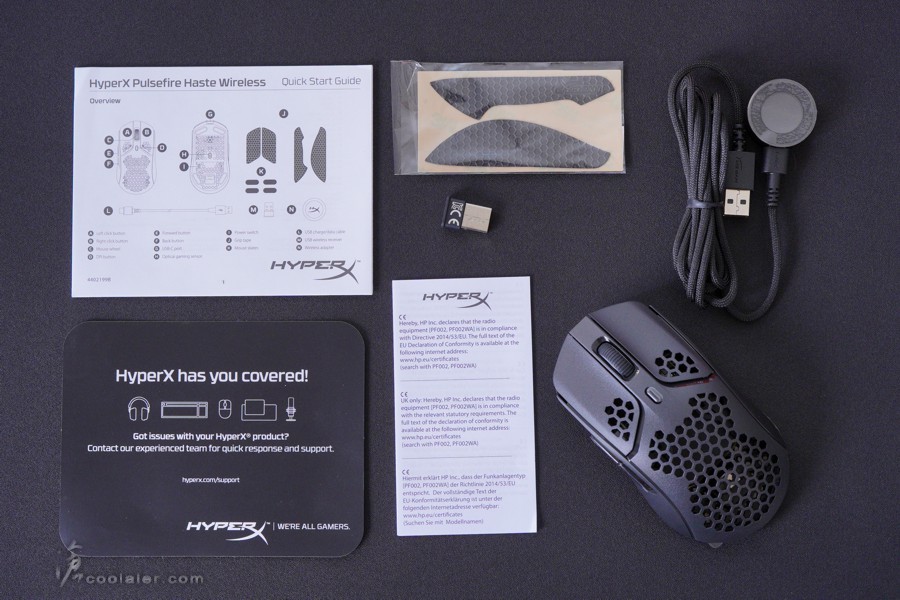
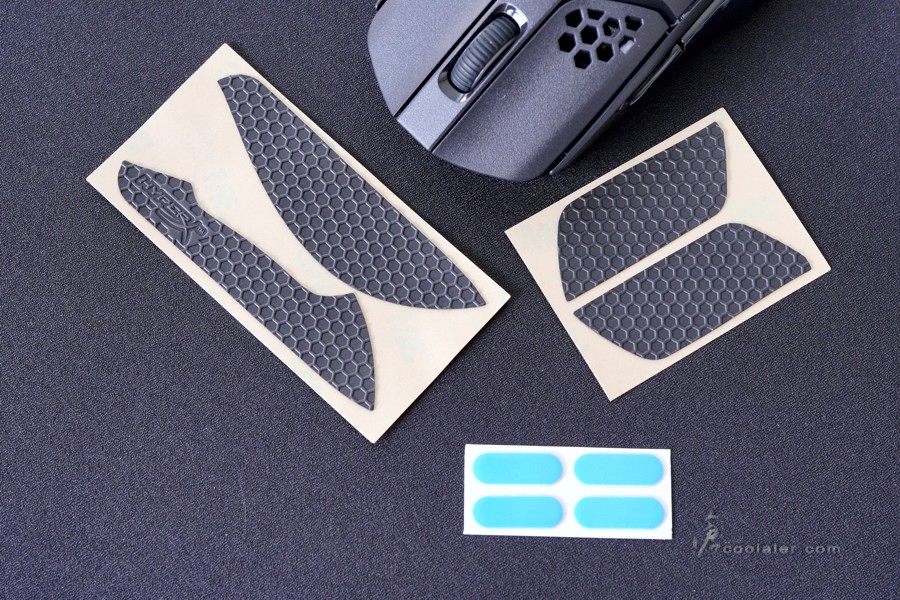
防滑貼可以貼在左右鍵以及兩側邊,你如果希望可以有比較止滑觸感的操控是可以更換上去,雖然這是用背膠黏上,但移除的時候並不會有殘膠。另外也給了一組備用的 PTFE 鐵氟龍低摩擦係數鼠腳。
連接線有採用較為柔軟的編織包覆,這部分可以用於充電,或是延伸接收器到桌面上可以有更好的接收訊號。

圓形的是轉接座,一邊是 Type-C 一邊是 Type-A。
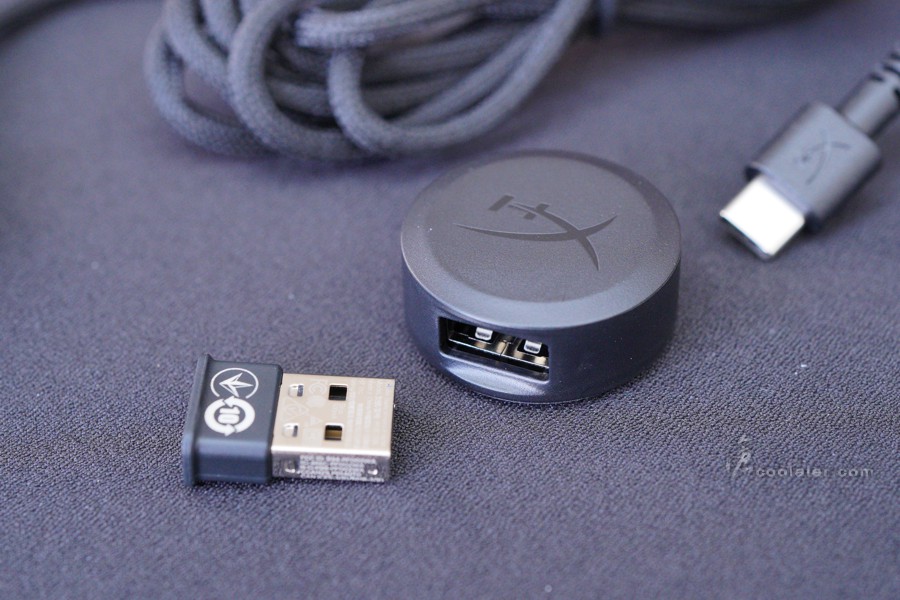
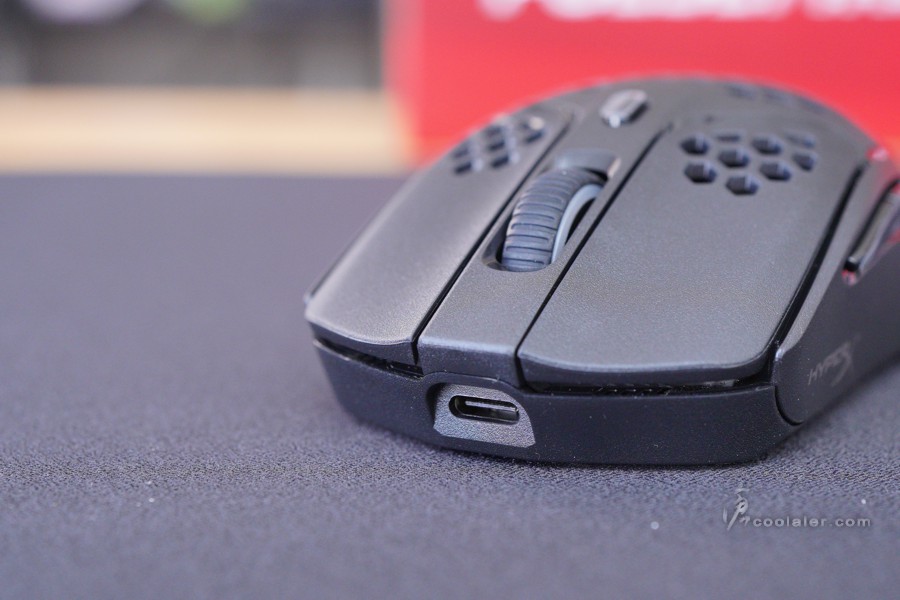
滑鼠的部分是採用 Type-C 接頭,充電或當有線使用。
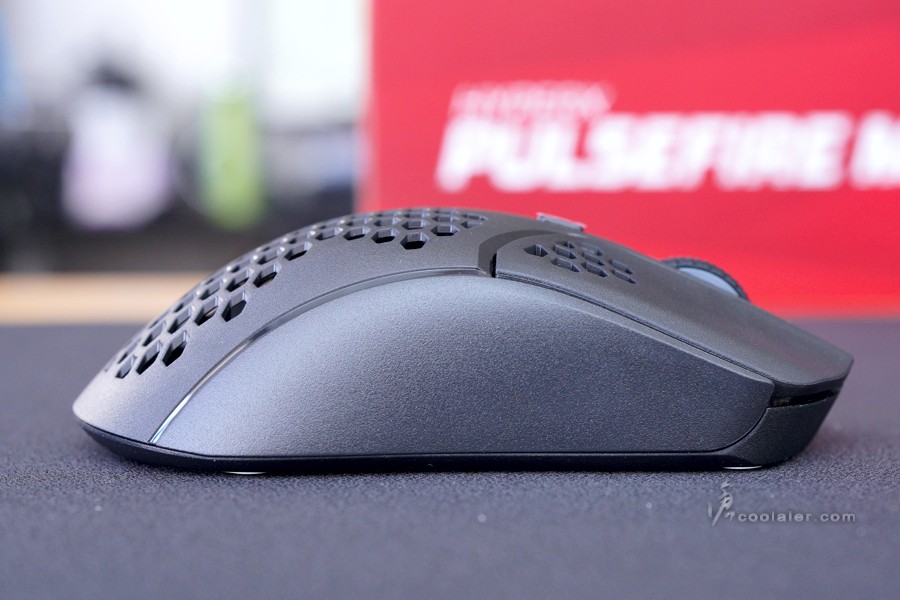
Pulsefire Haste Wireless 採用左右對稱的設計,基本上左手也是可以的。
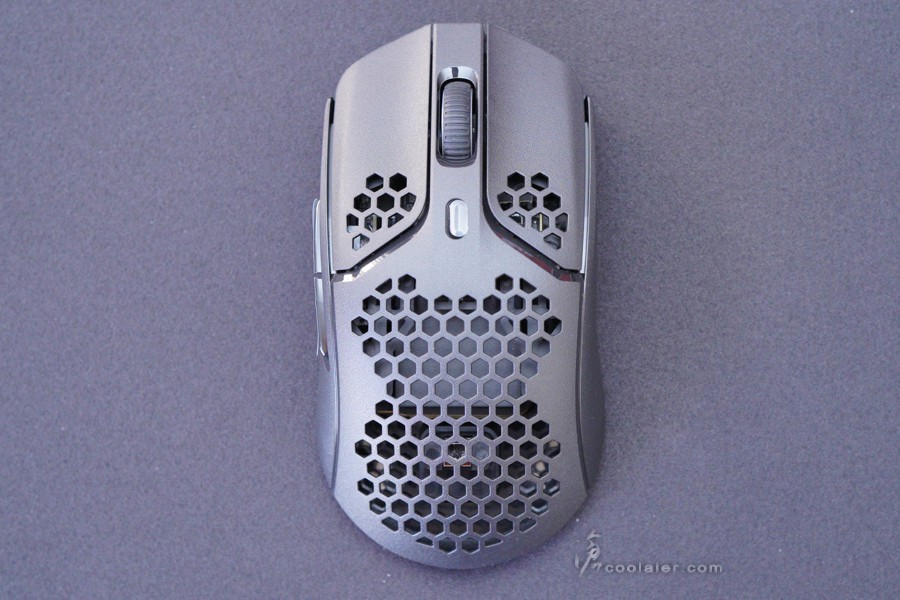
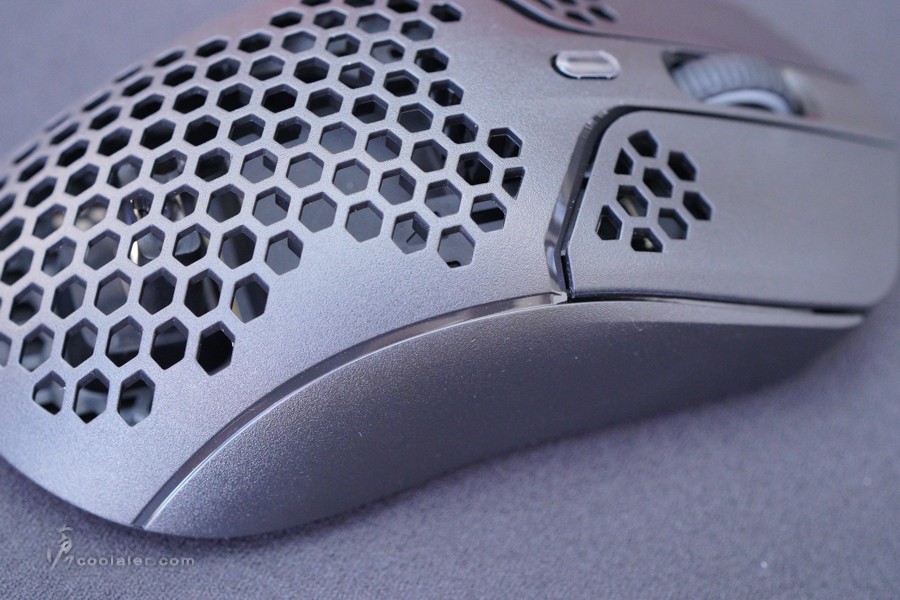
在滑鼠身上有不少蜂巢狀的孔洞設計,這個元素也是近期流行,主要用意就是輕量化,減少滑鼠重量,甩起來更為快速。
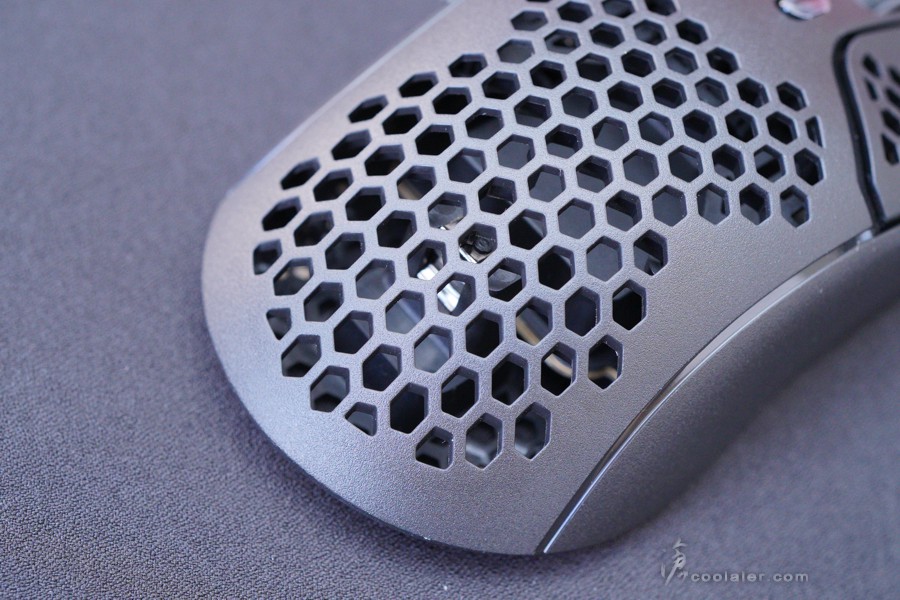
在接合處以及側邊溝槽用上了鏡面拋光處理。
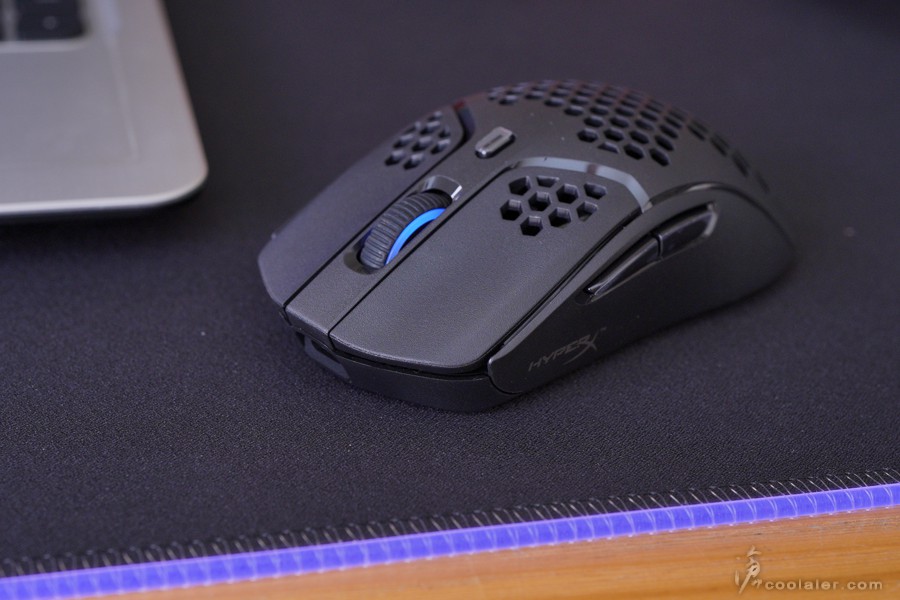
左側前緣有 HyperX Logo 字樣。左側邊上有兩顆功能按鍵,預設是上下一頁,可以透過軟體來自定義。
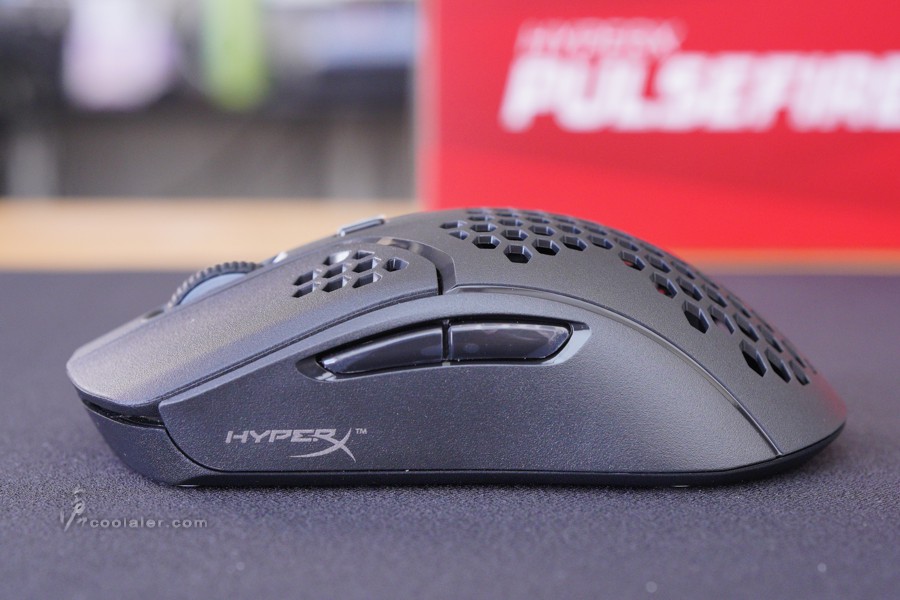
左右兩鍵的按壓區域是比較長一點的。
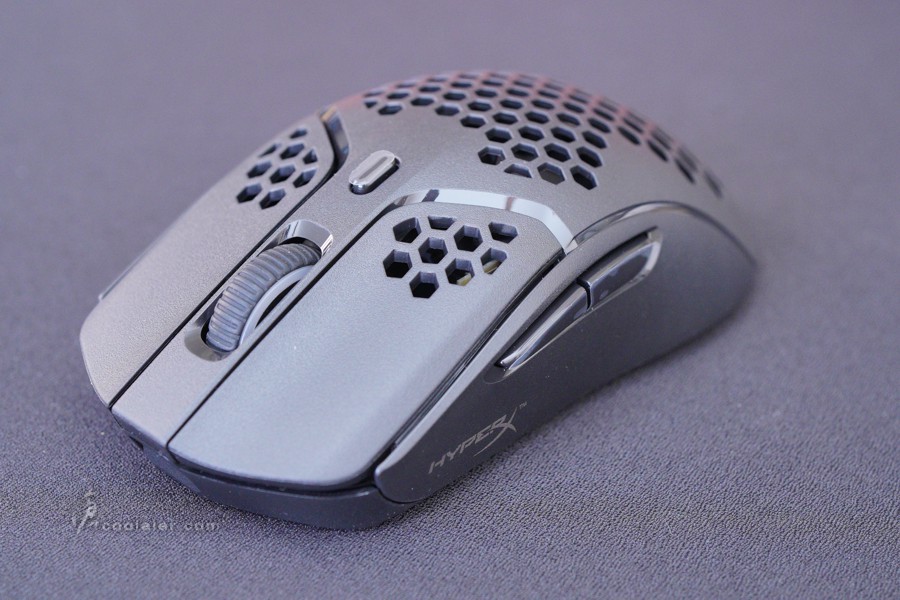
原諒我忘了把中間 DPI 快速切換鍵的膠膜移除,最近眼睛真的不太好XD,拍照完才發現。出廠預設是4段可調 400、800、1600、3200 DPI,按壓循環切換,切換時燈效上會有顏色代表目前段位。
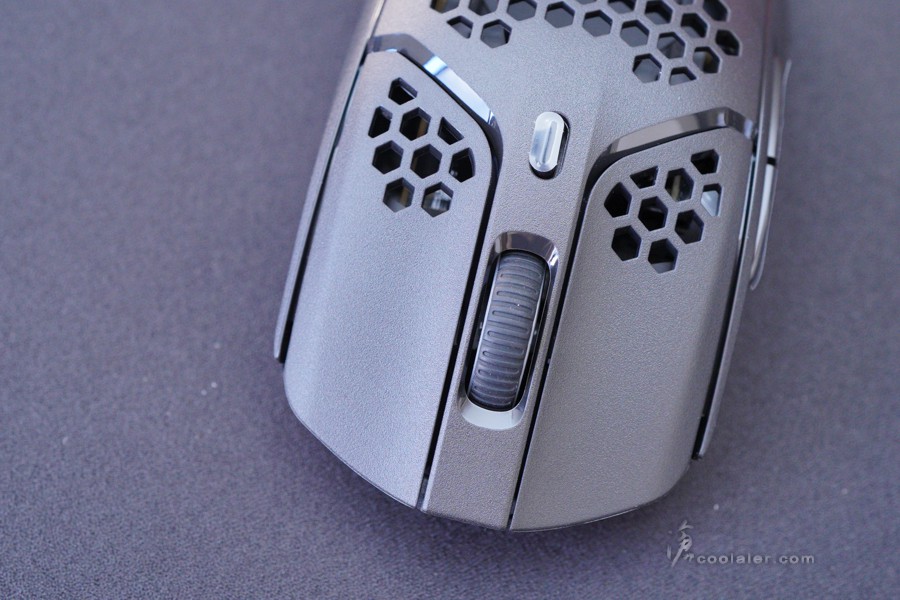
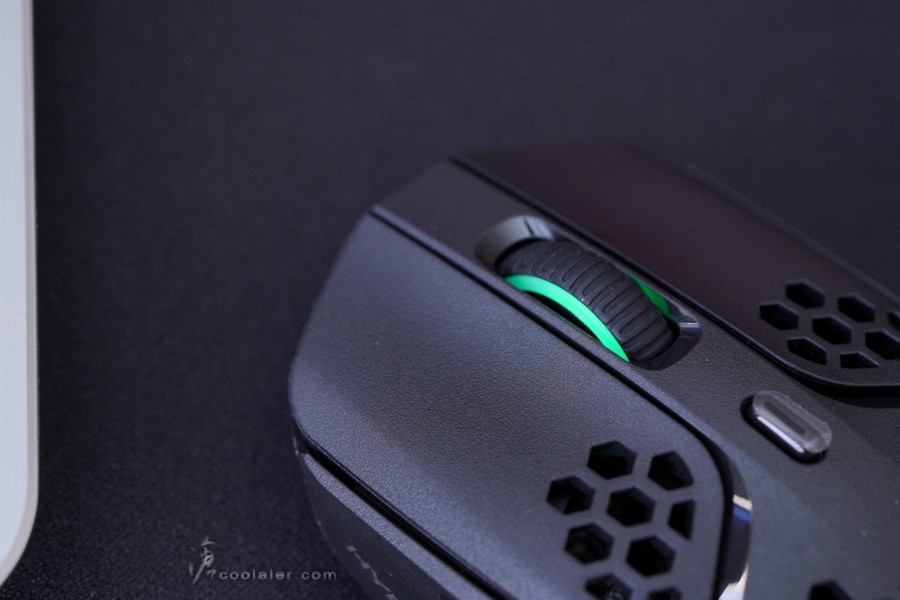
滾輪兩側白色部分是用來顯示 RGB 燈效。前面端則是一個 Type-C 的接口,用來充電或當成有線使用。
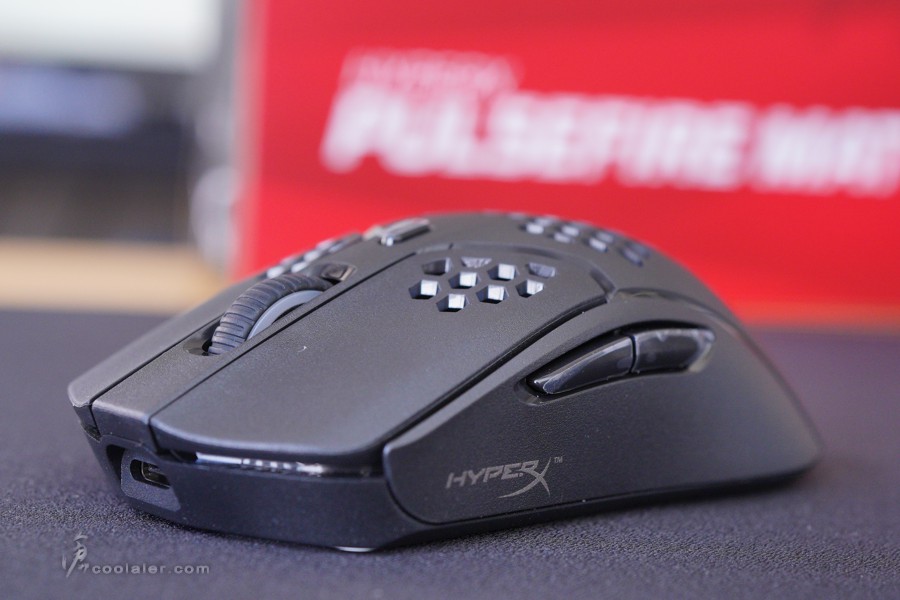
右側邊。
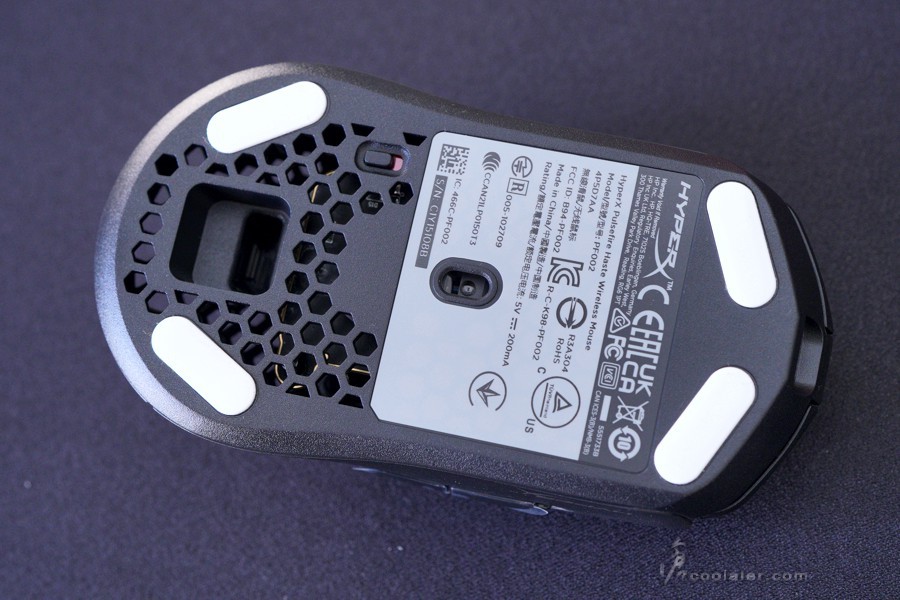
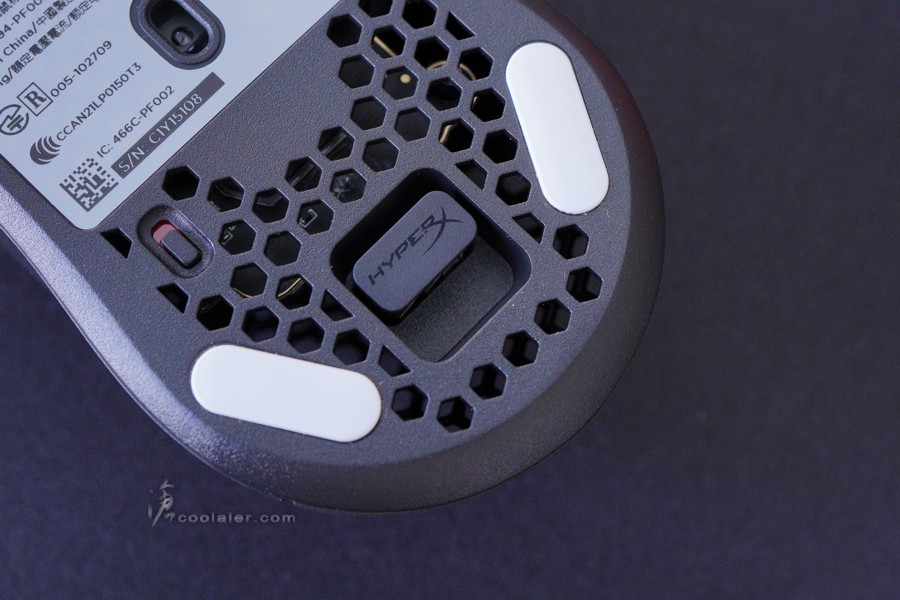
底部有四個鼠腳,採用 PTFE 鐵氟龍材質。左側偏下位置有個電源開關。
下方的口就是用來收納 2.4GHz 接收器,方便攜出使用。
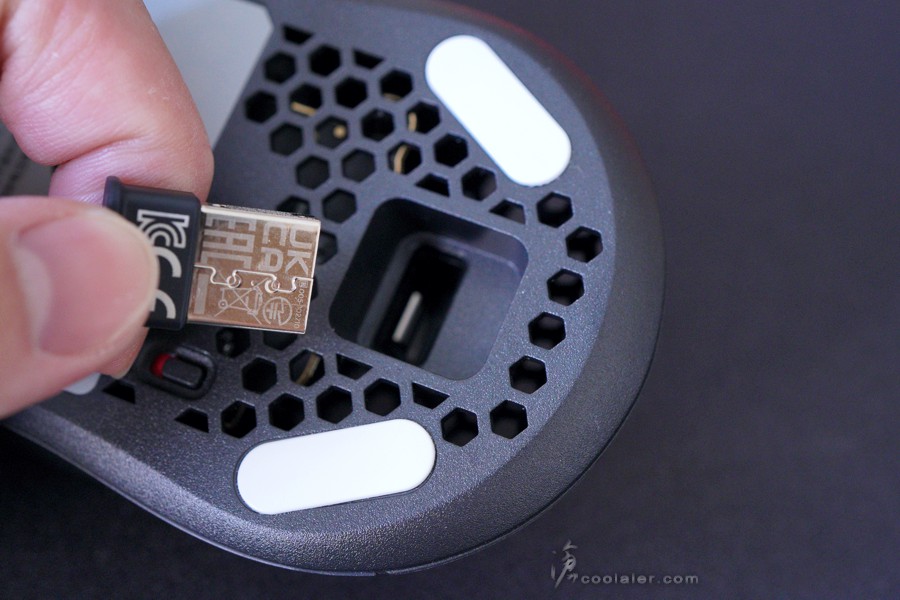
插進去就可以卡住固定。
90公分的鼠墊是真的很大。滑鼠墊的側邊有 RGB 燈效,這部分也可以透過 HyperX NGENUITY 軟體來選擇顏色或效果,也可以與滑鼠或其他 HyperX 周邊同步。
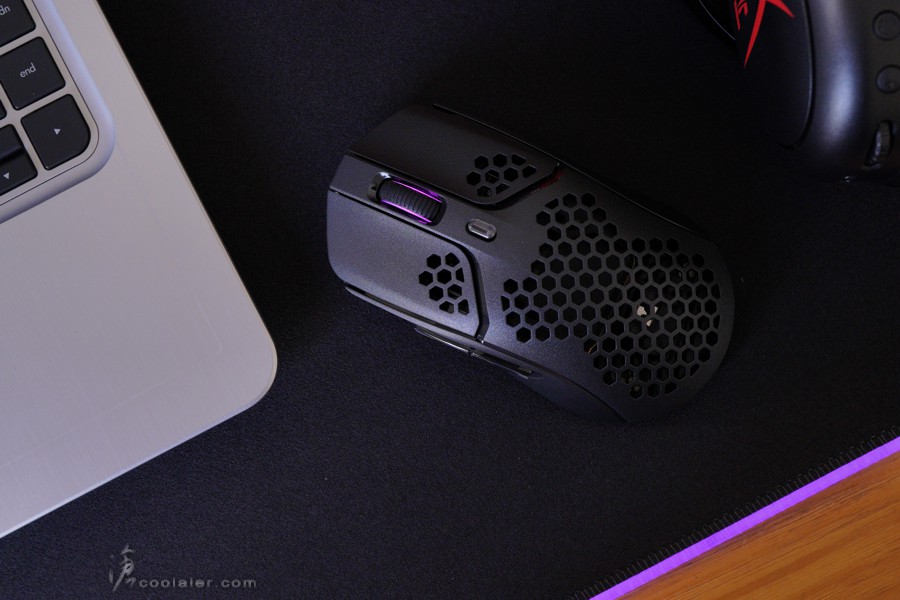
滑鼠燈效僅在滾輪側邊,看起來低調不炫目。
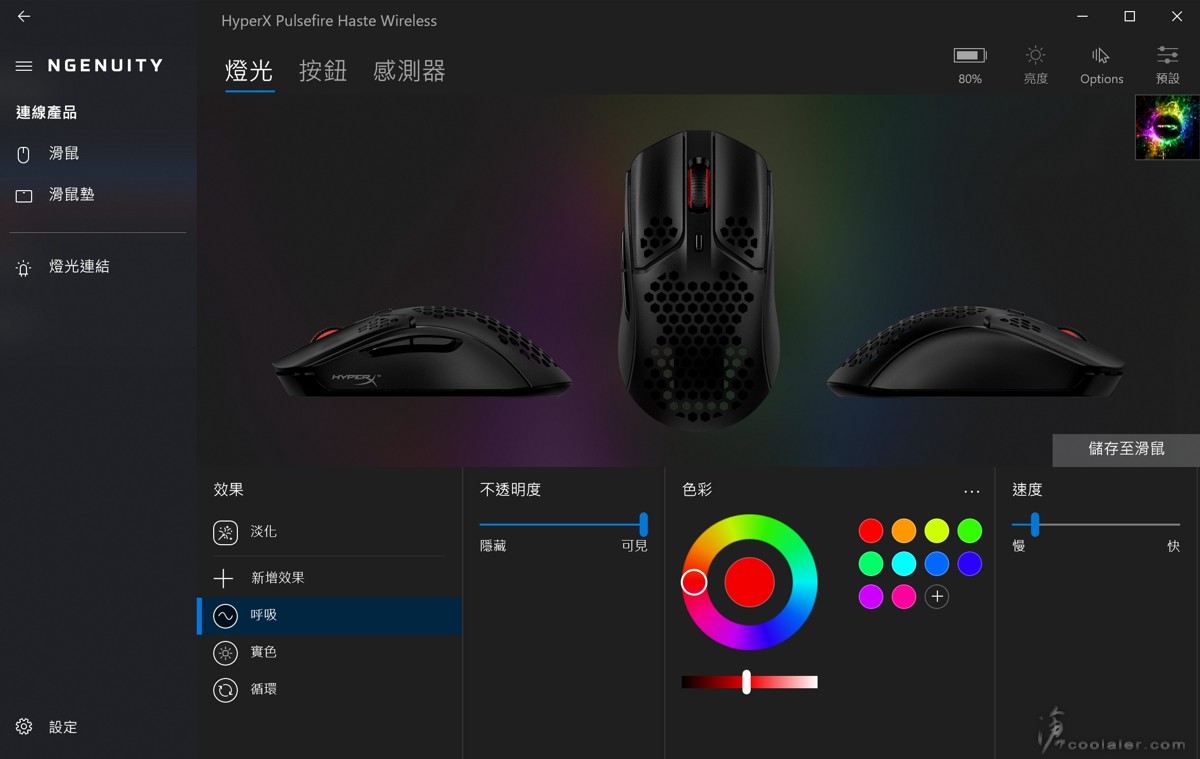
軟體的部分可以透過 Windows 商店搜尋 HyperX NGENUITY 來下載。左側邊即偵測到滑鼠與滑鼠墊,如果有多款 HyperX 的產品可以直接進行燈光連結,也就是同步的意思。在滑鼠的軟體介面上可以調整燈光、按鈕、感測器,右上側可以看到滑鼠電量、調整亮度、選項、套用設定檔等。
另外在燈效上支援一些特色選擇,如淡化、呼吸、實色、循環等,也可以直接編輯不透明度、色彩、顯示速度快慢。
按鈕,可以將滑鼠鍵功能指派設定,包括鍵盤、滑鼠功能、多媒體、巨集、Windows 捷徑、停用。
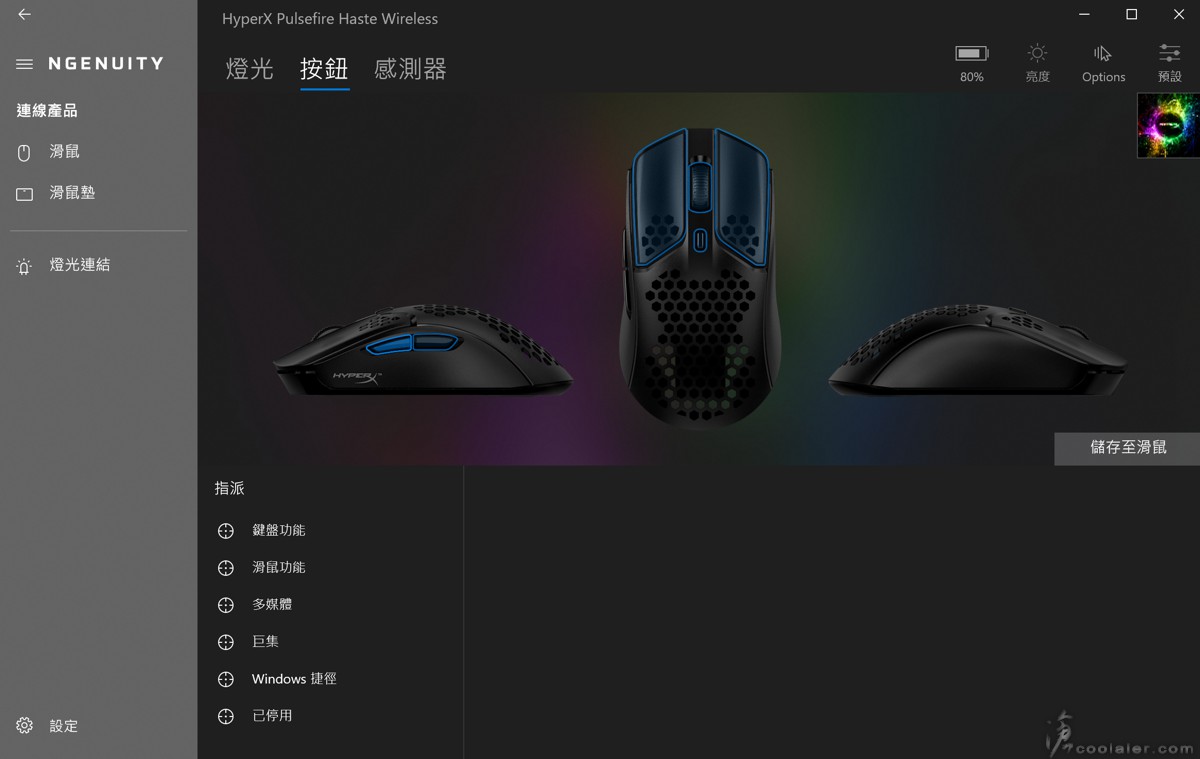
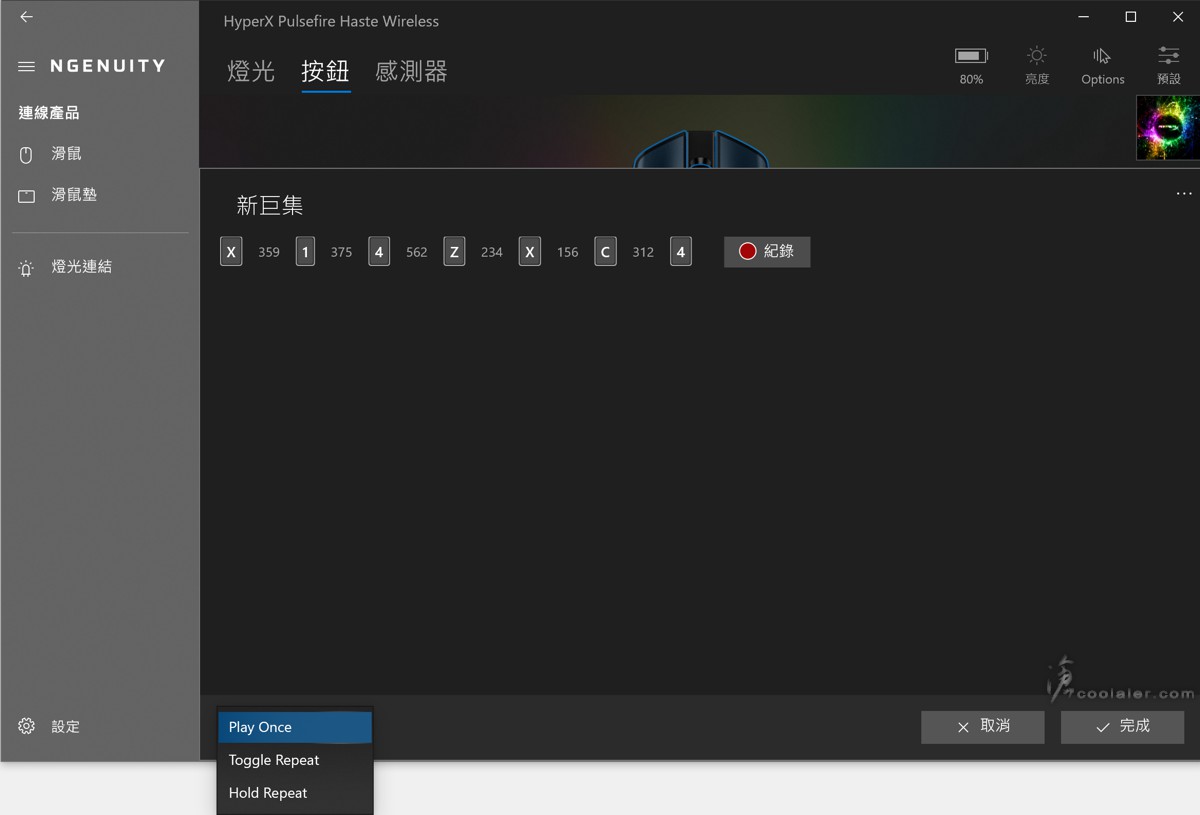
也可以錄製編輯巨集並設定於滑鼠鍵上。
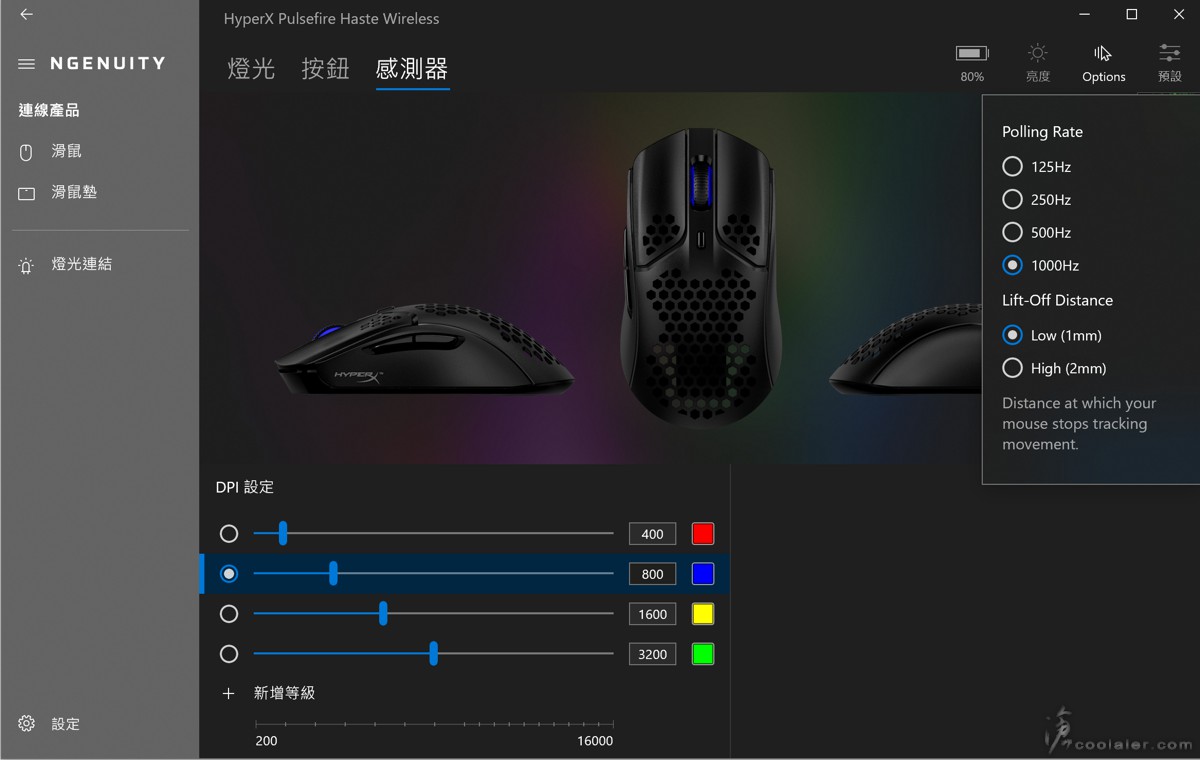
感測器,用於設定 DPI,有四段可設定,預設是透過滾輪下方那顆鍵切換,按壓循環,也可以設定對應燈效顏色,最低 200 DPI,最高 16000 DPI。右側邊 Option,可以設定回報率 125Hz、250Hz、500Hz、1000Hz,Lift-Off Distance 則是離桌面的感應距離,1mm 或 2mm 可調。
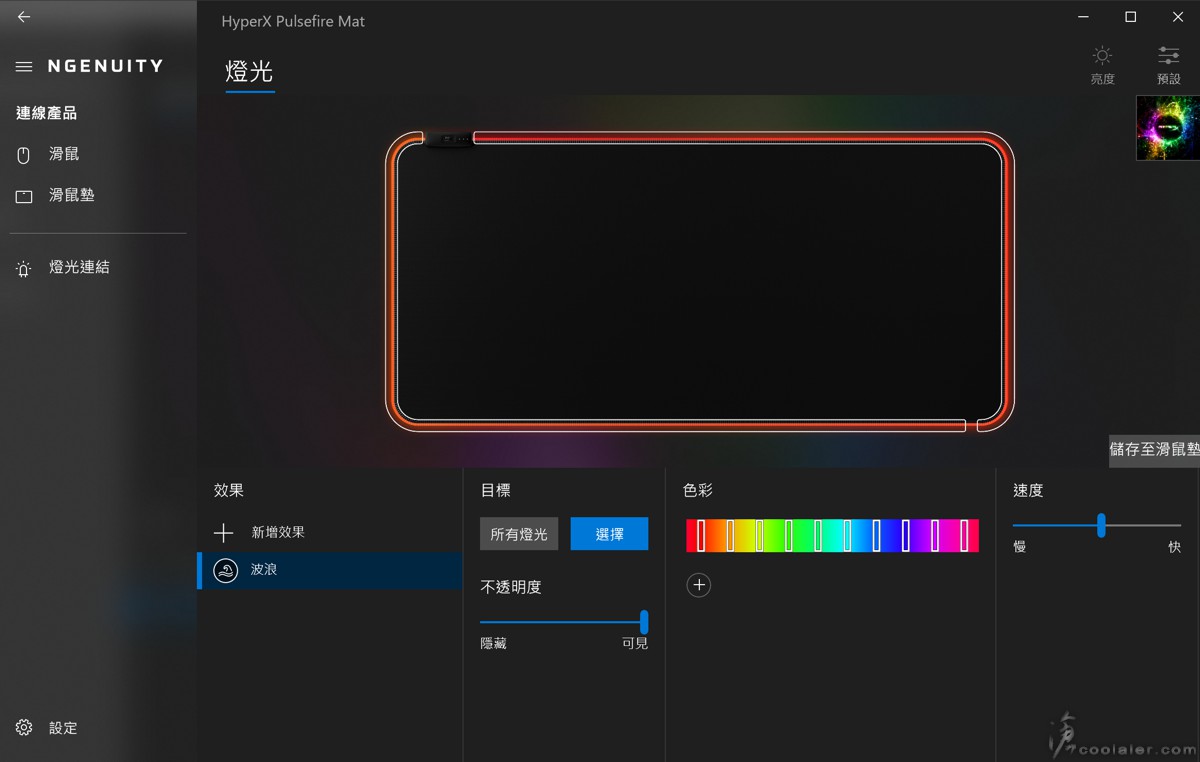
滑鼠墊,從左上的燈控裝置區分左下跟右上兩個燈條,可以分開設定,這裡也可以調整燈效、顏色、不透明度、亮度、特效速度。
小結
HyperX Haste Wireless 無線滑鼠採用輕量化的設計,僅61g,操作上算是相當輕盈好嚕,洞洞的設計也比較通風一點,有手汗的玩家應該會感到較為舒適一些,外型算是與一般滑鼠差不多大,也沒有非對稱式的設計,在操作上如果原本就慣用文書鼠的也能夠在短時間上手,RGB 燈效只在滾輪兩側,所以並不太會干擾到視覺。而 Pulsefire Mat RGB 滑鼠墊在材質觸感以及做工上都很好,不過就是大了點,面積是90x42cm,所以購買時可能得丈量一下桌面空間是否放得下。
與 Pulsefire Haste Wireless 滑鼠一併開箱的還有 Pulsefire Mat RGB 鼠墊。
這個 Pulsefire Mat RGB 鼠墊是已經推一段時間,面積相當大,可以涵蓋整個桌面。
主要就是鍵盤、滑鼠使用區域,面積是90x42cm,個人覺得是42公分是有點深,可能會吃到螢幕腳架位置。
Pulsefire Mat 表面為布質,底部是防滑橡膠,整體做工細節都不錯。
連接的線材在左上位置,線長有180公分。
燈效是在側邊的導光條,導光條與鼠墊採用無縫針織固定。
表面是細密編織的布面材質,摸起來有點粗紋,但質感是不錯的。
Pulsefire Haste Wireless 滑鼠,輕量化設計,重量61g,充飽電可用上100個小時,採用 Pixart PAW3335 傳感器,最高16000DPI,支援 HyperX NGENUITY 軟體可自定義按鍵功能或巨集以及改變燈效顏色或亮度。
配件有說明書、防滑貼、備用鼠腳、2.4GHz 接收器、充電線。
防滑貼可以貼在左右鍵以及兩側邊,你如果希望可以有比較止滑觸感的操控是可以更換上去,雖然這是用背膠黏上,但移除的時候並不會有殘膠。另外也給了一組備用的 PTFE 鐵氟龍低摩擦係數鼠腳。
連接線有採用較為柔軟的編織包覆,這部分可以用於充電,或是延伸接收器到桌面上可以有更好的接收訊號。
圓形的是轉接座,一邊是 Type-C 一邊是 Type-A。
滑鼠的部分是採用 Type-C 接頭,充電或當有線使用。
Pulsefire Haste Wireless 採用左右對稱的設計,基本上左手也是可以的。
在滑鼠身上有不少蜂巢狀的孔洞設計,這個元素也是近期流行,主要用意就是輕量化,減少滑鼠重量,甩起來更為快速。
在接合處以及側邊溝槽用上了鏡面拋光處理。
左側前緣有 HyperX Logo 字樣。左側邊上有兩顆功能按鍵,預設是上下一頁,可以透過軟體來自定義。
左右兩鍵的按壓區域是比較長一點的。
原諒我忘了把中間 DPI 快速切換鍵的膠膜移除,最近眼睛真的不太好XD,拍照完才發現。出廠預設是4段可調 400、800、1600、3200 DPI,按壓循環切換,切換時燈效上會有顏色代表目前段位。
滾輪兩側白色部分是用來顯示 RGB 燈效。前面端則是一個 Type-C 的接口,用來充電或當成有線使用。
右側邊。
底部有四個鼠腳,採用 PTFE 鐵氟龍材質。左側偏下位置有個電源開關。
下方的口就是用來收納 2.4GHz 接收器,方便攜出使用。
插進去就可以卡住固定。
90公分的鼠墊是真的很大。滑鼠墊的側邊有 RGB 燈效,這部分也可以透過 HyperX NGENUITY 軟體來選擇顏色或效果,也可以與滑鼠或其他 HyperX 周邊同步。
滑鼠燈效僅在滾輪側邊,看起來低調不炫目。
軟體的部分可以透過 Windows 商店搜尋 HyperX NGENUITY 來下載。左側邊即偵測到滑鼠與滑鼠墊,如果有多款 HyperX 的產品可以直接進行燈光連結,也就是同步的意思。在滑鼠的軟體介面上可以調整燈光、按鈕、感測器,右上側可以看到滑鼠電量、調整亮度、選項、套用設定檔等。
另外在燈效上支援一些特色選擇,如淡化、呼吸、實色、循環等,也可以直接編輯不透明度、色彩、顯示速度快慢。
按鈕,可以將滑鼠鍵功能指派設定,包括鍵盤、滑鼠功能、多媒體、巨集、Windows 捷徑、停用。
也可以錄製編輯巨集並設定於滑鼠鍵上。
感測器,用於設定 DPI,有四段可設定,預設是透過滾輪下方那顆鍵切換,按壓循環,也可以設定對應燈效顏色,最低 200 DPI,最高 16000 DPI。右側邊 Option,可以設定回報率 125Hz、250Hz、500Hz、1000Hz,Lift-Off Distance 則是離桌面的感應距離,1mm 或 2mm 可調。
滑鼠墊,從左上的燈控裝置區分左下跟右上兩個燈條,可以分開設定,這裡也可以調整燈效、顏色、不透明度、亮度、特效速度。
小結
HyperX Haste Wireless 無線滑鼠採用輕量化的設計,僅61g,操作上算是相當輕盈好嚕,洞洞的設計也比較通風一點,有手汗的玩家應該會感到較為舒適一些,外型算是與一般滑鼠差不多大,也沒有非對稱式的設計,在操作上如果原本就慣用文書鼠的也能夠在短時間上手,RGB 燈效只在滾輪兩側,所以並不太會干擾到視覺。而 Pulsefire Mat RGB 滑鼠墊在材質觸感以及做工上都很好,不過就是大了點,面積是90x42cm,所以購買時可能得丈量一下桌面空間是否放得下。