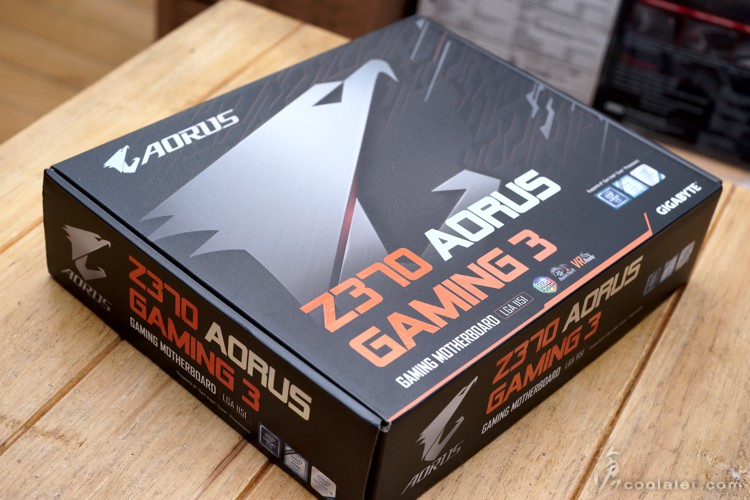
GIGABYTE 在 Z370 系列上也推出了不少主機板,這一代仍大多承襲以前的命名方式,Gaming 系列後綴數字代表等級區隔,目前在線上販售的有 AORUS Gaming 3、Gaming 5 以及 Gaming 7,如果有需要比較絢麗燈效的玩家大概只能考慮 5 或 7,因為 Gaming 3 只有晶片散熱片與音效區域有燈效綴飾,而 5 以上則是全板,記憶體、散熱片、側邊、PCI-E x16、遮罩等都有燈效,另外在規格擴充上當然也是最主要差異,畢竟價格也不一樣嘛XD。
GIGABYTE Z370 AORUS Gaming 3
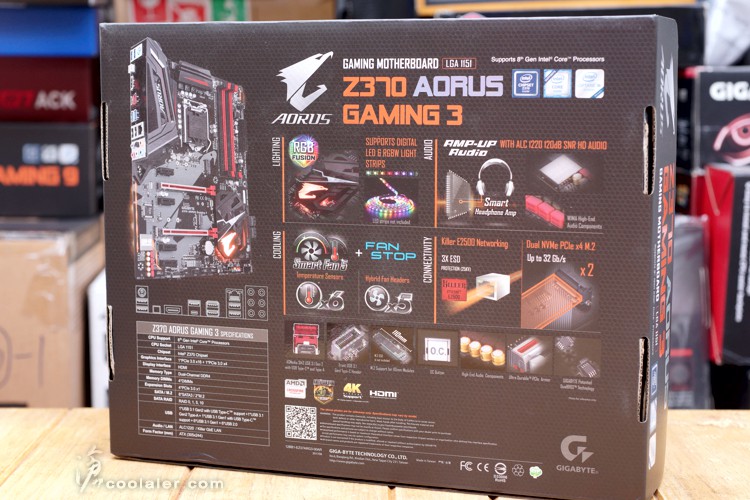
外盒背面有一些規格特色介紹,雖然燈效比較少,但仍支援數位LED燈條,可使用RGB Fusion軟體控制一些燈效,網路的部分也搭載了 Killer E2500,音效則是 ALC1220 120db訊噪比晶片,另外有2個M.2、ASMedia 3142 USB 3.1 晶片、OC Button、高品質音效電容、PCI-E 護甲、DualBIOS等。
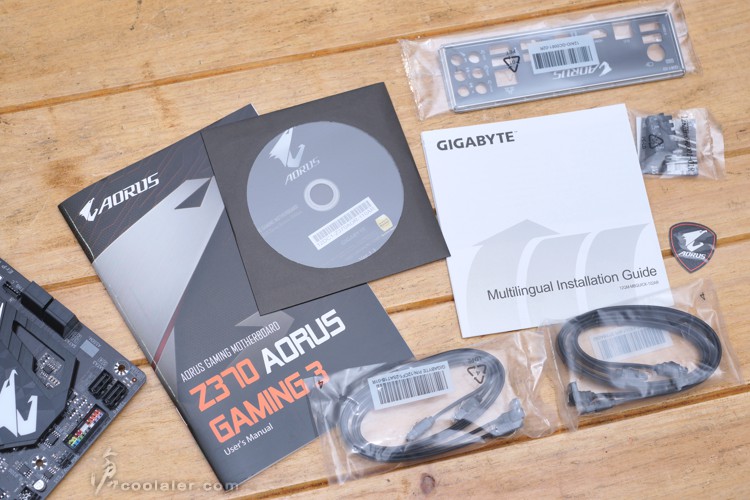
配件有說明書、軟體光碟、檔板、G Connector IO連接座、貼紙、4條SATA線。
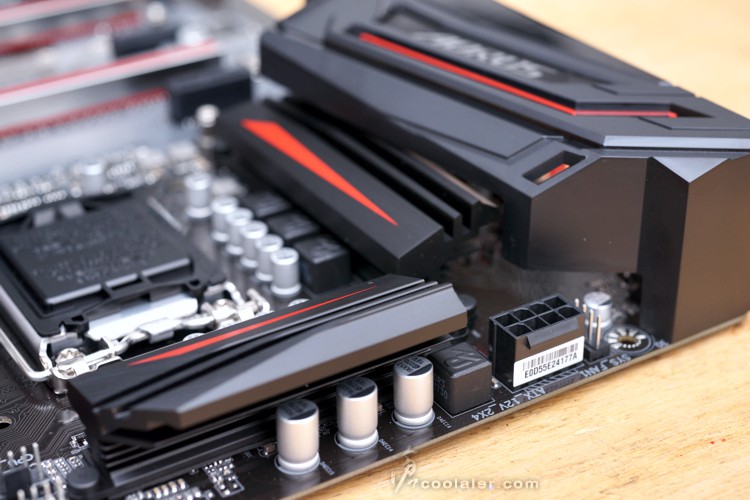
主機板採用標準 ATX 尺寸設計,PCB整體為黑色,底部可以看到有 AORUS 老鷹圖案,另外散熱片上方、擴充插槽則是有部分使用紅色來點綴。
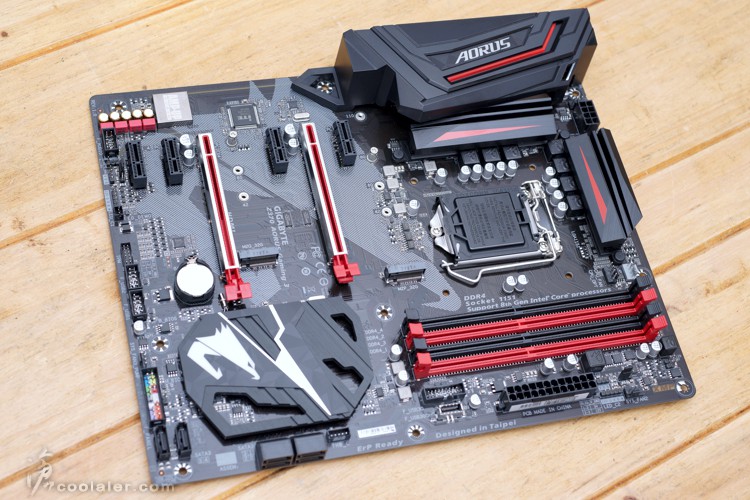
後方IO埠上面有飾板,不過這部分沒有燈效。
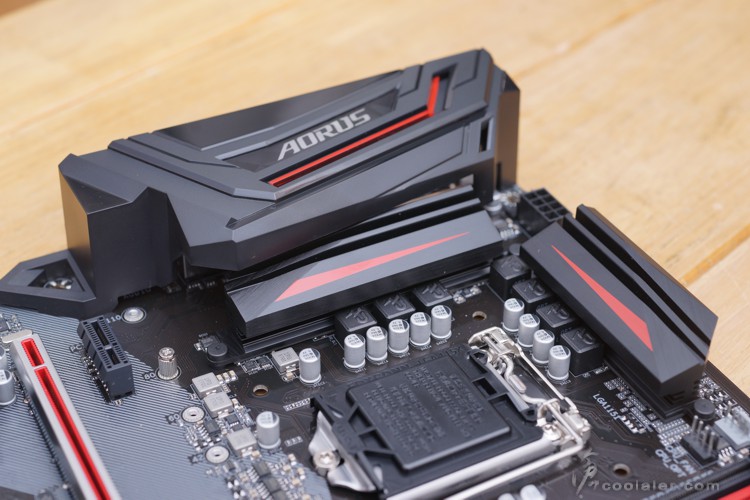
供電上方則是有被動式的造型散熱片。
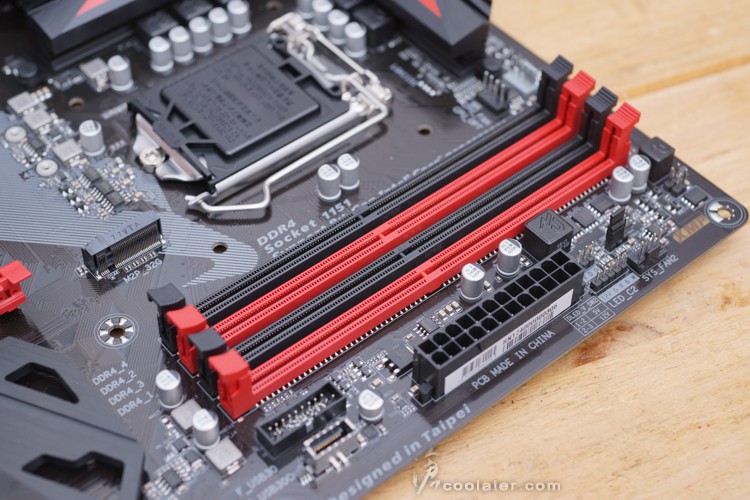
4根 DDR4 記憶體插槽,最高可以擴充到64GB,時脈則是可以支援到 DDR4 4000(OC)。
6個SATA,支援RAID 0、RAID 1、RAID 5及RAID 10。
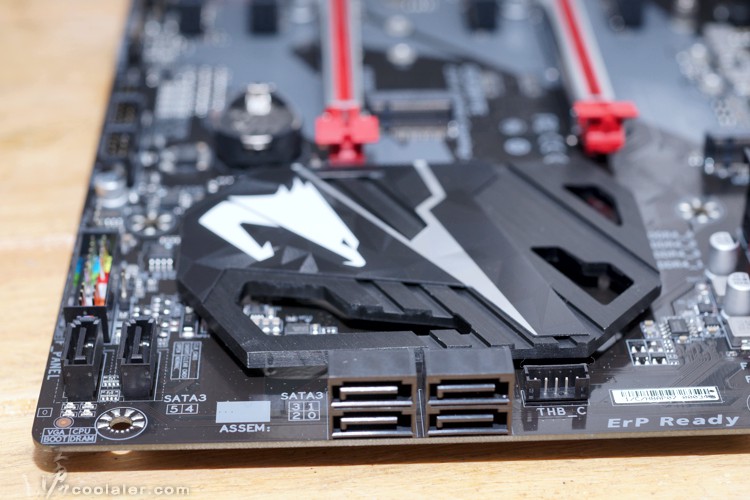
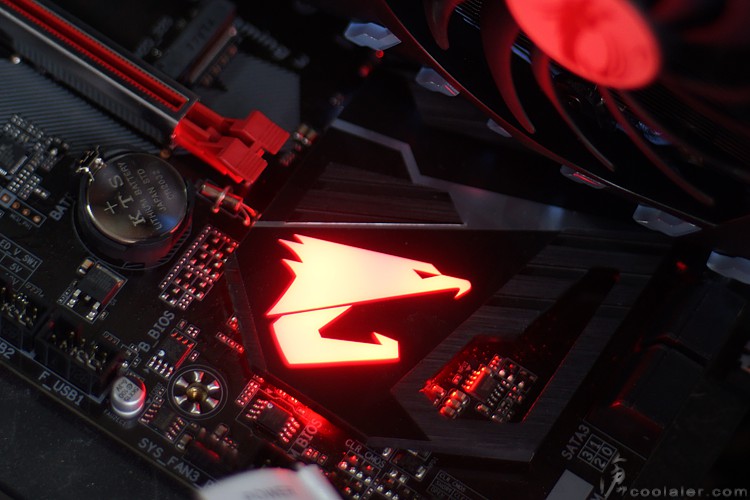
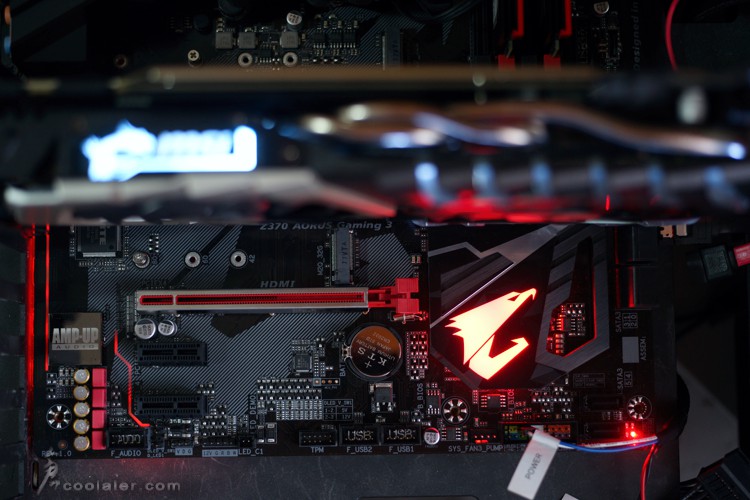
晶片組上方的散熱片質感還不錯,上面有部分髮絲紋處理,AORUS 的老鷹標誌則是有LED燈效。
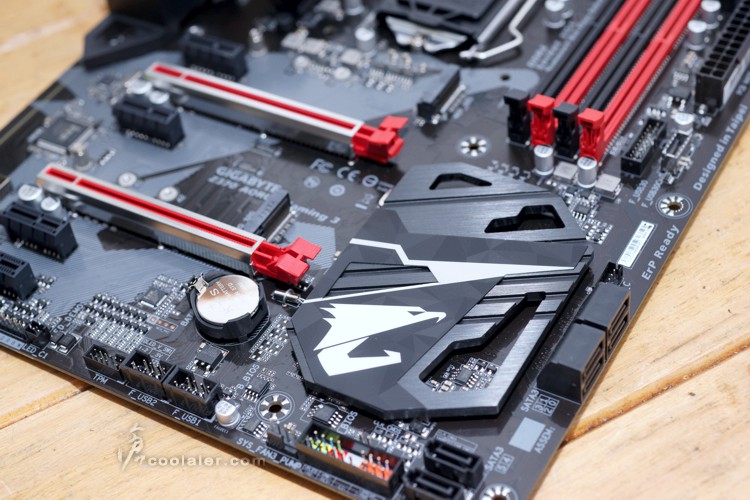
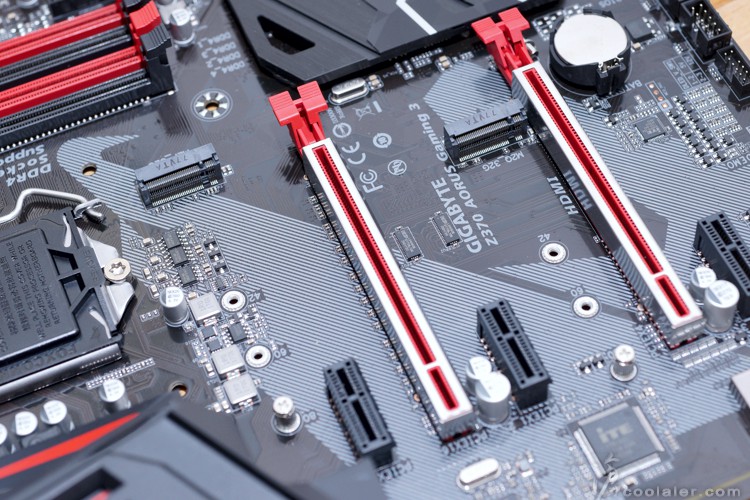
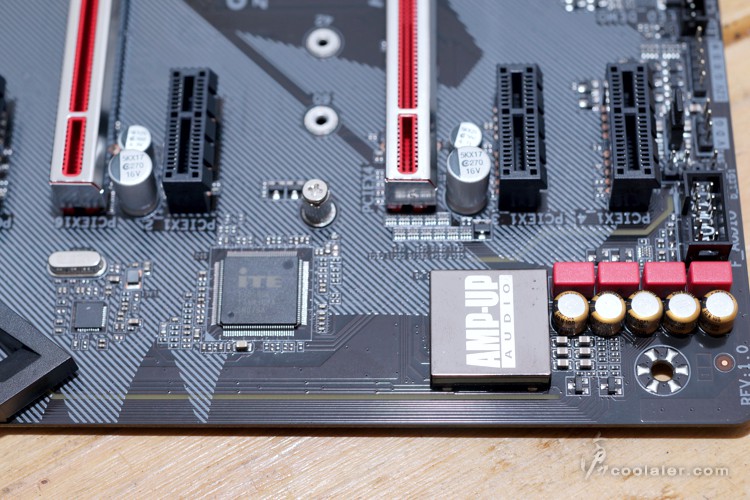
擴充卡槽,4個PCI-E x1、2個PCI-E x16。
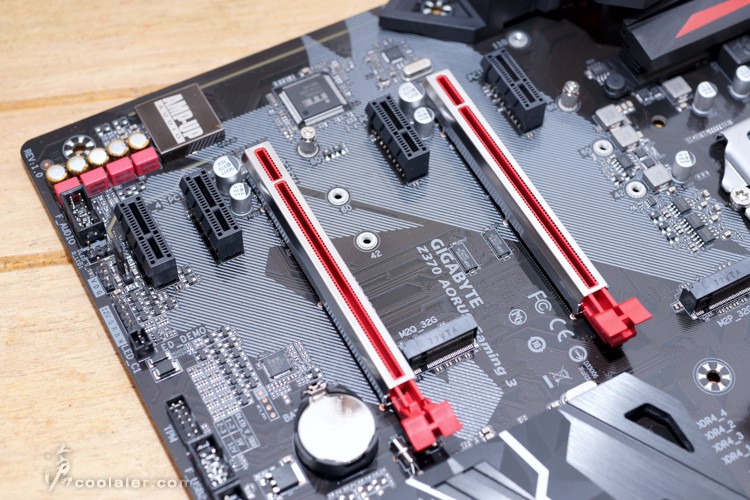
PCI-E x16上面有金屬護甲。
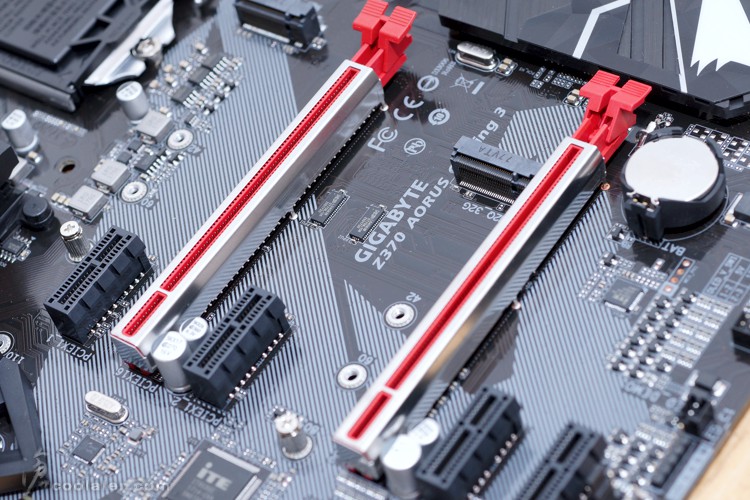
擴充槽旁有2個M.2擴充槽。
音效的部分有隔離區域設計,採用 Realtek ALC1220 晶片搭配音效電容。
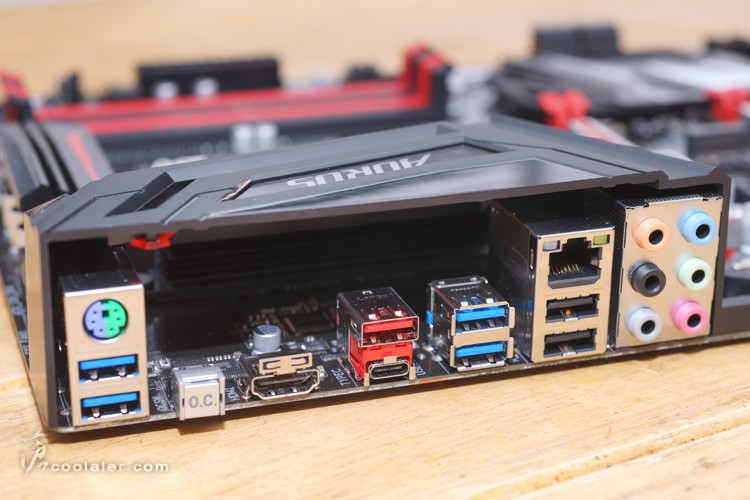
後面IO埠有PS/2鍵盤滑鼠接口、4個USB 3.1 Gen1、OC鍵、HDMI、1個USB 3.1 Gen 2 Type A、1個Type C、2個USB2.0、1個RJ45、6個音源輸出入。
開機後晶片組與音效側有燈效。
BIOS簡介
測試前先來看看 BIOS,目前 GIGABYTE 的主機板介面與風格是大同小異。
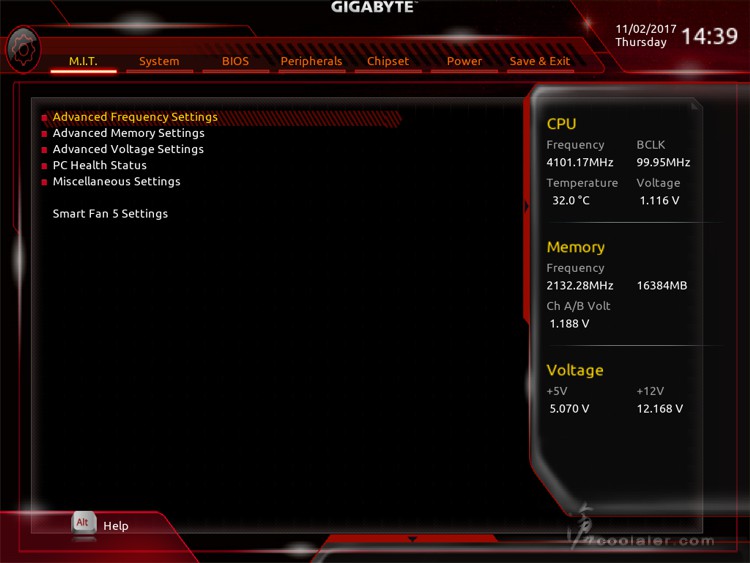
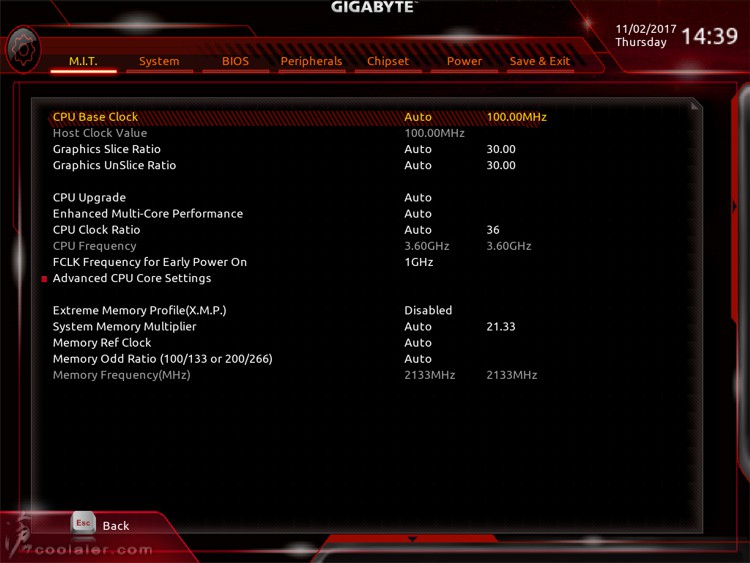
進階頻率設定選項,這邊就是用來調整超頻,可調倍頻、外頻、快速超頻、XMP等快速設定。
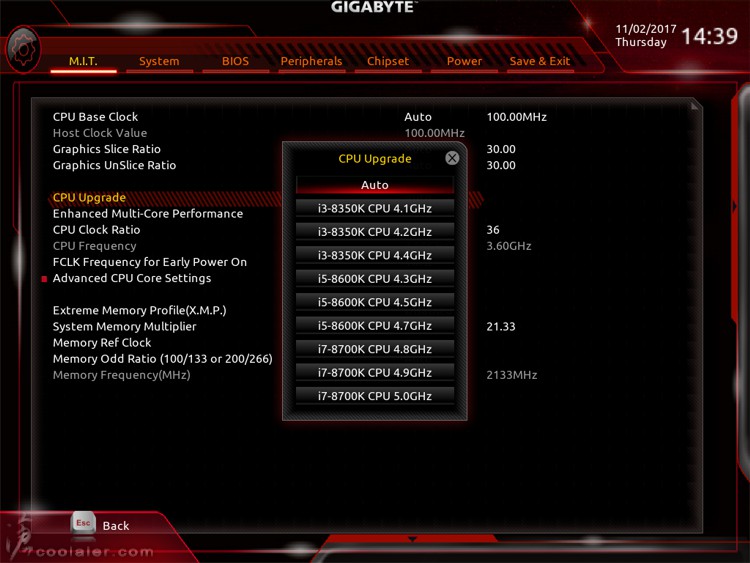
CPU快速超頻,選擇你的處理器以及想要的時脈即可完成超頻,相當方便。
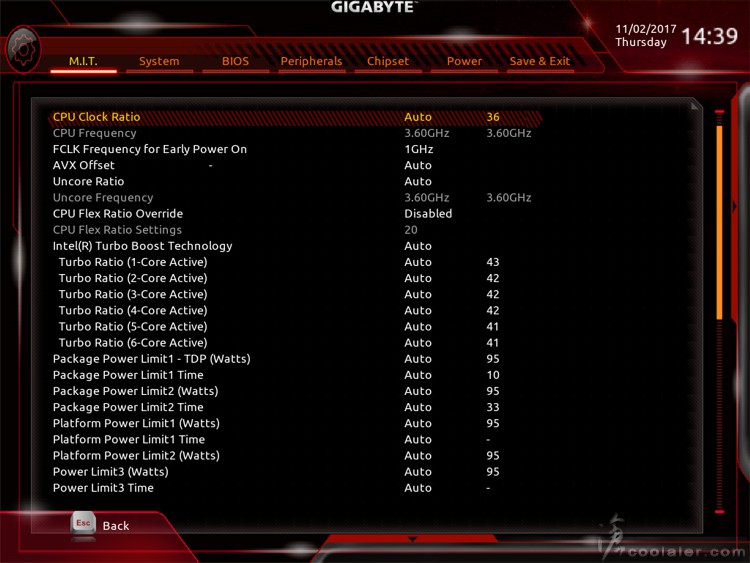
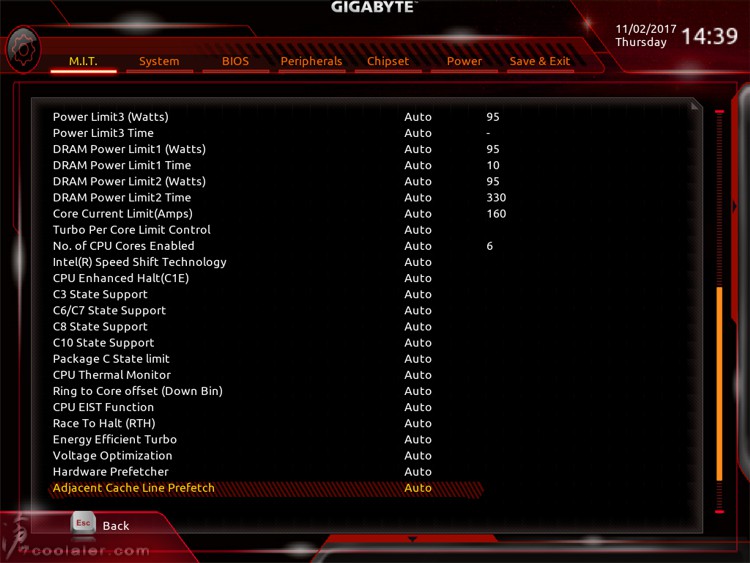
CPU進階設定。
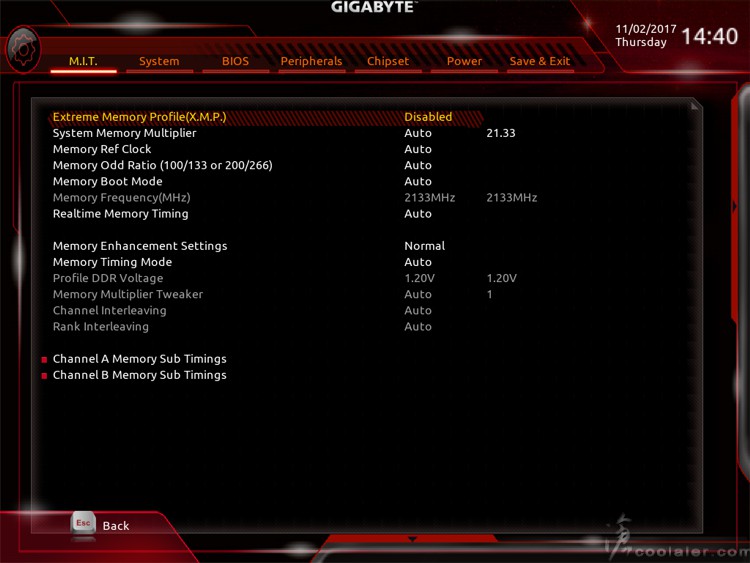
記憶體設定調整。
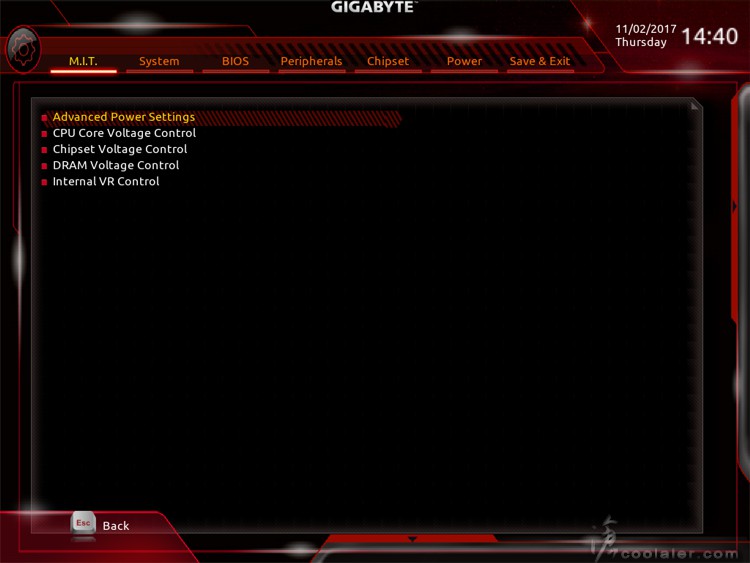
相當完整的電壓選項。
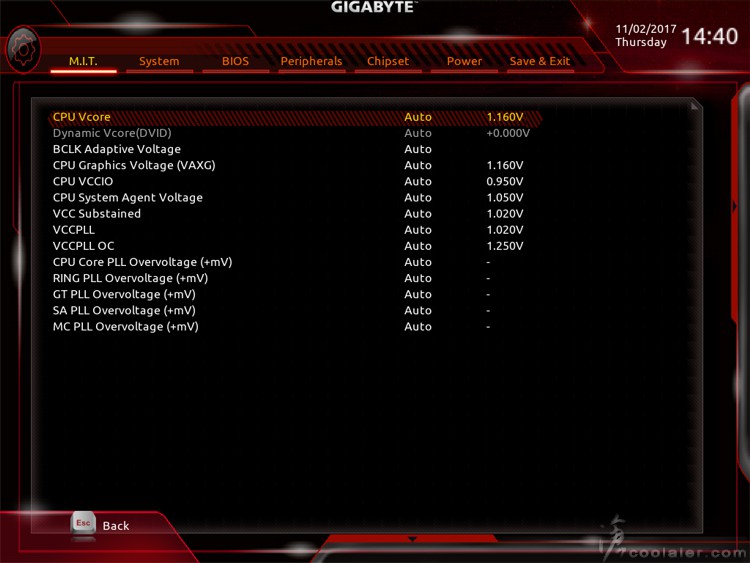
CPU 電壓設定選項。
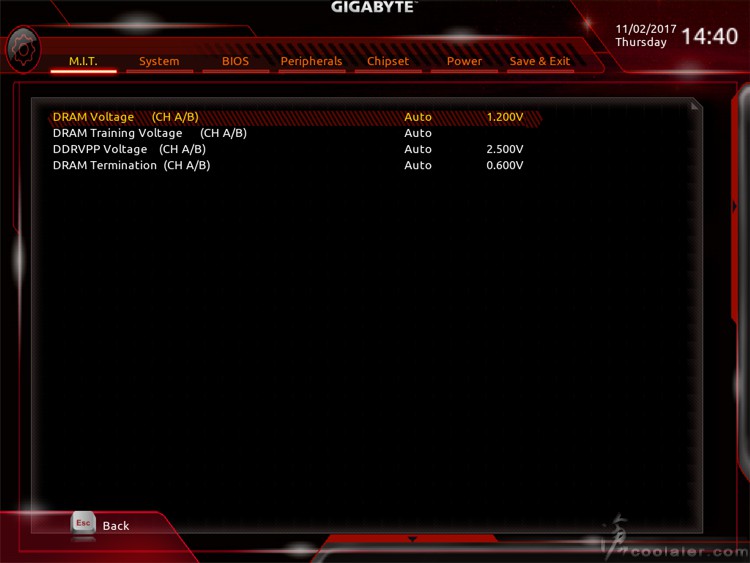
記憶體電壓選項。
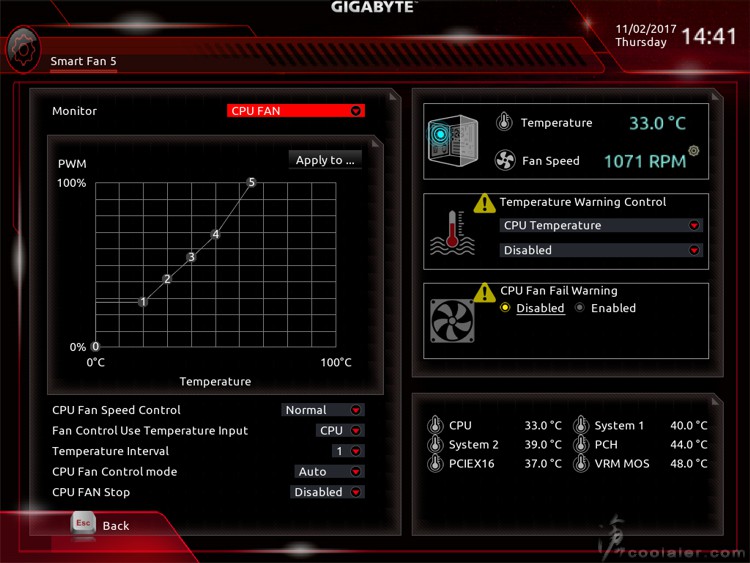
Smart Fan 5,溫度與風扇轉速關係設定。
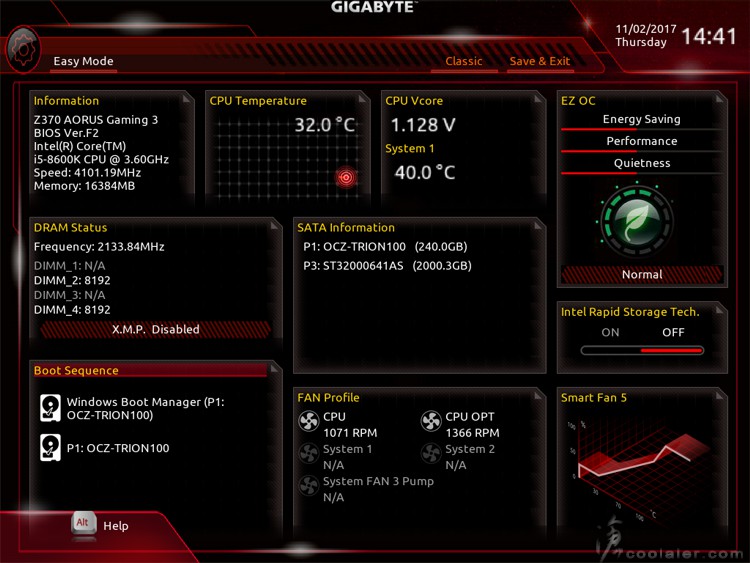
也有 Easy Mode 簡易BIOS模式。
測試平台
CPU: Intel Core i5-8600K
CPU Cooler: Tt Water 3.0 Extreme
RAM: GSKILL DDR4 3200 8GBx2
MB: GIGABYTE Z370 AORUS Gaming 3
VGA: MSI GTX 1070 Ti TITANIUM
HDD: OCZ Vertex 3.20 240GB、Seagate 2TB
PSU: IN WIN SI 1050W
OS: Windows 10 64bit
這次測試這顆 Core i5-8600K 並不是上次那顆,但一樣是ES,不過似乎體質比較差一些,後面會有超頻測試。
預設值測試
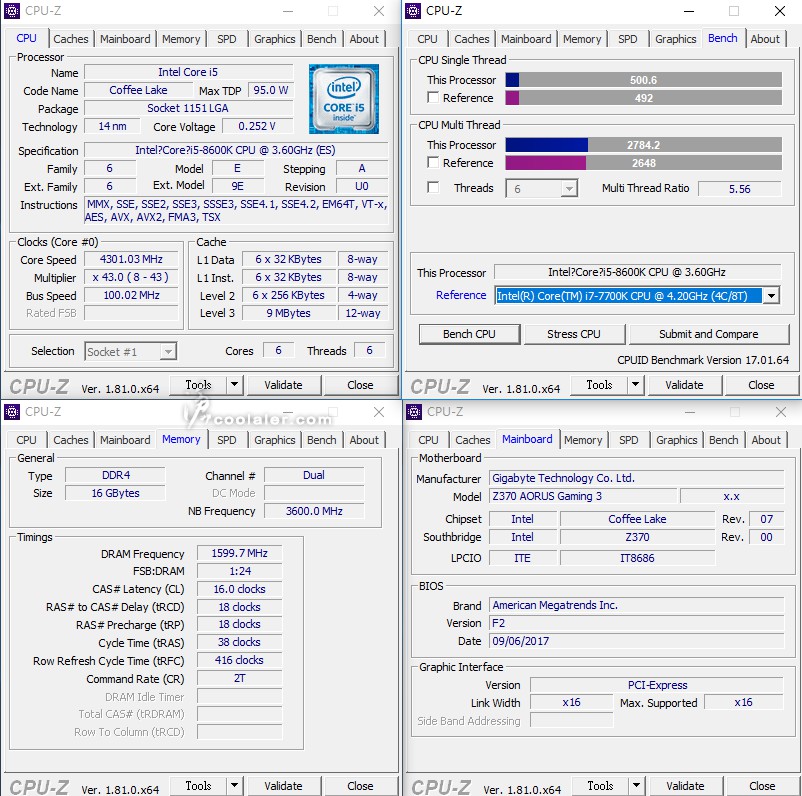
CPU-Z
CPU Single:500.6
CPU Multi:2784.2
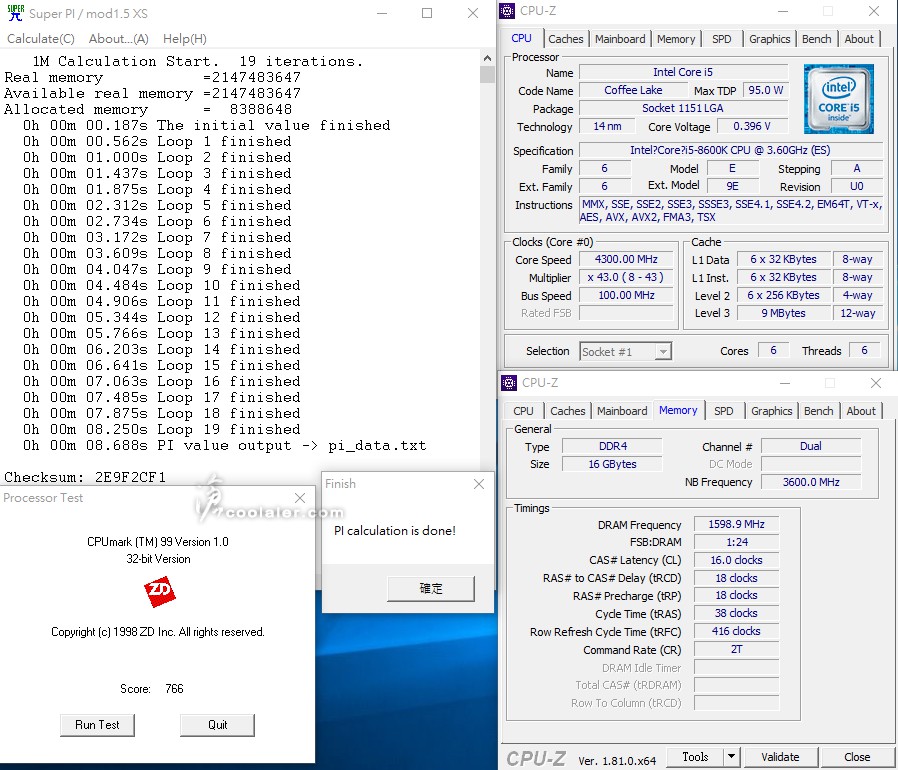
SuperPI 1M :8.688s
CPUmark99:766
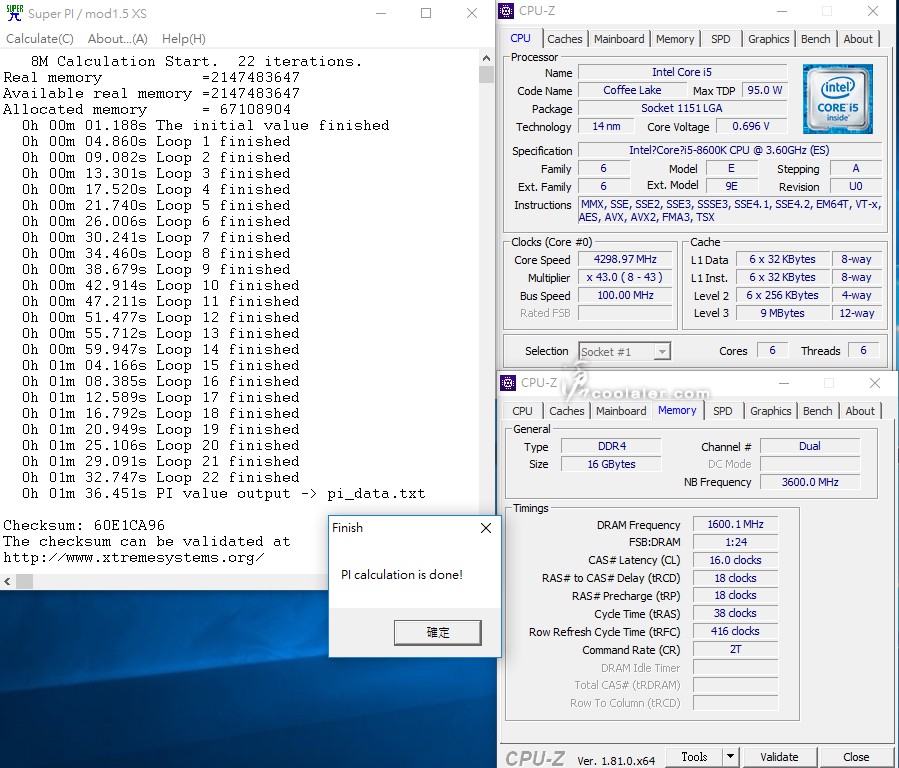
SuperPI 8M:1m36.451s
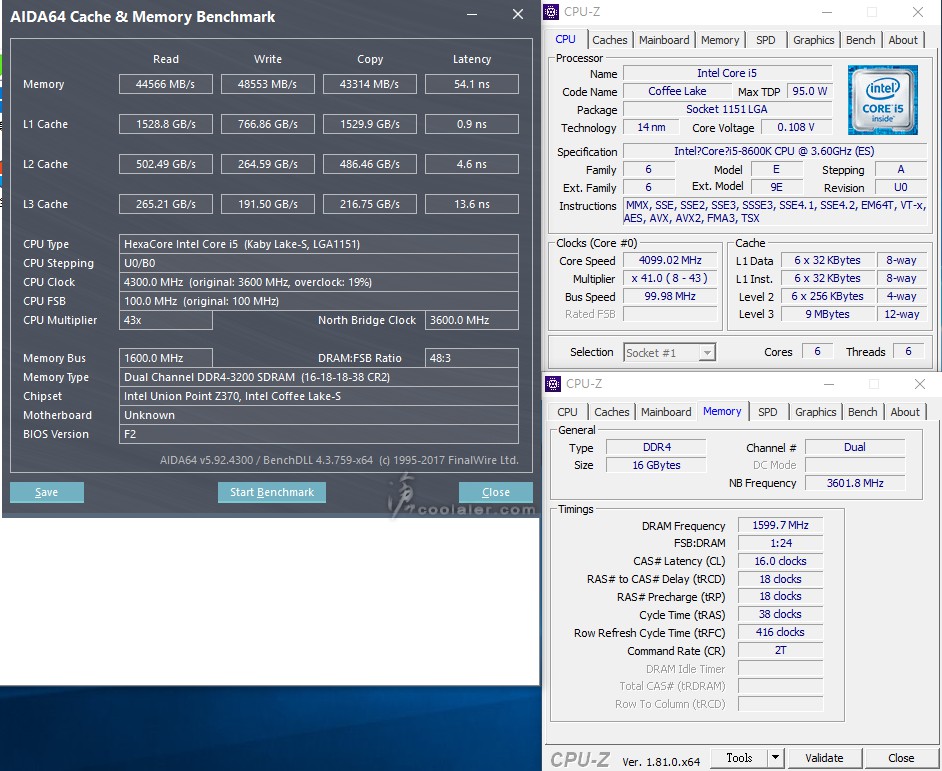
Memory Benchmark
Read:44566MB/s
Write:48553MB/s
Copy:43314MB/s
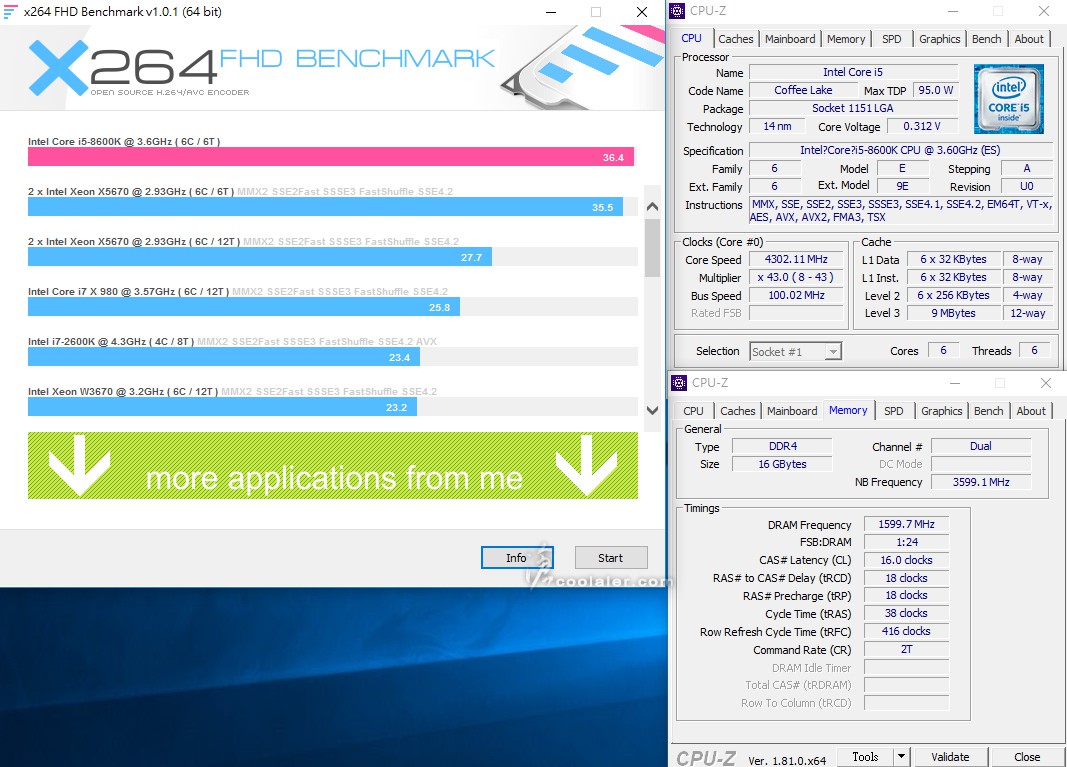
x264 FHD Benchmark:36.4
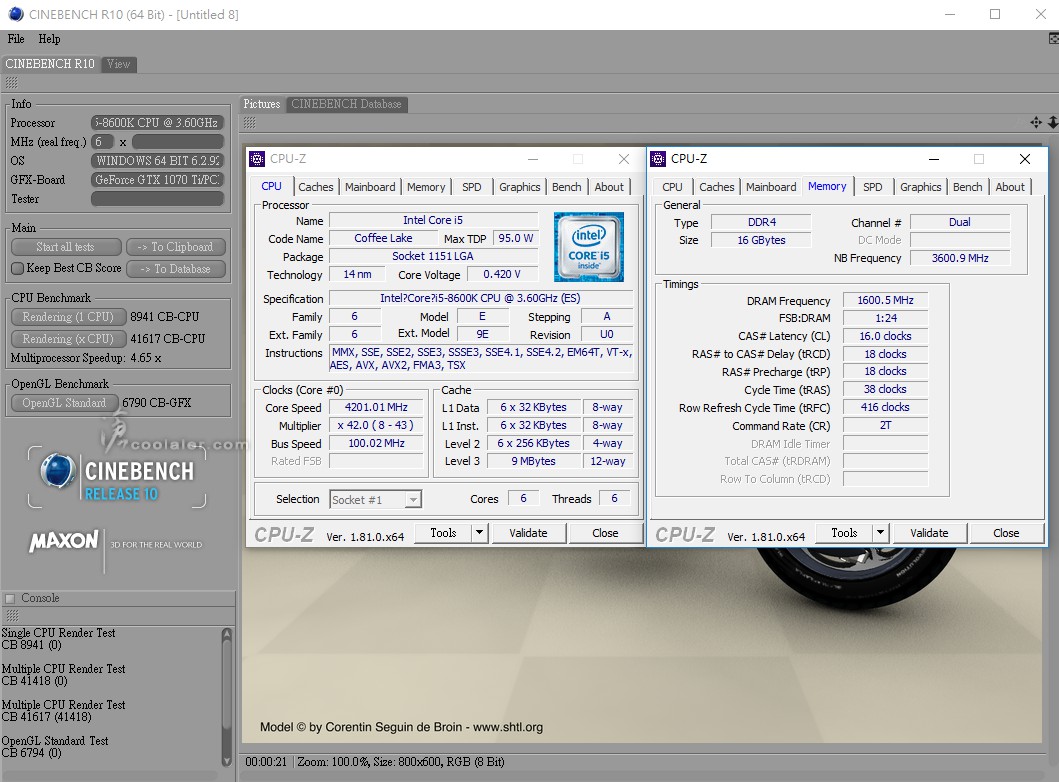
CINEBENCH R10
1 CPU:8941
x CPU:41617
OpenGL:6790
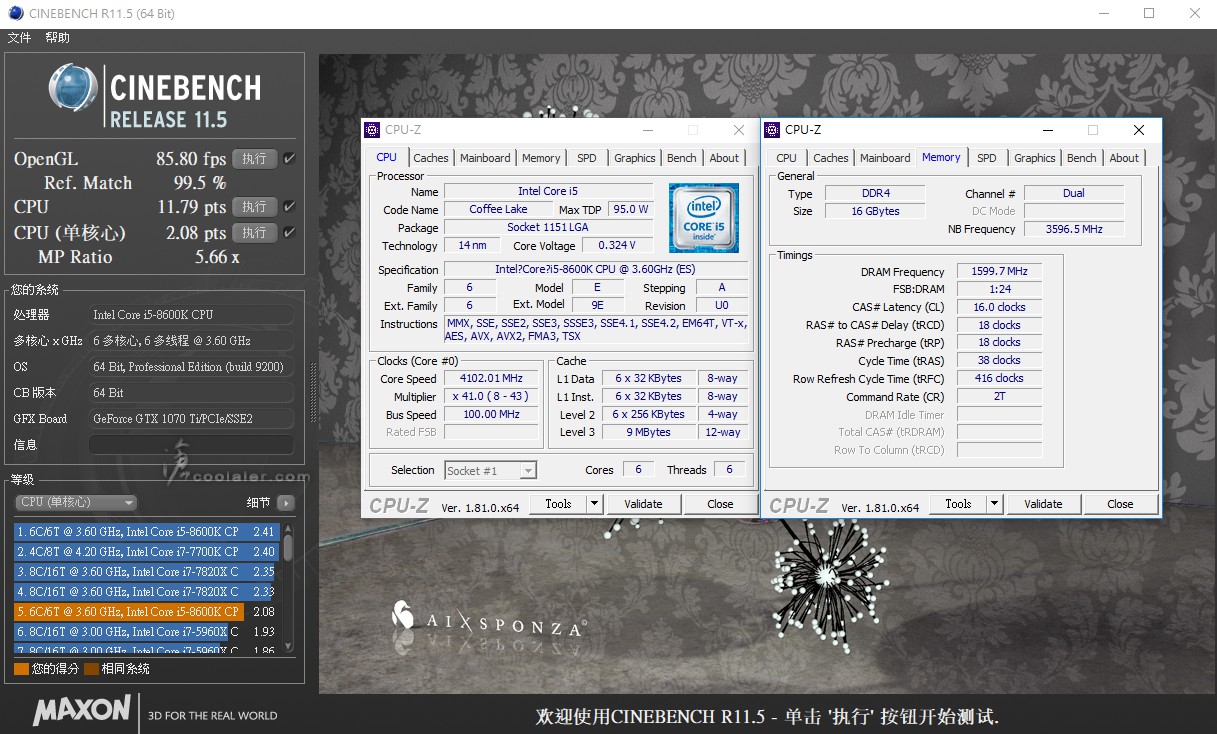
CINEBENCH R11.5
OpenGL:85.80 fps
CPU:11.79 pts
CPU(單核心):2.08 pts
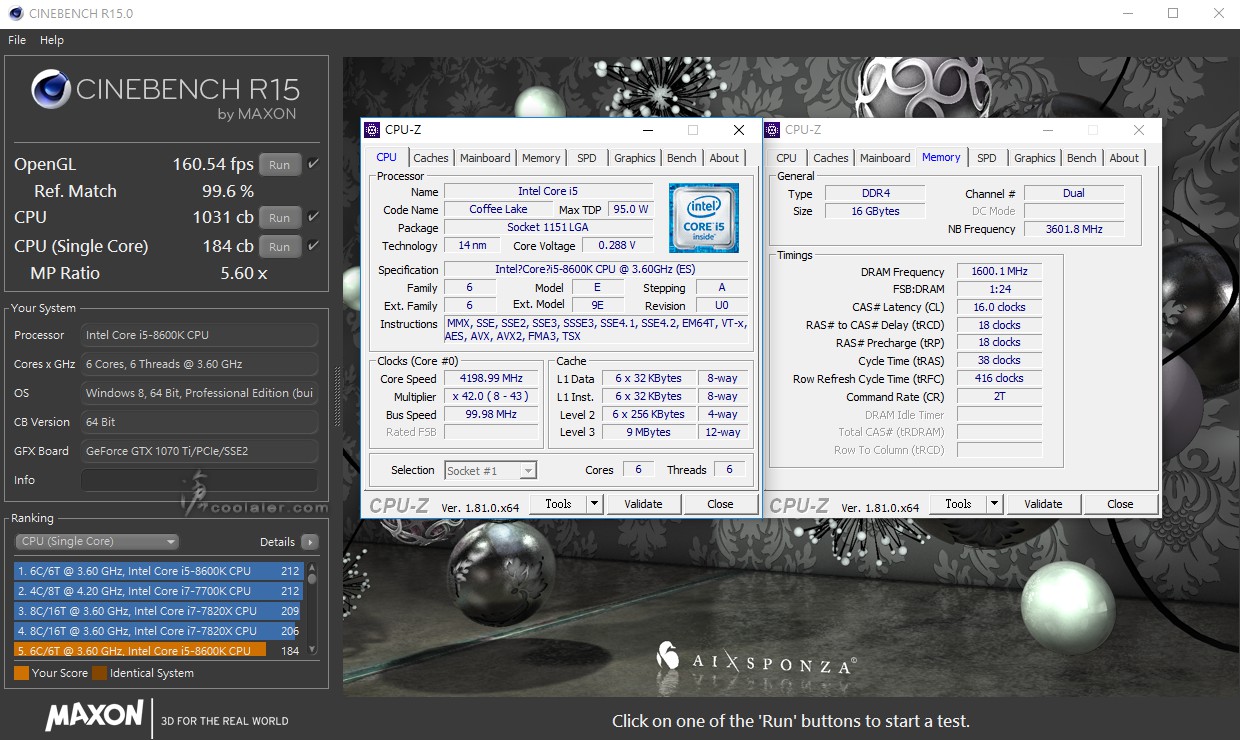
CINEBENCH R15
OpenGL:160.54 fps
CPU:1031 cb
CPU(單核心):184 cb
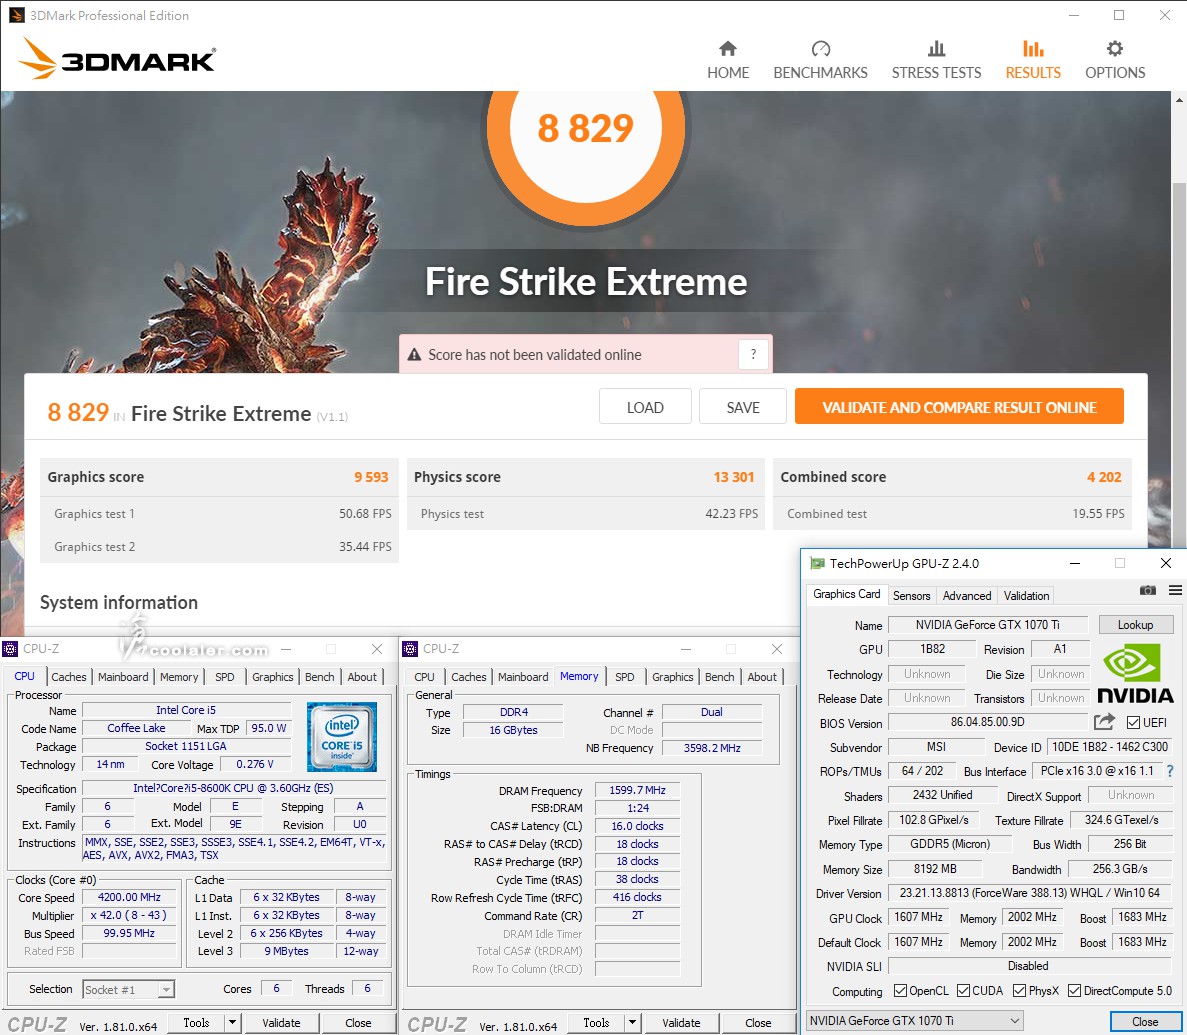
3DMark Fire Strike Extreme:8829
Graphics:9593
Physics:13301
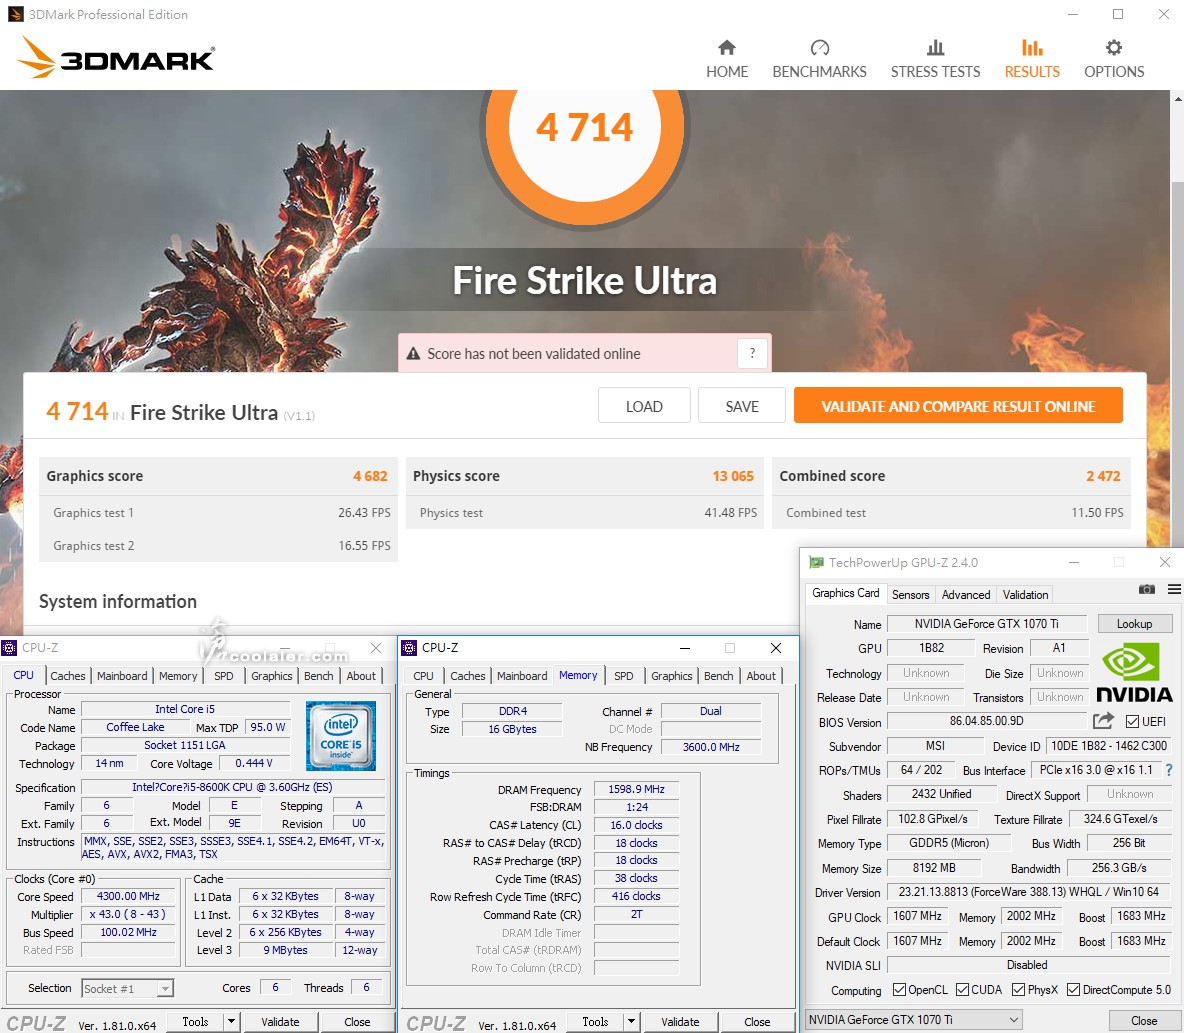
3DMark Fire Strike Ultra:4714
Graphics:4682
Physics:13065
3DMark Time Spy:6629
Graphics:6770
CPU:5931

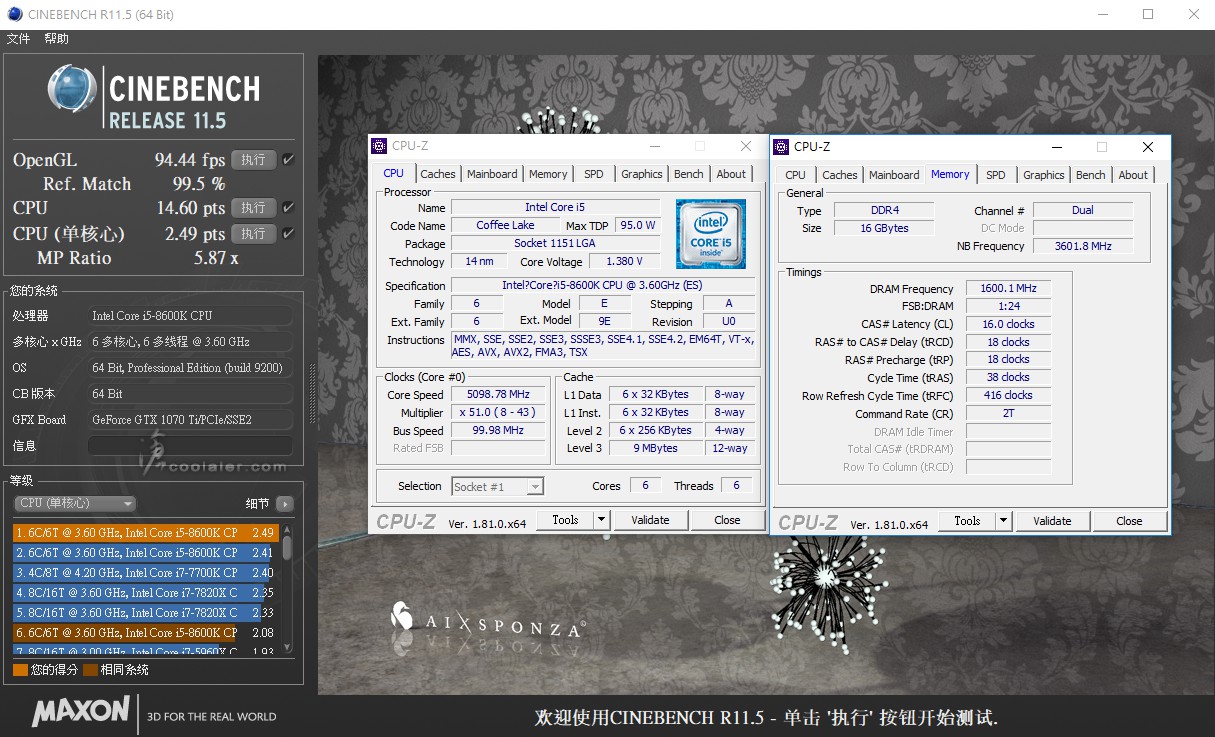
超頻5.1GHz測試
之前那顆 Core i5-8600K 可以上到5.2GHz沒問題,不過最近入手這顆並不行,在這張主機板上大約抓了一下,超頻至 5.1GHz 電壓設1.38V可以穩定過測各項目。括弧後面為預設值成績。
CPU-Z
CPU Single:615.6(500.6)+23%
CPU Multi:3288.0(2784.2)+18.1%

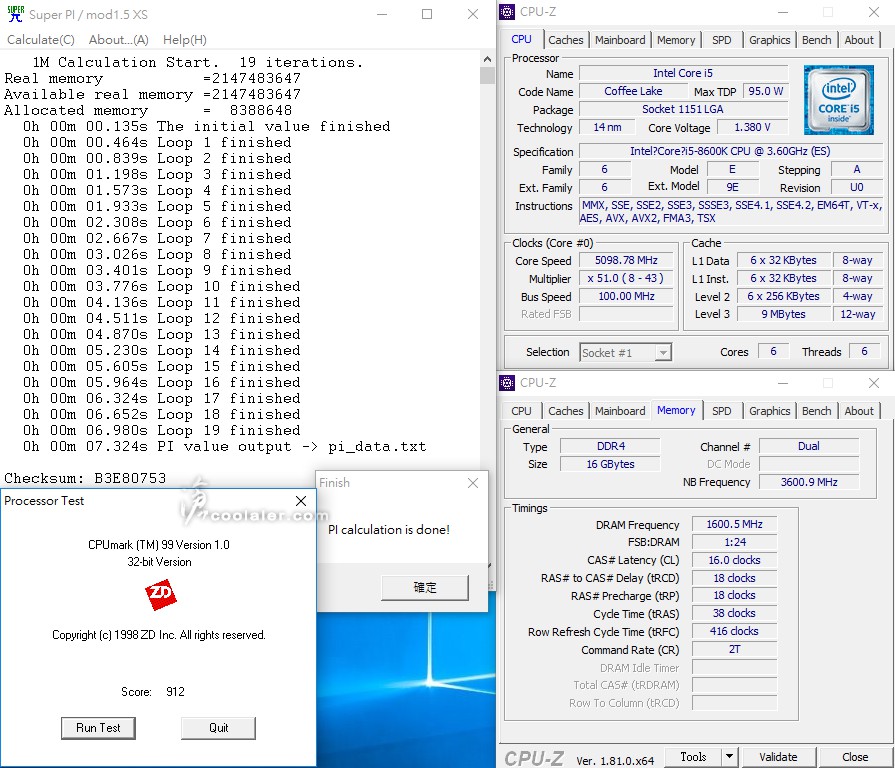
SuperPI 1M :7.324s(8.688s)+15.7%
CPUmark99:912(766)+19.1%
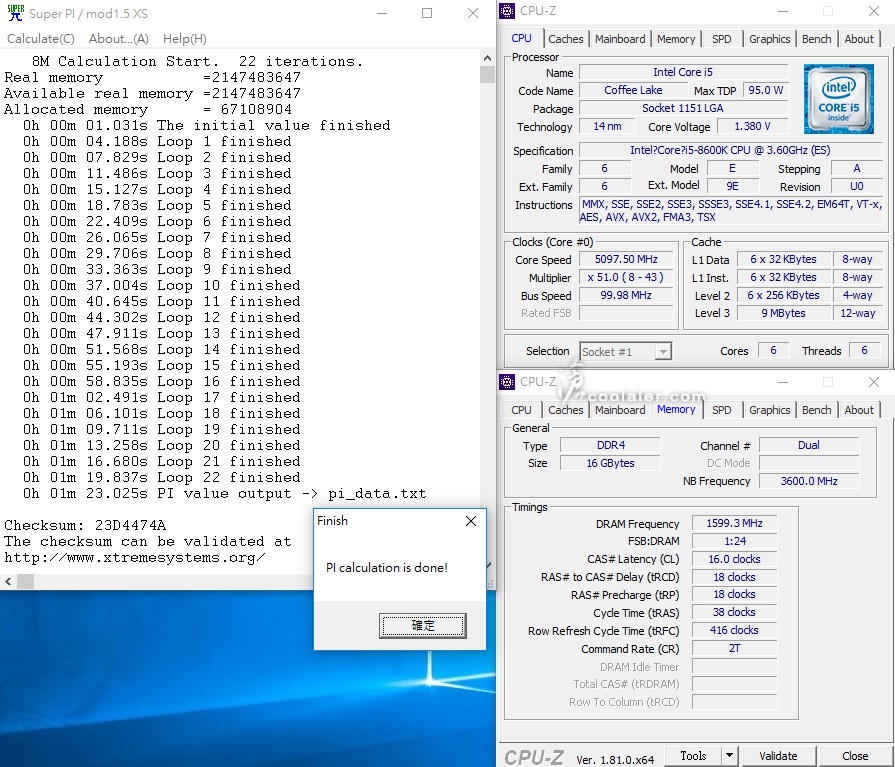
SuperPI 8M:1m23.025s(1m36.451s)+13.9%
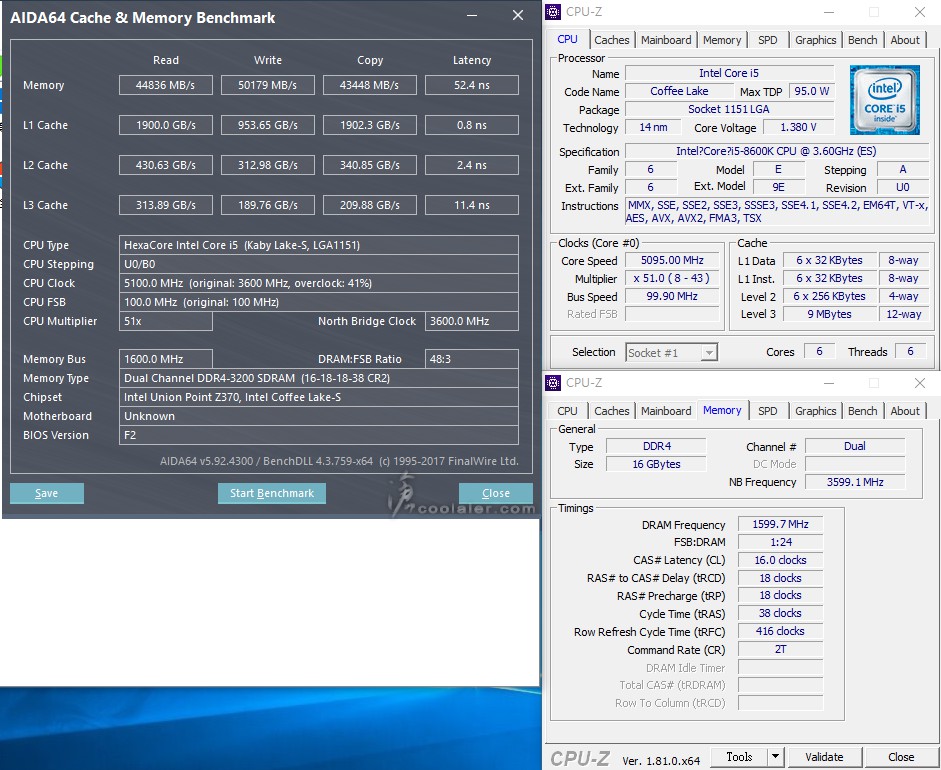
Memory Benchmark
Read:44836(44566MB/s)
Write:50179(48553MB/s)
Copy:43448(43314MB/s)
x264 FHD Benchmark:44.3(36.4)+21.7%

CINEBENCH R10
1 CPU:10758(8941)+20.3%
x CPU:51341(41617)+23.4%
OpenGL:6800(6790)

CINEBENCH R11.5
OpenGL:94.44(85.80 fps)
CPU:14.60(11.79 pts)+23.8%
CPU 單核心:2.49(2.08 pts)+19.7%
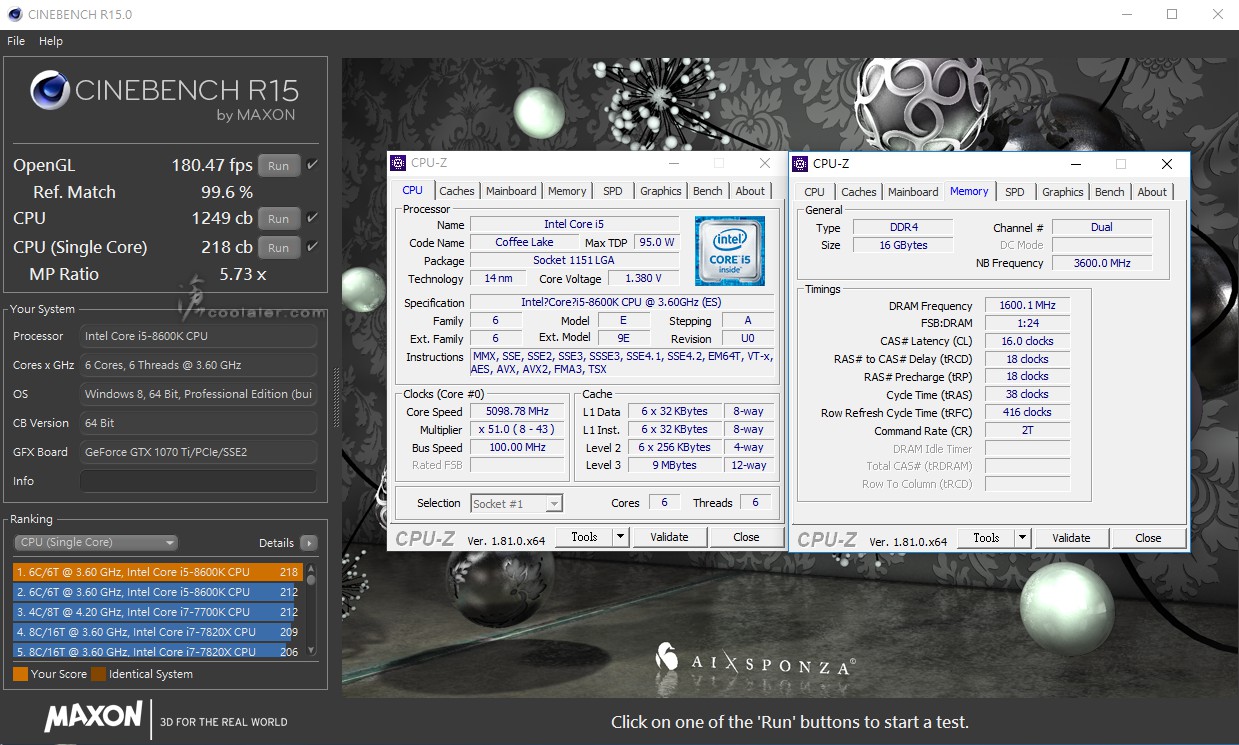
CINEBENCH R15
OpenGL:180.47(160.54 fps)
CPU:1249(1031 cb)+21.1%
CPU 單核心:218(184 cb)+18.5%
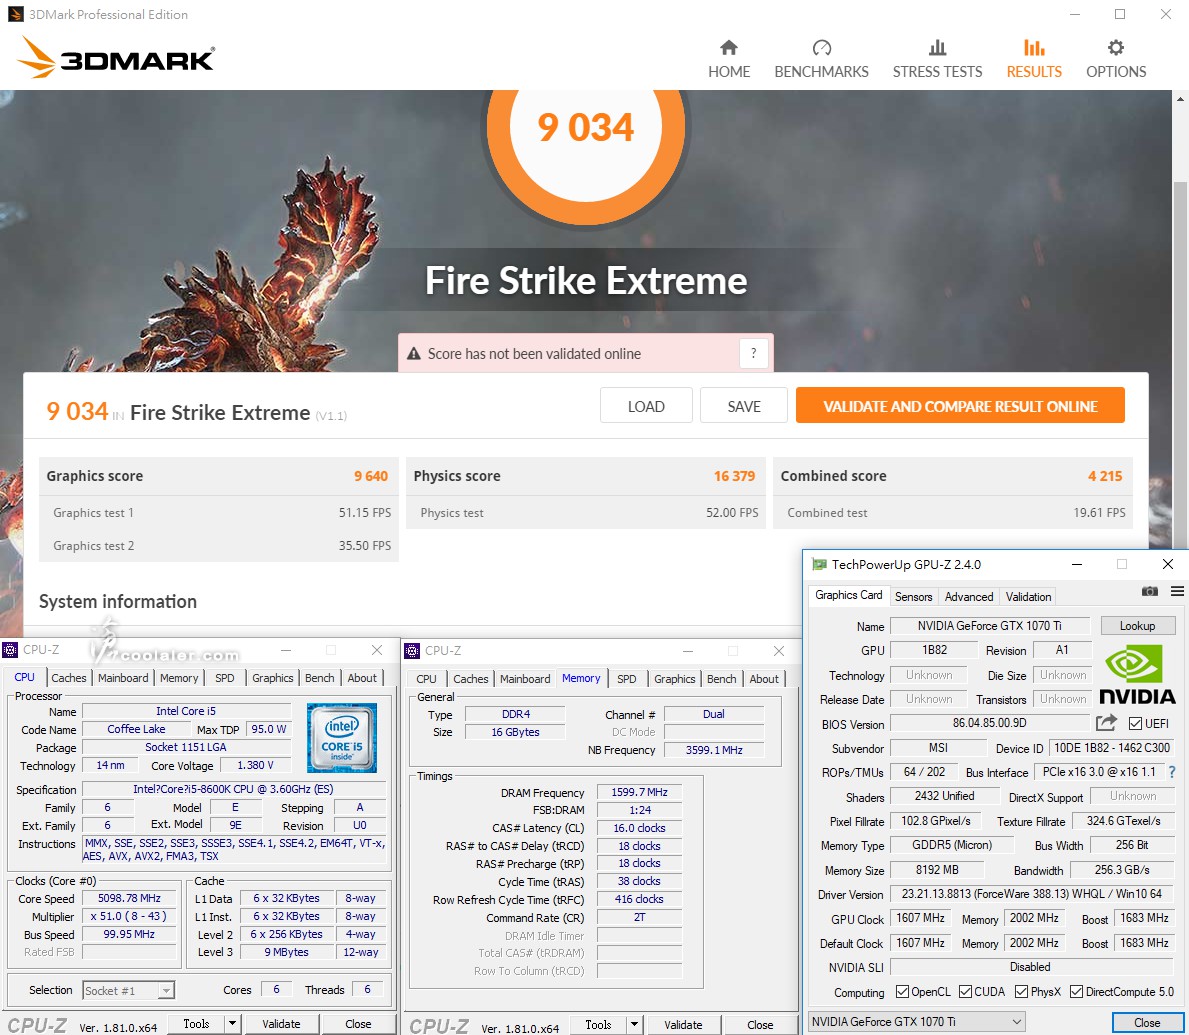
3DMark Fire Strike Extreme:9034(8829)
Graphics:9640(9593)
Physics:16379(13301)+23.1%
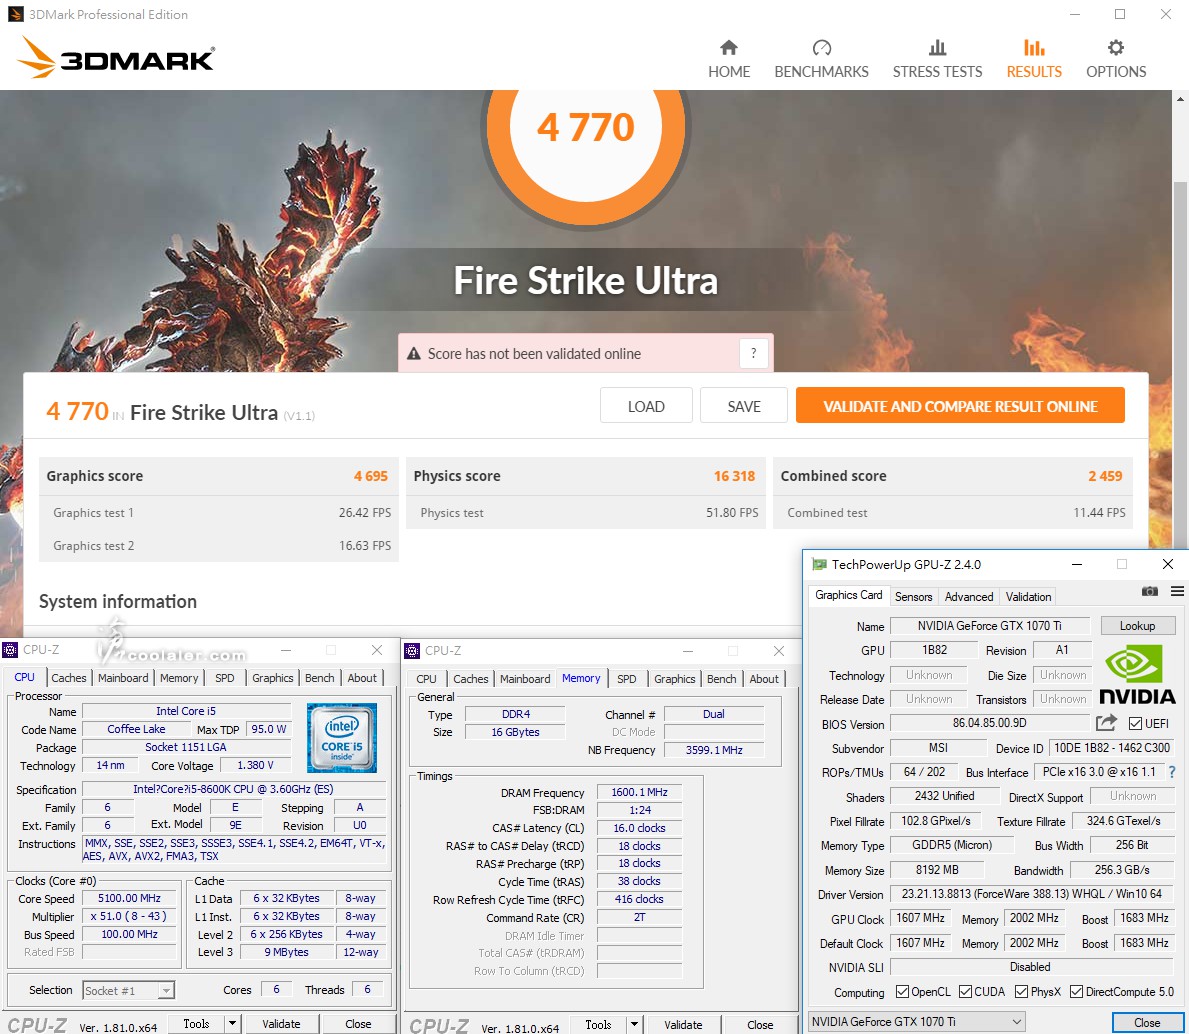
3DMark Fire Strike Ultra:4770(4714)
Graphics:4695(4682)
Physics:16318(13065)+24.9%
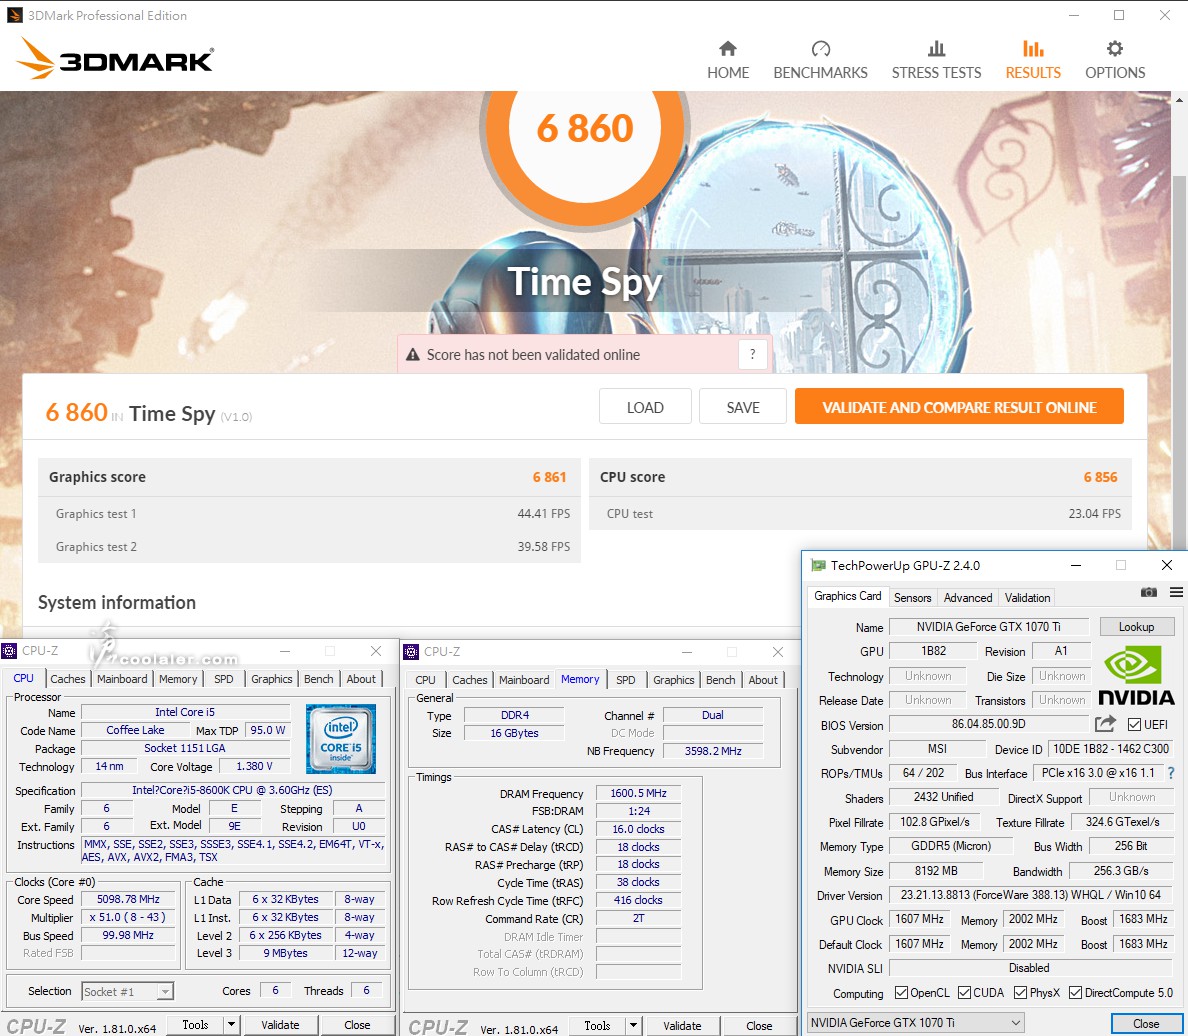
3DMark Time Spy:6860(6629)
Graphics:6861(6770)
CPU:6856(5931)+15.6%
小結
目前要搭配 Intel 第八代處理器就只有 Z370 系列晶片可以選擇,GIGABYTE Z370 的價位大約在3600~10000元, Z370 AORUS Gaming 3 趨於中間5990元,如果不追求華麗燈效或特殊需求,如雙網、3個PCI-E x16以上、較多的供電相等等,那這張應該是很夠用的,另外在超頻的部分BIOS有內建快速超頻,對於新手或是不想要手動調整超頻的玩家來說是相當便利,進到BIOS內點選CPU型號以及欲設定的時脈儲存離開就可以輕鬆提升效能,當然手動超頻也沒甚麼問題,有完整的選項可以做調整,也能夠符合高階的超頻玩家。
最近 GIGABYTE 有一些促銷活動,購買 Z370 AORUS 系列可以獲得 800元 Steam Code 遊戲折價券以及兩張「正義聯盟」的電影票,如果近期有意入手的玩家記得上網登錄索取,活動以官網連結為主(如下)。
https://tw.aorus.com/event-detail.php?i=331
https://event-mb.gigabyte.tw/activity.php?i=28
GIGABYTE Z370 AORUS Gaming 3
外盒背面有一些規格特色介紹,雖然燈效比較少,但仍支援數位LED燈條,可使用RGB Fusion軟體控制一些燈效,網路的部分也搭載了 Killer E2500,音效則是 ALC1220 120db訊噪比晶片,另外有2個M.2、ASMedia 3142 USB 3.1 晶片、OC Button、高品質音效電容、PCI-E 護甲、DualBIOS等。
配件有說明書、軟體光碟、檔板、G Connector IO連接座、貼紙、4條SATA線。
主機板採用標準 ATX 尺寸設計,PCB整體為黑色,底部可以看到有 AORUS 老鷹圖案,另外散熱片上方、擴充插槽則是有部分使用紅色來點綴。
後方IO埠上面有飾板,不過這部分沒有燈效。
供電上方則是有被動式的造型散熱片。
4根 DDR4 記憶體插槽,最高可以擴充到64GB,時脈則是可以支援到 DDR4 4000(OC)。
6個SATA,支援RAID 0、RAID 1、RAID 5及RAID 10。
晶片組上方的散熱片質感還不錯,上面有部分髮絲紋處理,AORUS 的老鷹標誌則是有LED燈效。
擴充卡槽,4個PCI-E x1、2個PCI-E x16。
PCI-E x16上面有金屬護甲。
擴充槽旁有2個M.2擴充槽。
音效的部分有隔離區域設計,採用 Realtek ALC1220 晶片搭配音效電容。
後面IO埠有PS/2鍵盤滑鼠接口、4個USB 3.1 Gen1、OC鍵、HDMI、1個USB 3.1 Gen 2 Type A、1個Type C、2個USB2.0、1個RJ45、6個音源輸出入。
開機後晶片組與音效側有燈效。
BIOS簡介
測試前先來看看 BIOS,目前 GIGABYTE 的主機板介面與風格是大同小異。
進階頻率設定選項,這邊就是用來調整超頻,可調倍頻、外頻、快速超頻、XMP等快速設定。
CPU快速超頻,選擇你的處理器以及想要的時脈即可完成超頻,相當方便。
CPU進階設定。
記憶體設定調整。
相當完整的電壓選項。
CPU 電壓設定選項。
記憶體電壓選項。
Smart Fan 5,溫度與風扇轉速關係設定。
也有 Easy Mode 簡易BIOS模式。
測試平台
CPU: Intel Core i5-8600K
CPU Cooler: Tt Water 3.0 Extreme
RAM: GSKILL DDR4 3200 8GBx2
MB: GIGABYTE Z370 AORUS Gaming 3
VGA: MSI GTX 1070 Ti TITANIUM
HDD: OCZ Vertex 3.20 240GB、Seagate 2TB
PSU: IN WIN SI 1050W
OS: Windows 10 64bit
這次測試這顆 Core i5-8600K 並不是上次那顆,但一樣是ES,不過似乎體質比較差一些,後面會有超頻測試。
預設值測試
CPU-Z
CPU Single:500.6
CPU Multi:2784.2
SuperPI 1M :8.688s
CPUmark99:766
SuperPI 8M:1m36.451s
Memory Benchmark
Read:44566MB/s
Write:48553MB/s
Copy:43314MB/s
x264 FHD Benchmark:36.4
CINEBENCH R10
1 CPU:8941
x CPU:41617
OpenGL:6790
CINEBENCH R11.5
OpenGL:85.80 fps
CPU:11.79 pts
CPU(單核心):2.08 pts
CINEBENCH R15
OpenGL:160.54 fps
CPU:1031 cb
CPU(單核心):184 cb
3DMark Fire Strike Extreme:8829
Graphics:9593
Physics:13301
3DMark Fire Strike Ultra:4714
Graphics:4682
Physics:13065
3DMark Time Spy:6629
Graphics:6770
CPU:5931
超頻5.1GHz測試
之前那顆 Core i5-8600K 可以上到5.2GHz沒問題,不過最近入手這顆並不行,在這張主機板上大約抓了一下,超頻至 5.1GHz 電壓設1.38V可以穩定過測各項目。括弧後面為預設值成績。
CPU-Z
CPU Single:615.6(500.6)+23%
CPU Multi:3288.0(2784.2)+18.1%
SuperPI 1M :7.324s(8.688s)+15.7%
CPUmark99:912(766)+19.1%
SuperPI 8M:1m23.025s(1m36.451s)+13.9%
Memory Benchmark
Read:44836(44566MB/s)
Write:50179(48553MB/s)
Copy:43448(43314MB/s)
x264 FHD Benchmark:44.3(36.4)+21.7%
CINEBENCH R10
1 CPU:10758(8941)+20.3%
x CPU:51341(41617)+23.4%
OpenGL:6800(6790)
CINEBENCH R11.5
OpenGL:94.44(85.80 fps)
CPU:14.60(11.79 pts)+23.8%
CPU 單核心:2.49(2.08 pts)+19.7%
CINEBENCH R15
OpenGL:180.47(160.54 fps)
CPU:1249(1031 cb)+21.1%
CPU 單核心:218(184 cb)+18.5%
3DMark Fire Strike Extreme:9034(8829)
Graphics:9640(9593)
Physics:16379(13301)+23.1%
3DMark Fire Strike Ultra:4770(4714)
Graphics:4695(4682)
Physics:16318(13065)+24.9%
3DMark Time Spy:6860(6629)
Graphics:6861(6770)
CPU:6856(5931)+15.6%
小結
目前要搭配 Intel 第八代處理器就只有 Z370 系列晶片可以選擇,GIGABYTE Z370 的價位大約在3600~10000元, Z370 AORUS Gaming 3 趨於中間5990元,如果不追求華麗燈效或特殊需求,如雙網、3個PCI-E x16以上、較多的供電相等等,那這張應該是很夠用的,另外在超頻的部分BIOS有內建快速超頻,對於新手或是不想要手動調整超頻的玩家來說是相當便利,進到BIOS內點選CPU型號以及欲設定的時脈儲存離開就可以輕鬆提升效能,當然手動超頻也沒甚麼問題,有完整的選項可以做調整,也能夠符合高階的超頻玩家。
最近 GIGABYTE 有一些促銷活動,購買 Z370 AORUS 系列可以獲得 800元 Steam Code 遊戲折價券以及兩張「正義聯盟」的電影票,如果近期有意入手的玩家記得上網登錄索取,活動以官網連結為主(如下)。
https://tw.aorus.com/event-detail.php?i=331
https://event-mb.gigabyte.tw/activity.php?i=28