其實早早就入手這張 GIGABYTE X870E AORUS PRO ICE ,主要是在等這顆開賣即售罄的 AMD Ryzen 7 9800X3D 一起搭配測試,不過效能大家都知道,也不用甚麼測了吧 XD。
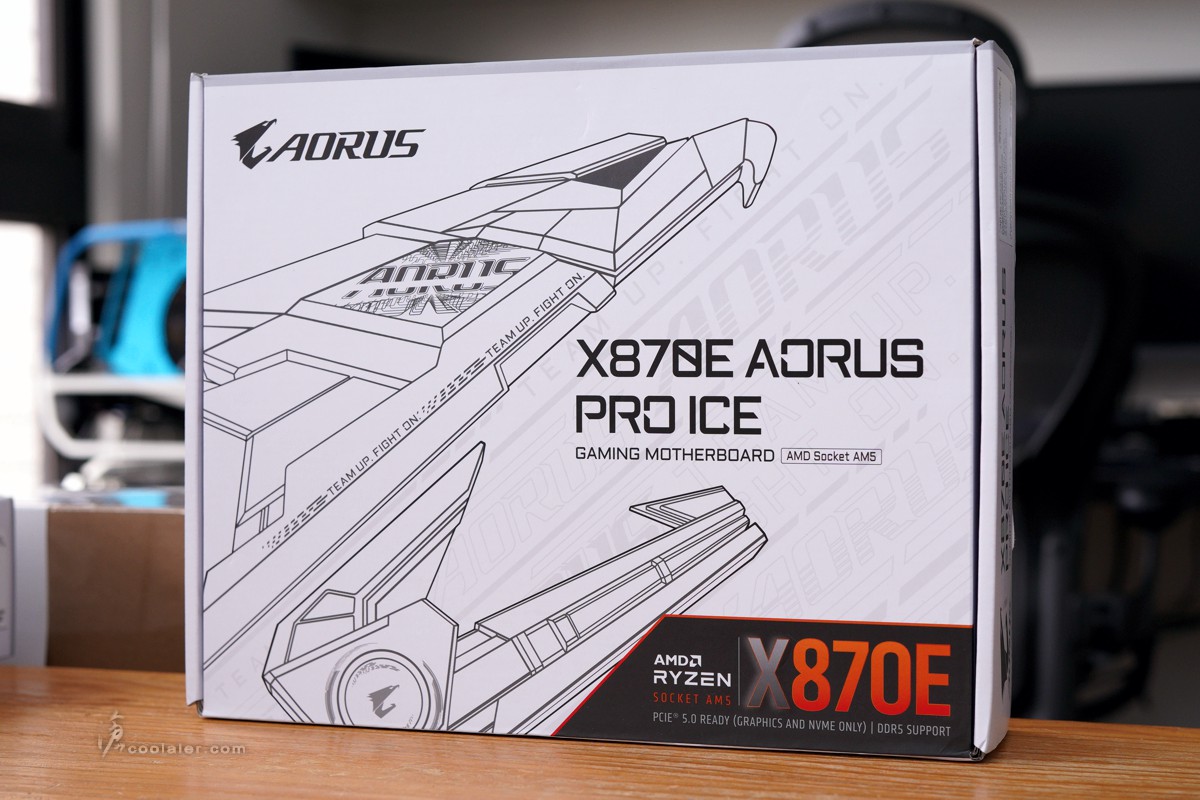
最近白化正夯?總之你想要搭配個白色主機板選擇性是越來越多了,GIGABYTE 在新的 AM5 平台 X870E 、 X870 晶片組上面目前有三款可選,X870E AORUS PRO ICE、X870 AORUS ELITE WIFI7 ICE 以及一張 mini-ITX 的 X870I AORUS PRO ICE ,一如既往都是 ICE 後綴字樣為白色代表。
此次要開箱介紹的也是白色版最高階的 X870E AORUS PRO ICE ,與 X870E AORUS PRO 其實是相同,差在黑白顏色。ICE 版也用上了白色的外盒包裝。
規格
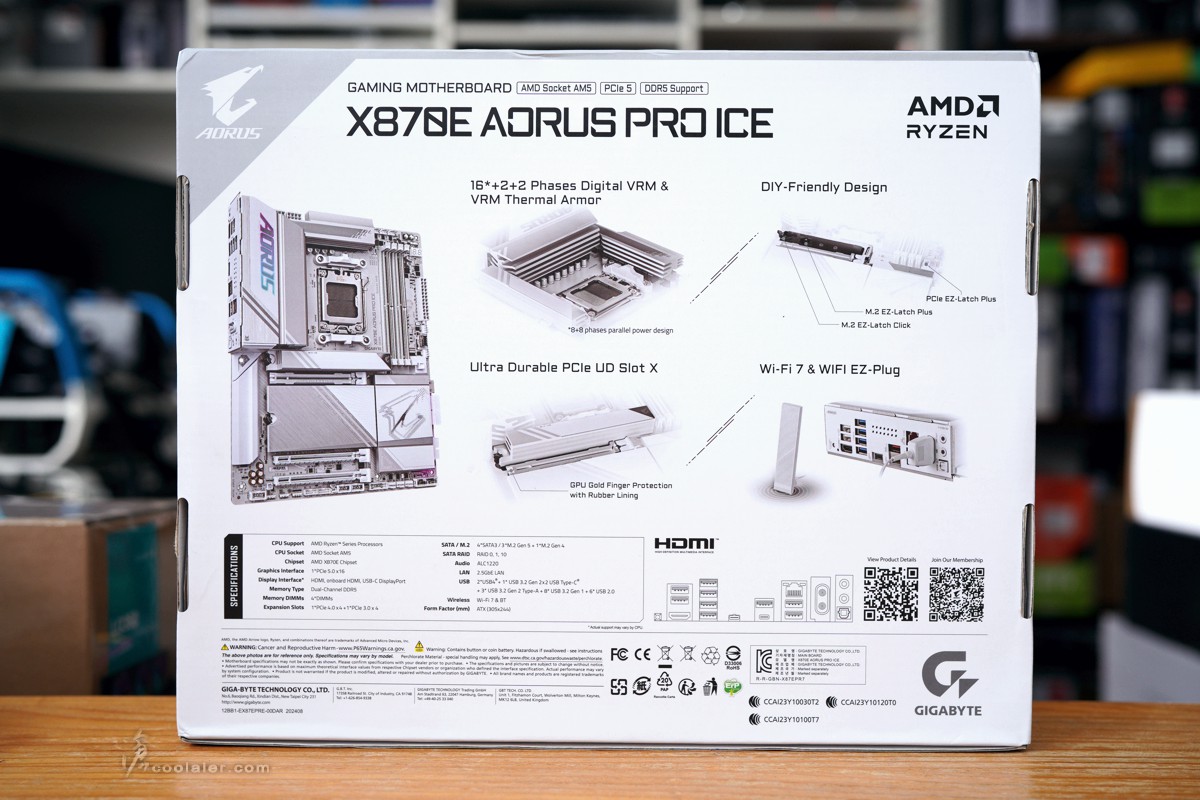
Chipset:AMD X870E
CPU Support:Ryzen 7000 / 8000 / 9000
CPU Socket:AM5
Form Factor:ATX 305 x 244mm
VRD :16+2+2
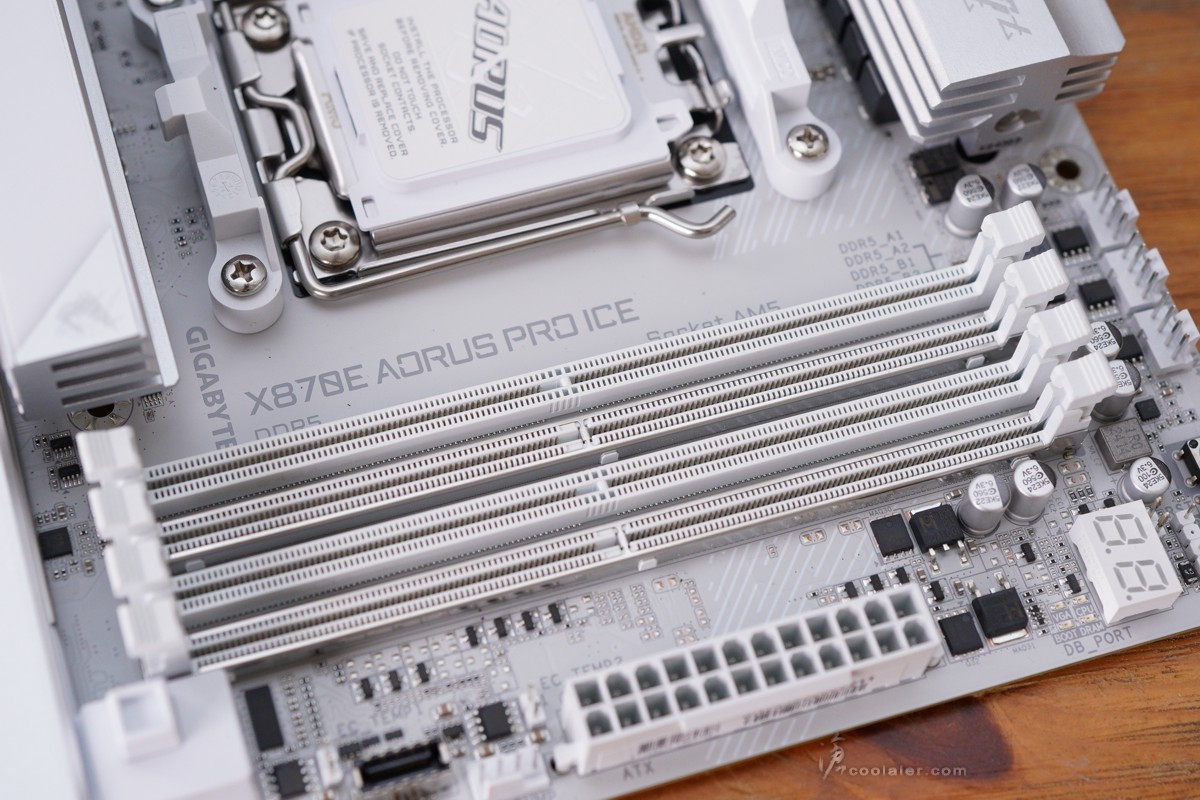
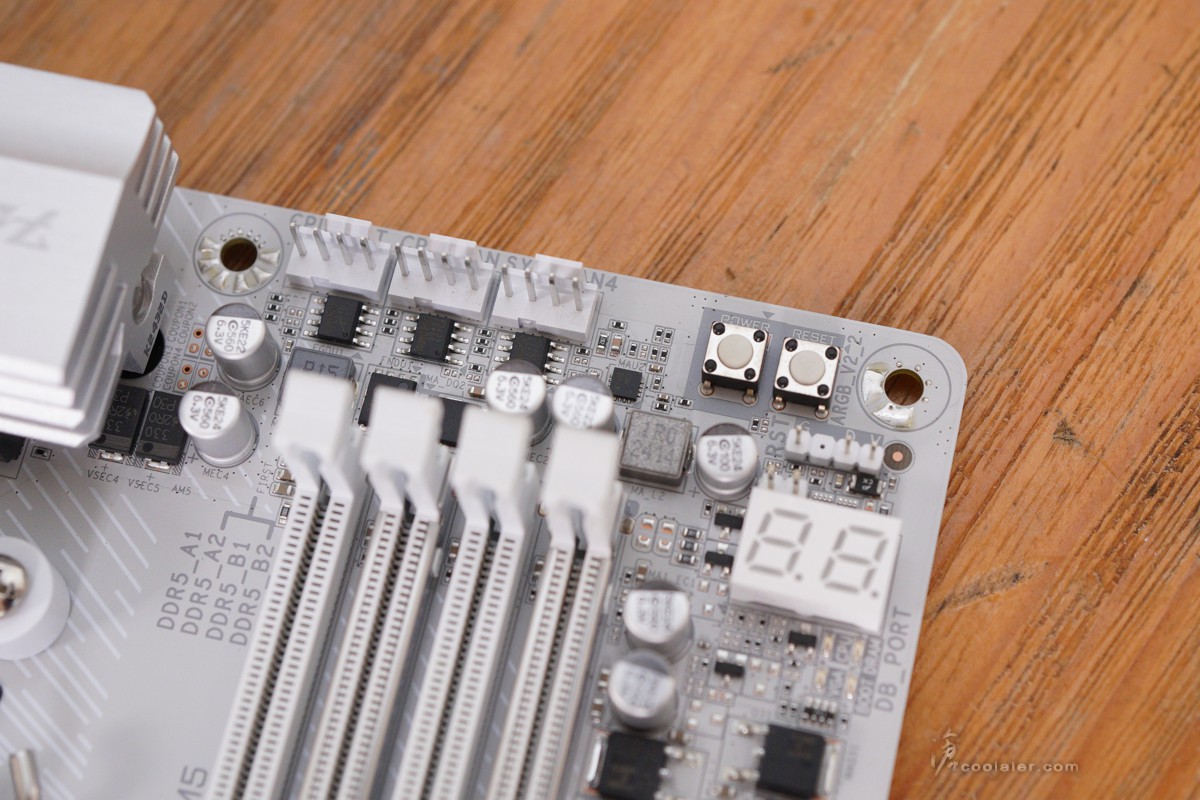
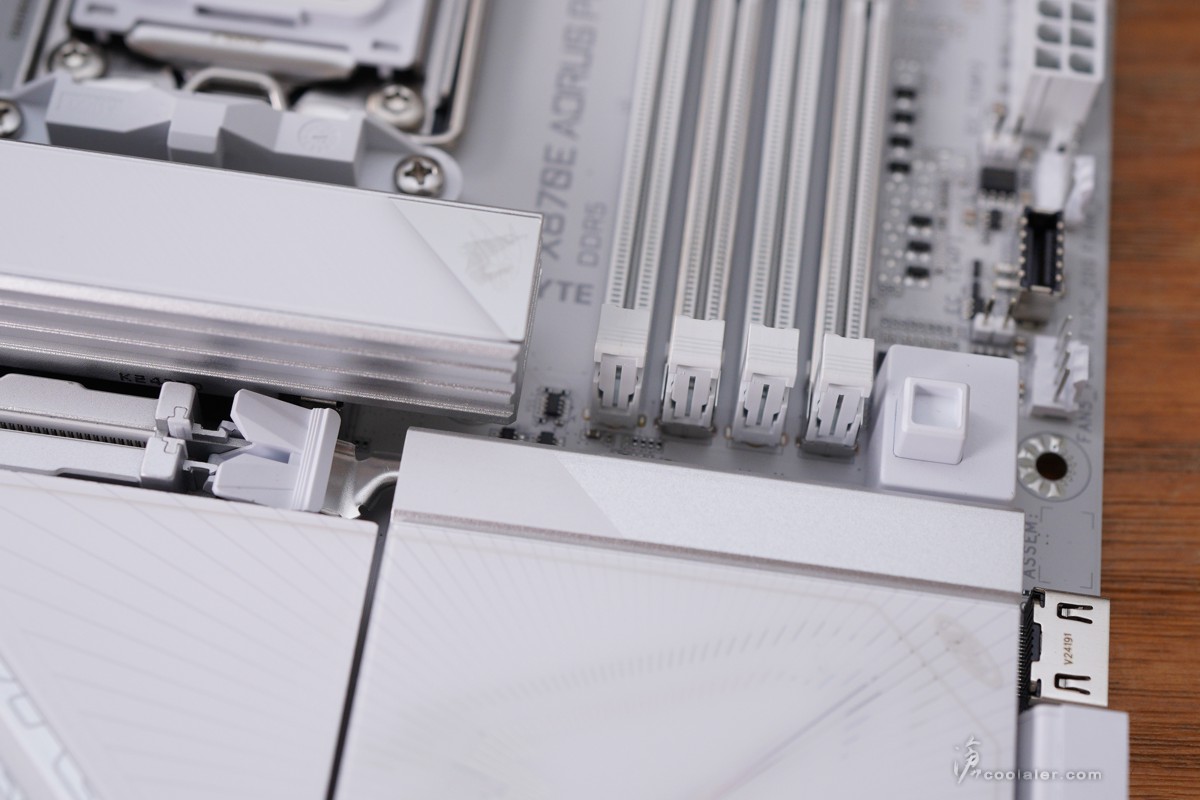
Memory:4 x DIMM DDR5
PCIe :1 x PCIe 5.0×16、1 x PCIe 4.0×4 (x16插槽)、1 x PCIe 3.0×4 (x16插槽)
M.2:3 x PCIe 5.0×4、1 x PCIe 4.0×4
SATA:4 x SATAIII
Display Interface:2 x HDMI(1前置)、2 xUSB Type-C
USB:2 x USB-C 4 、1 x USB-C 3.2 Gen2x2、3 x USB 3.2 Gen2、8 x USB 3.2 Gen1、6 x USB 2.0
Audio:Realtek ALC1220
LAN:Realtek 2.5GbE
Wireless / Bluetooth:Qualcomm Wi-Fi 7 QCNCM865 + BT 5.3
採用 16+2+2 相數位供電設計並加強散熱、有 DIY 友善設計、強化的 PCIe UD Slot X 插槽、Wi-Fi 7 無線網路以及 EZ-Plug 天線接頭設計。基本上的這些新加入元素都與同期 Z890 高階產品是相同的。
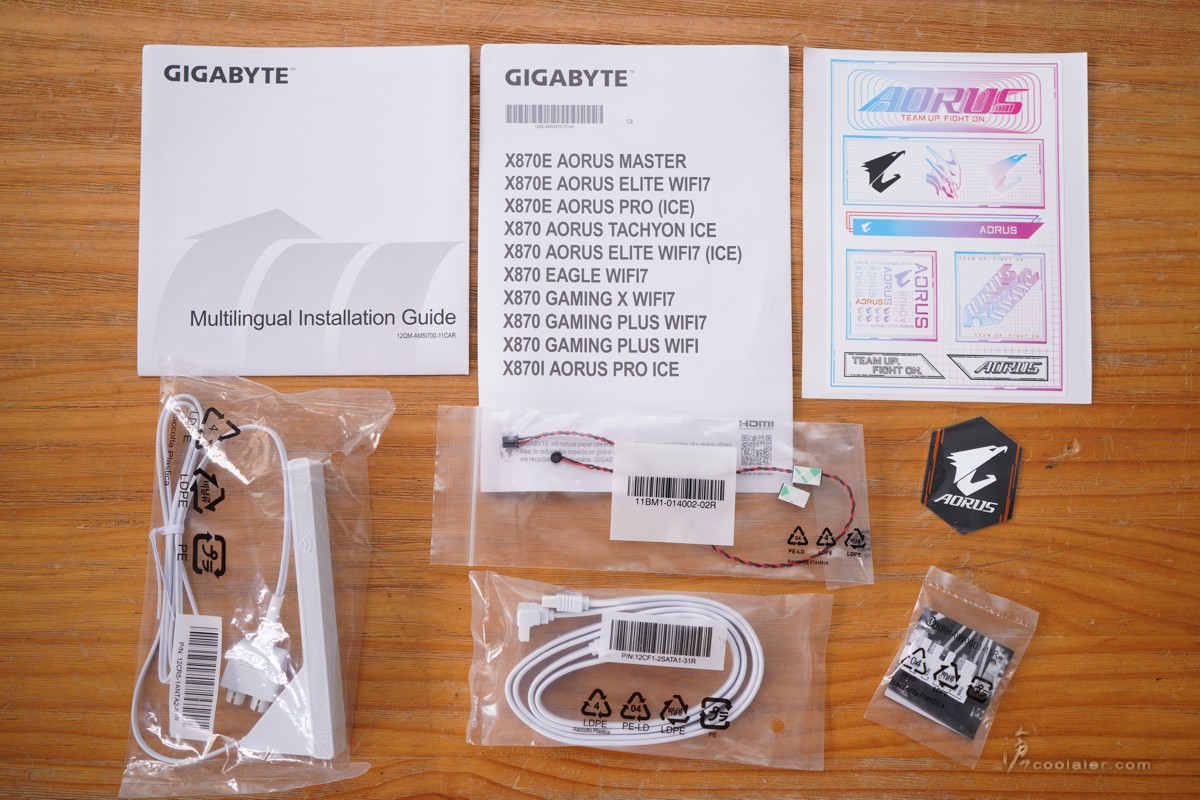
配件有說明書、帶有 EZ-Plug 的無線天線座、2條 SATA、噪音偵測線、1個白色快速前置 IO 接頭、AORUS 老鷹風格貼紙、AORUS 銘板貼紙。
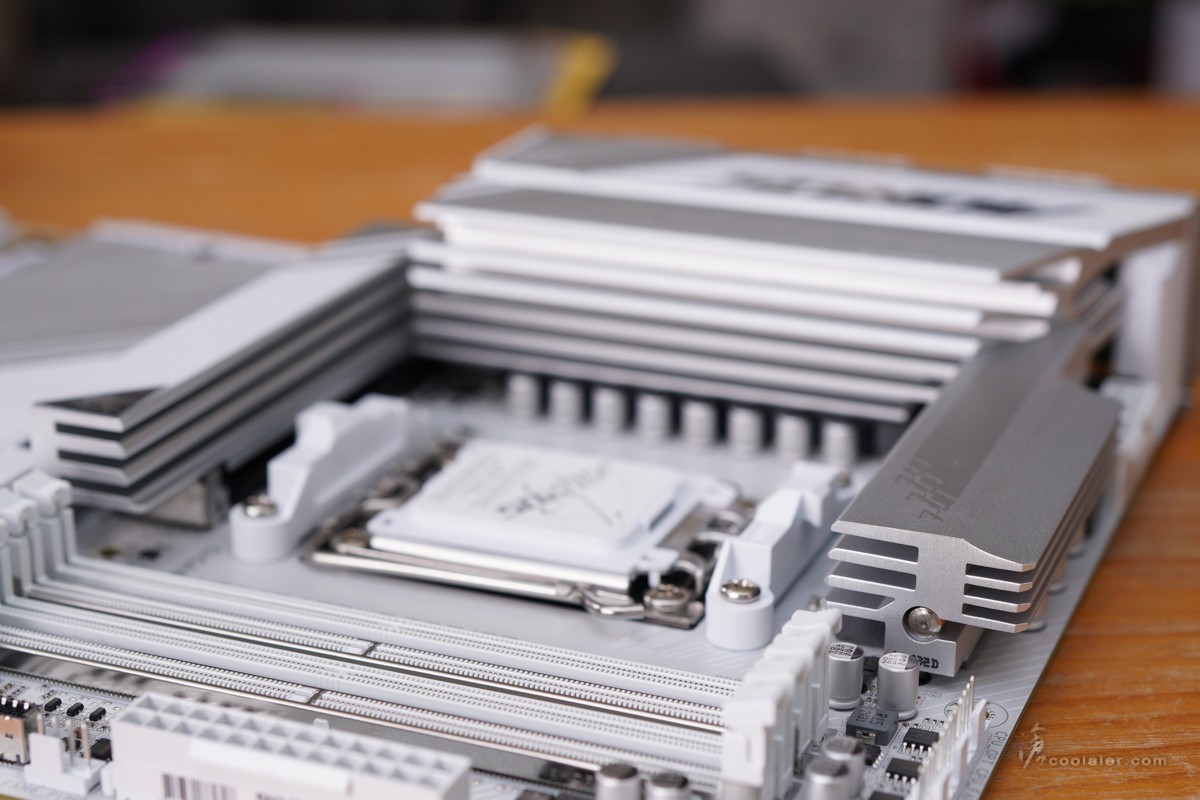
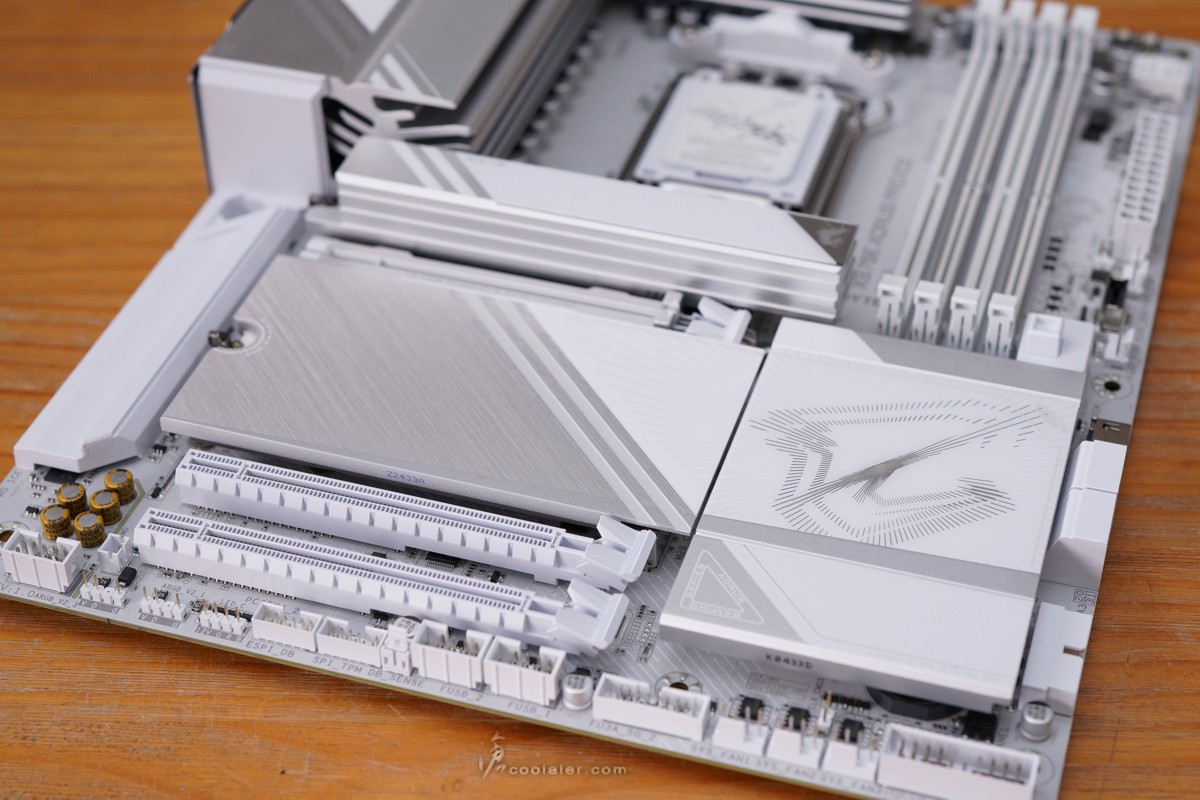
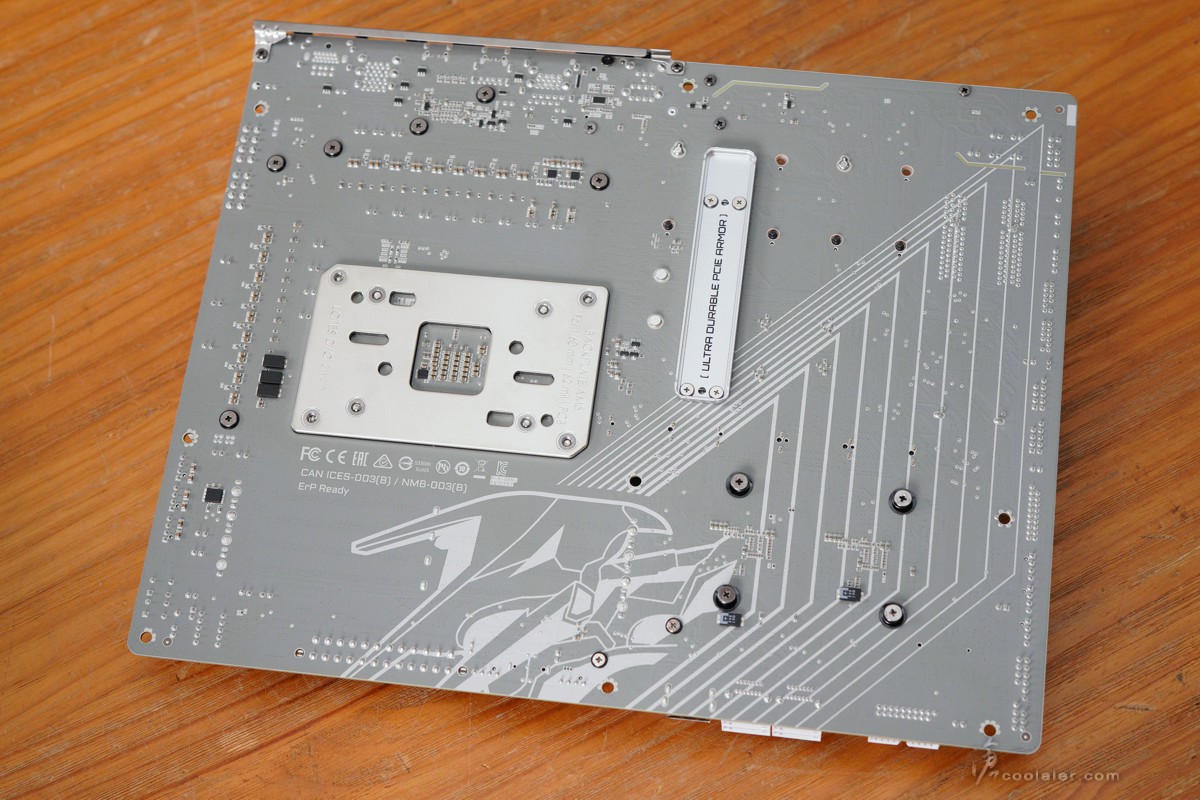
X870E AORUS PRO ICE在白化的部分是相當徹底,除了 PCB、散熱片之外,在插槽、AM5 扣具上也直接改用白色。
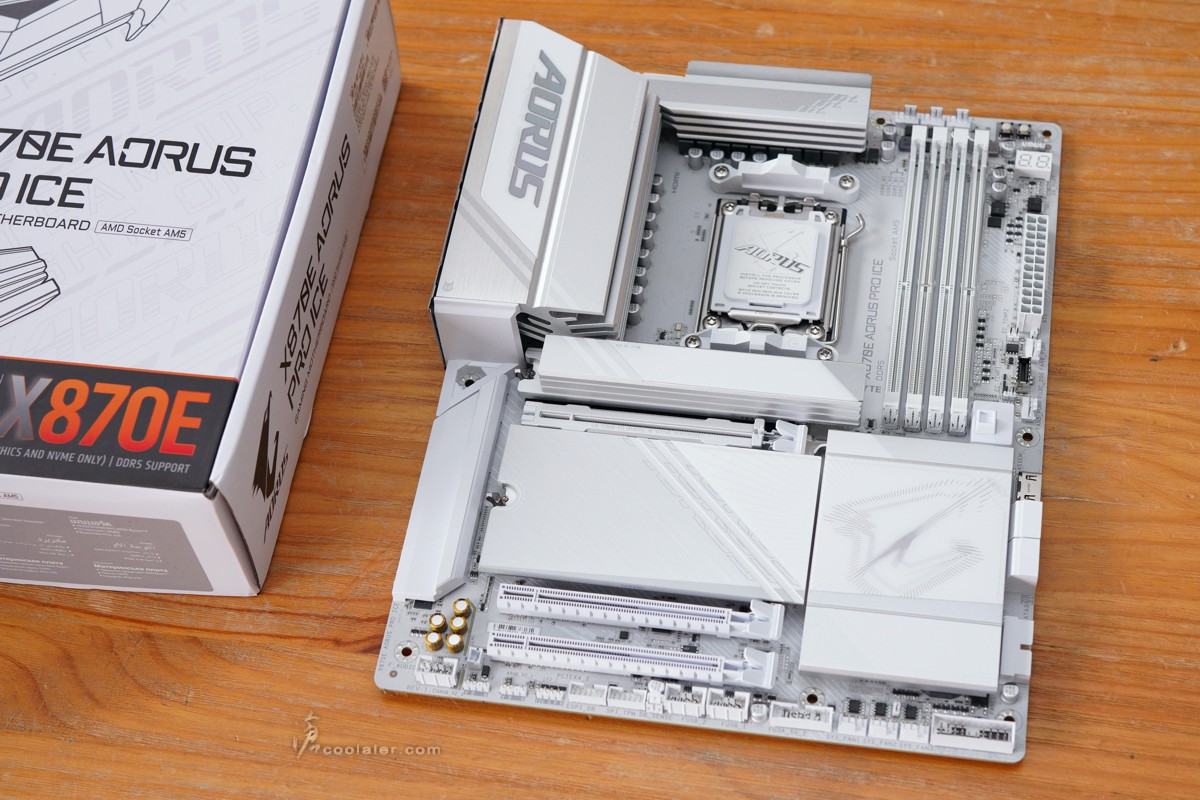
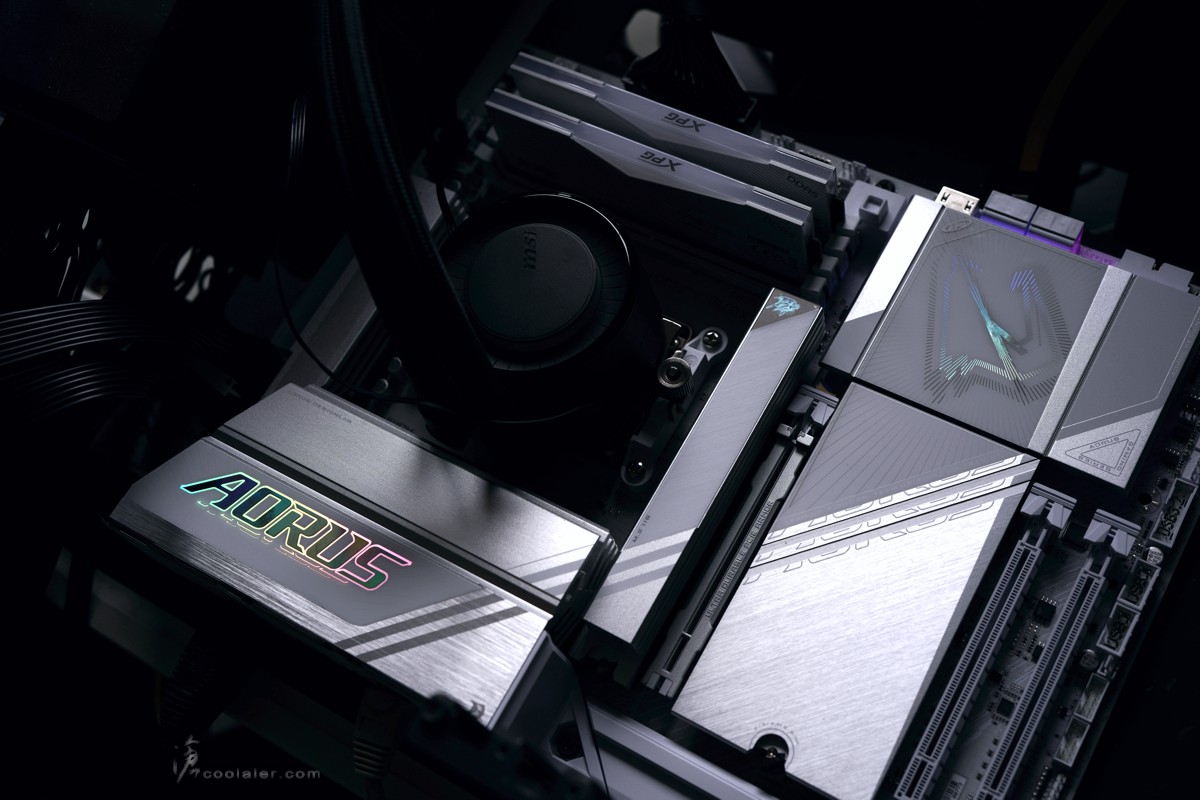
標準的 ATX 9孔尺寸,可以看到晶片組散熱片、M.2 散熱片以及供電散熱片上有刷上連貫的灰色斜紋點綴。

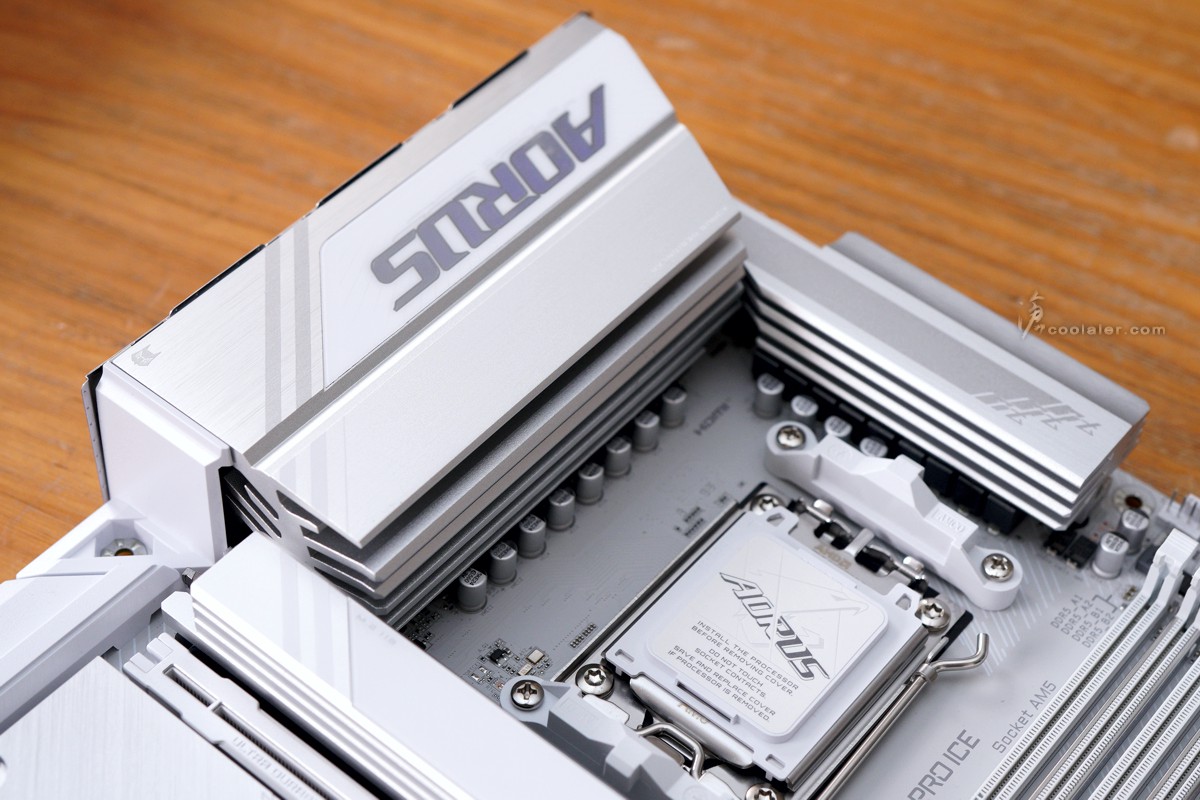
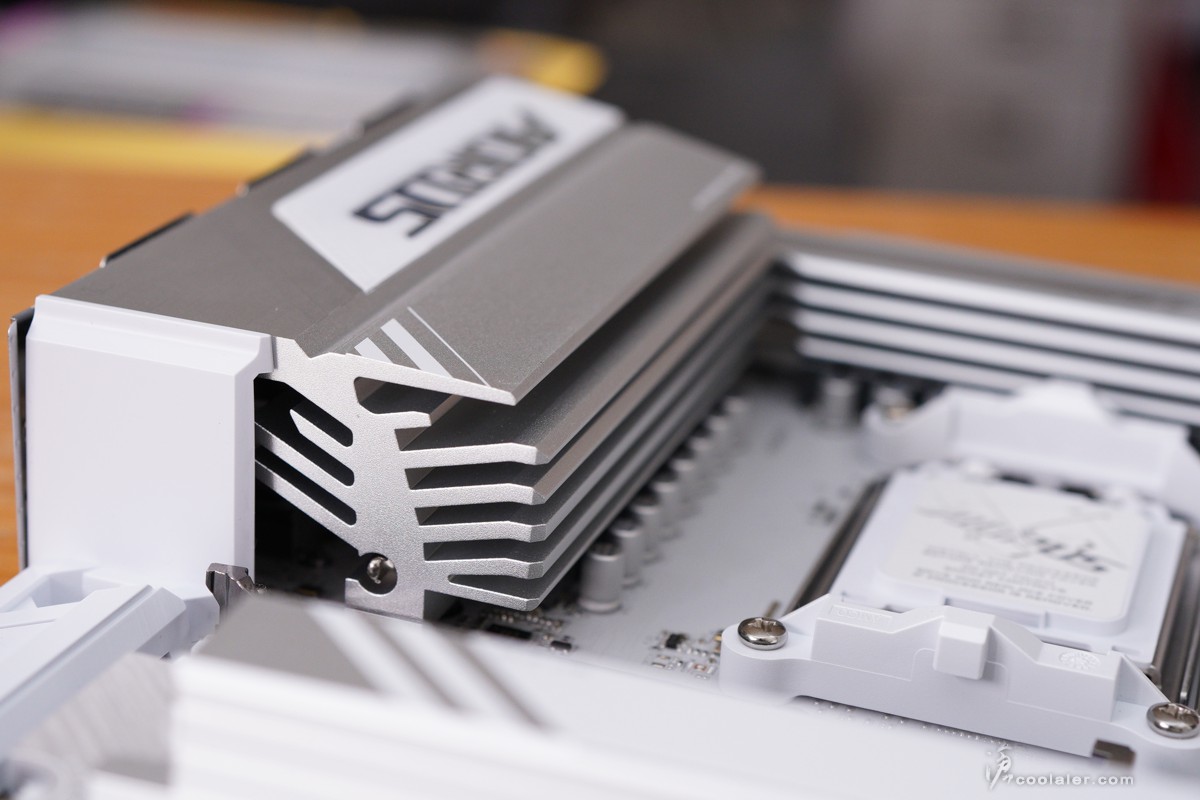
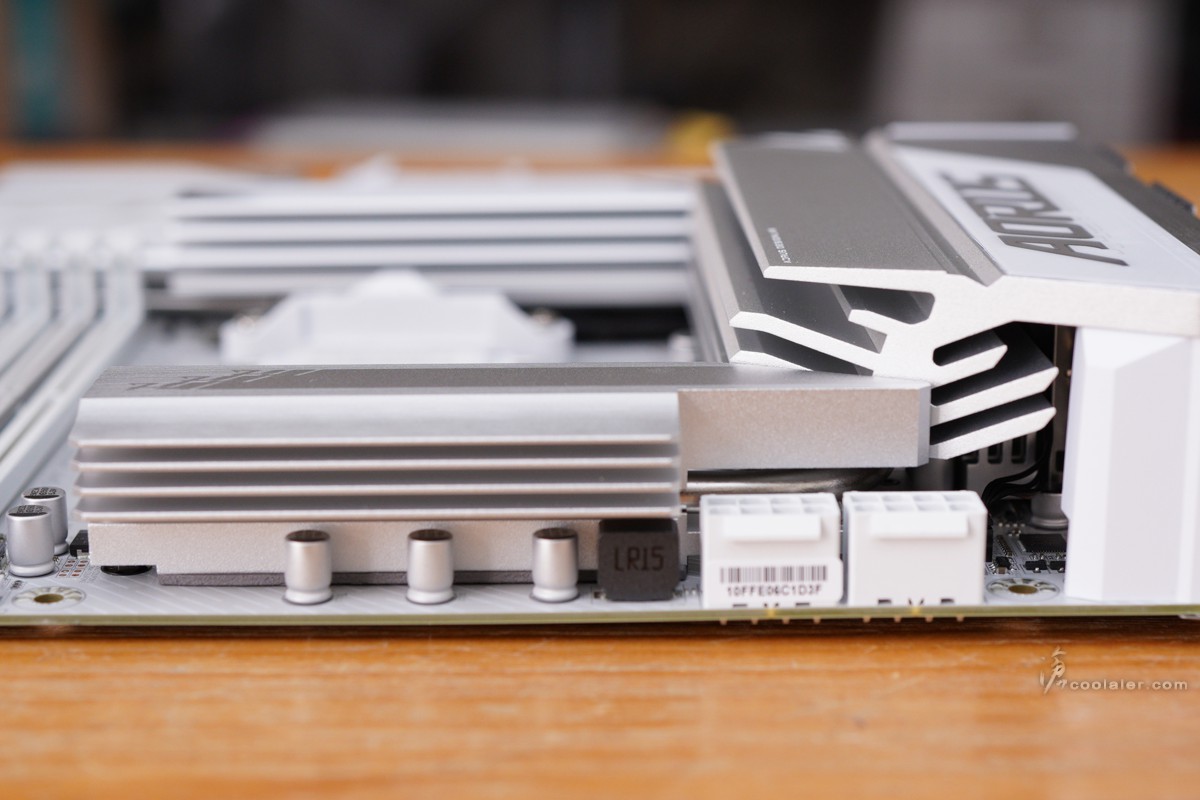
搭配高階的供電散熱片,從側邊可以看到有鋁擠鰭片增加散熱面積。
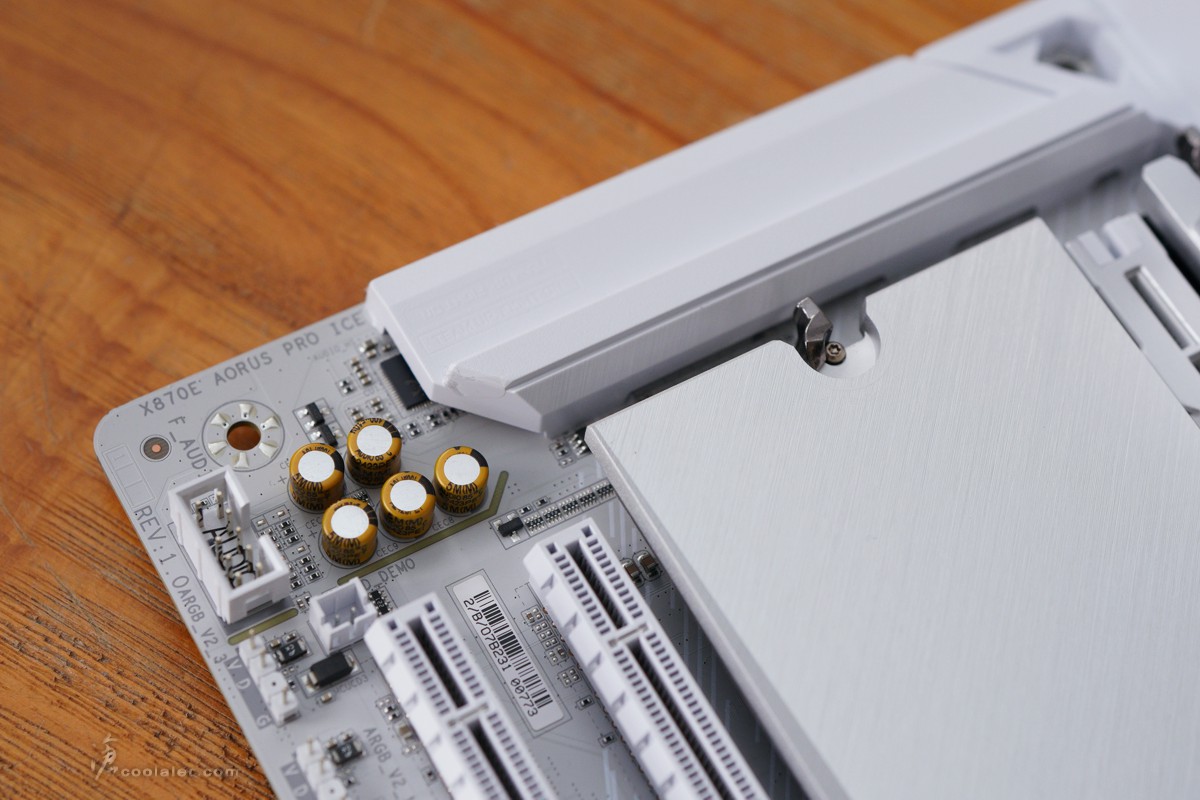
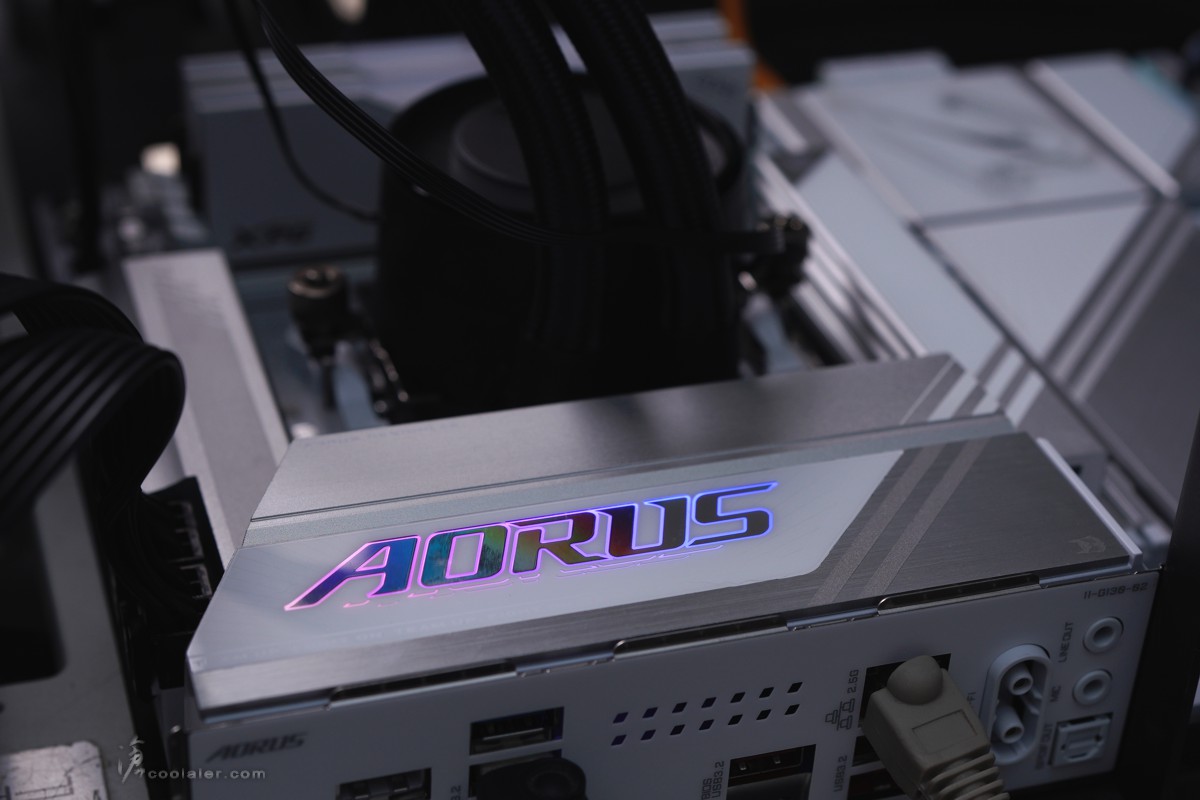
供電散熱延伸到後 IO 上,而上面也有 AORUS 的字樣,這部分有 ARGB 燈效。
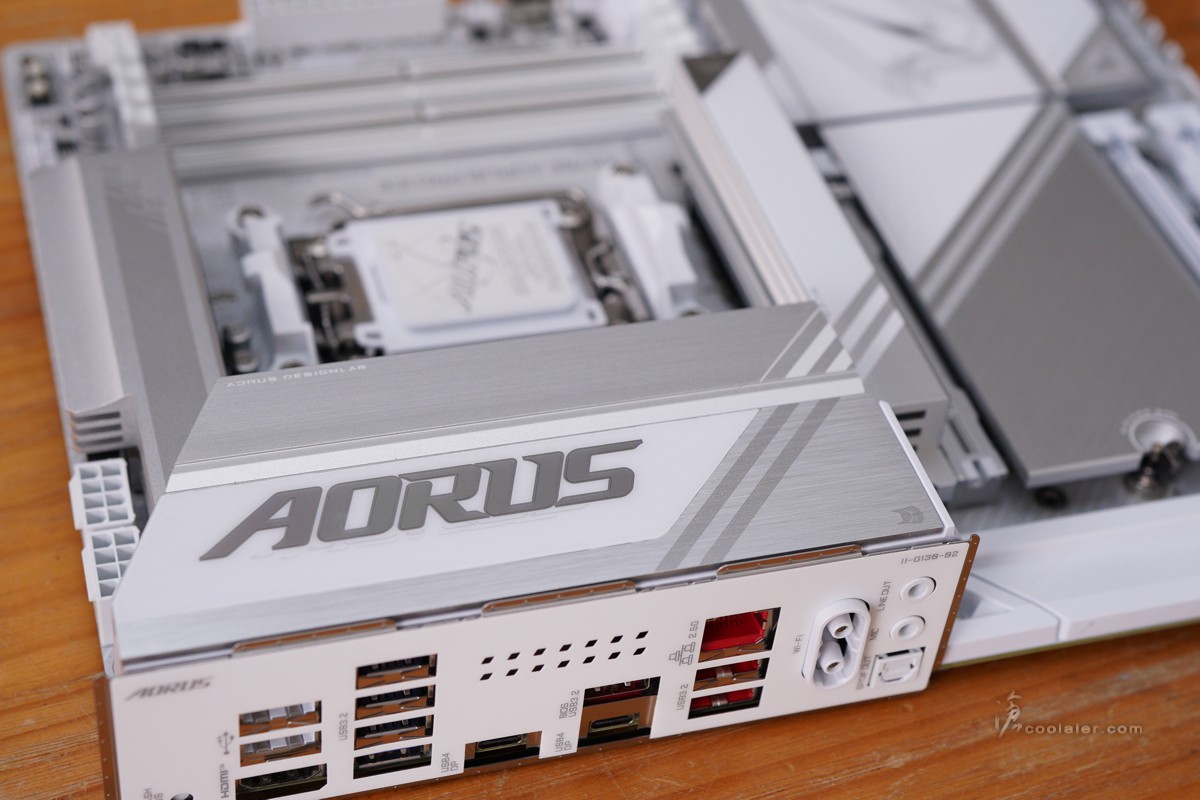
表面上有髮絲紋處理,另外在左下側邊有個小小的 AORUS 老鷹標。

供電散熱片有採用熱導管強化散熱。
16+2+2相 80A 數位供電設計。
2個 CPU 8pin 供電。

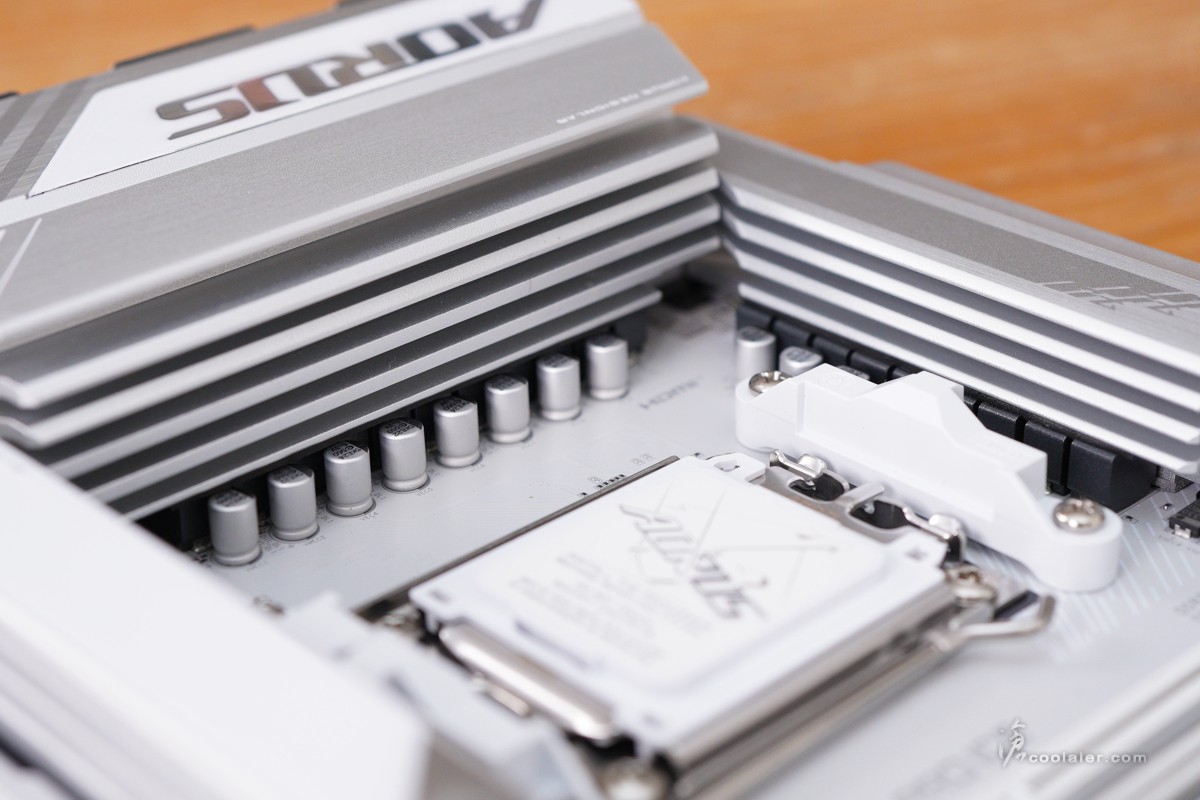
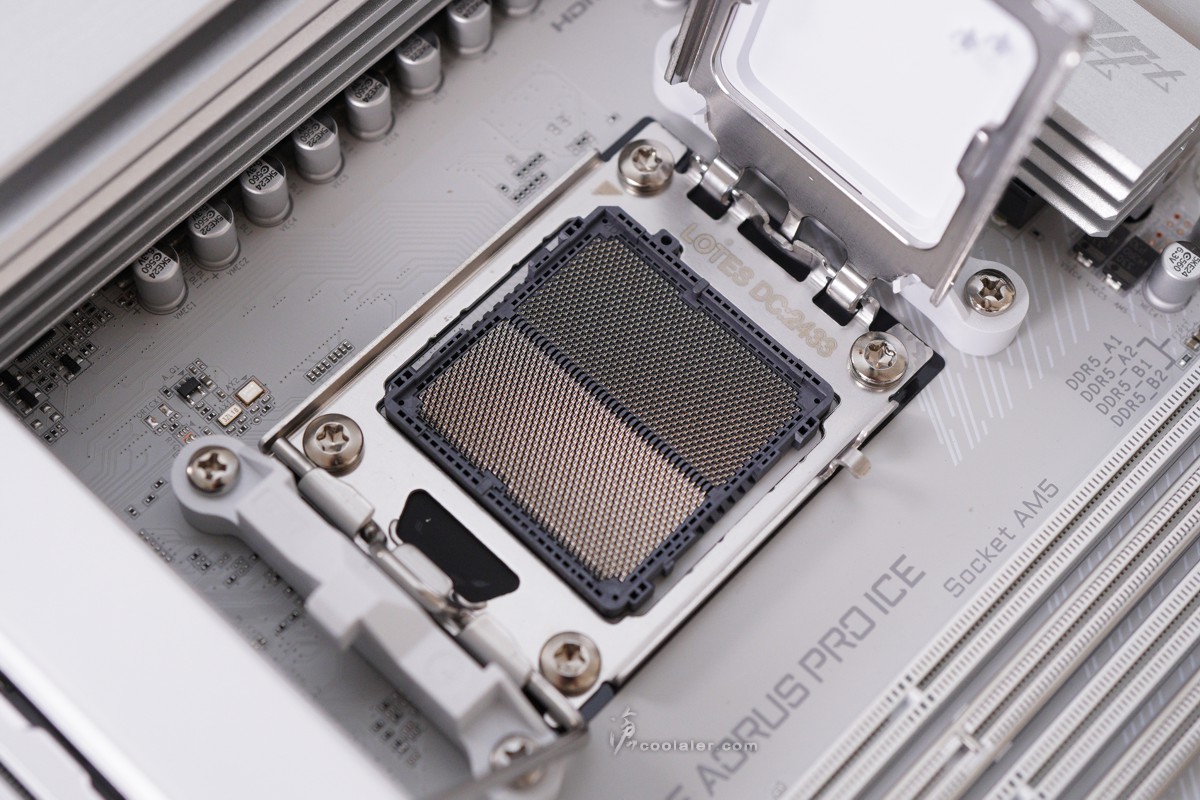
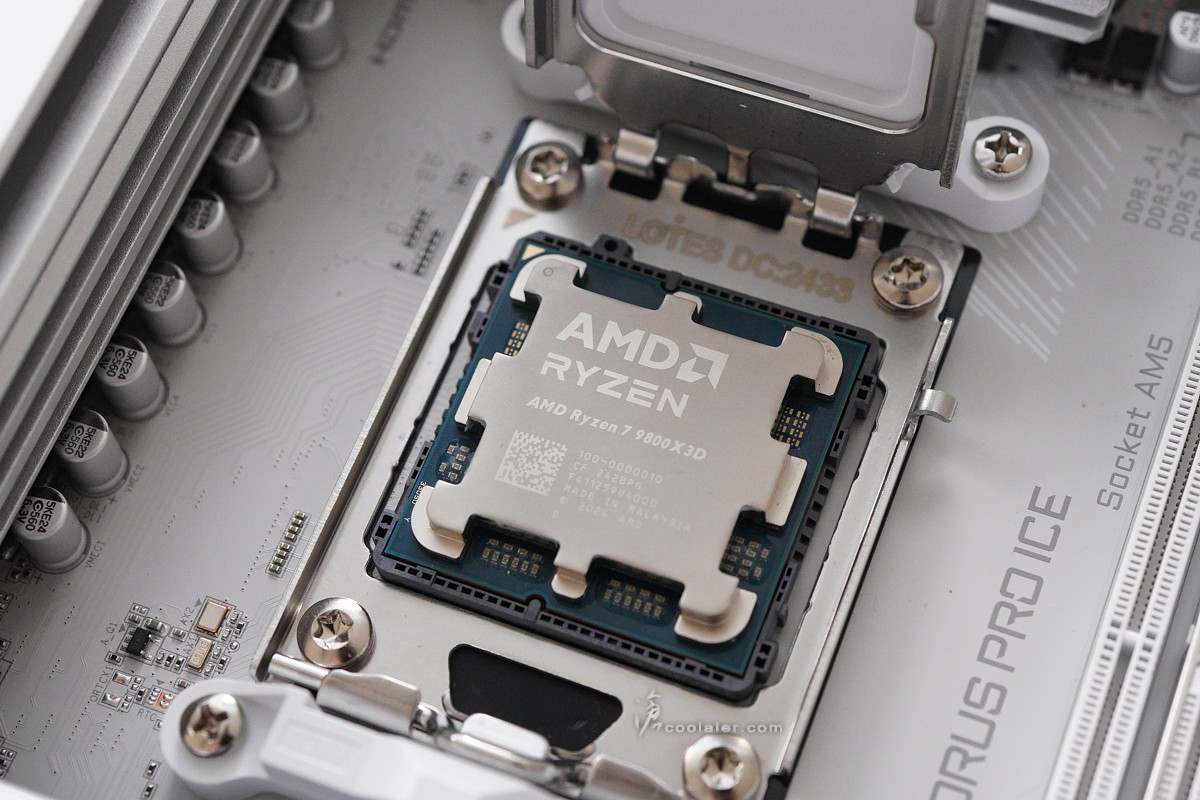
支援 AM5 腳位處理器。
4個 DDR5 記憶體插槽,最高可擴充至 256GB。速度支援 DDR5-8200(OC)。
在主板的右上角有快速電源、重置鍵、Debug 燈。
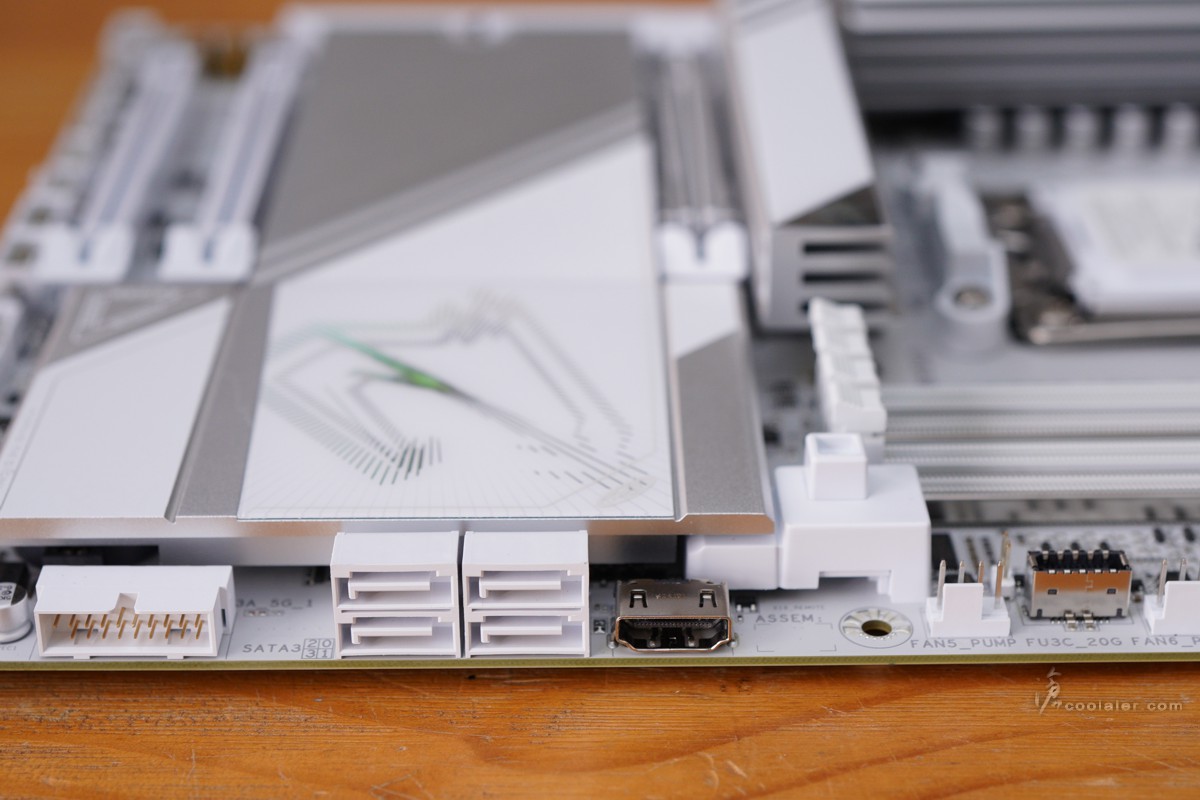
1組 USB 3.2 Gen1、4個 SATA、1個 HDMI、1個 USB 3.2 Gen2x2 Type-C。
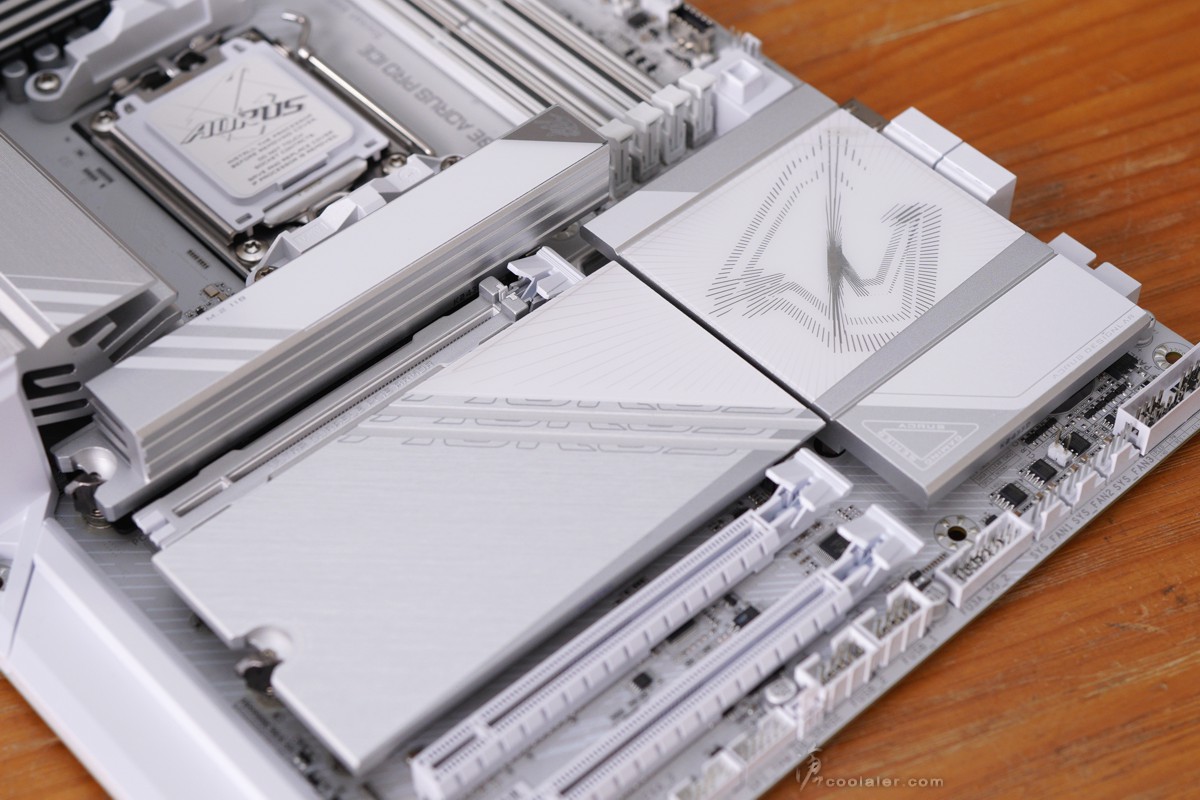
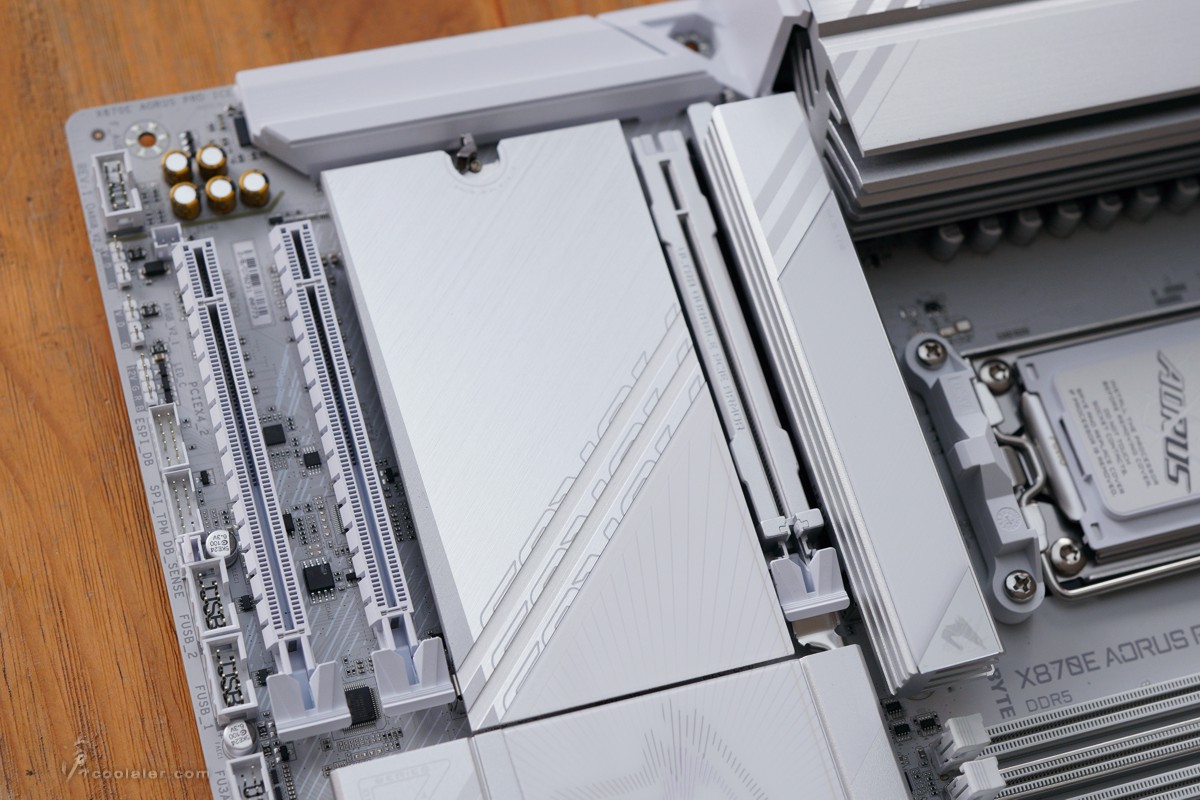
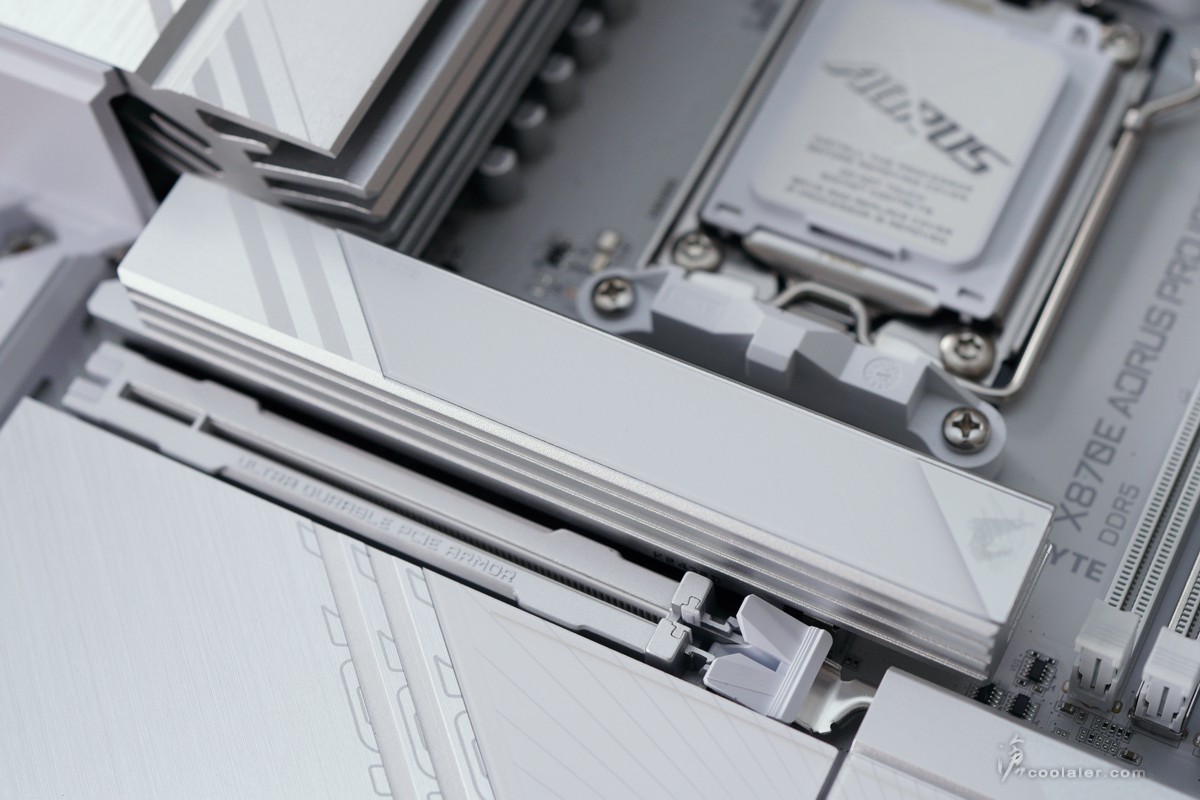
板子上面也搭載了各種 DIY 友善設計,第一根 PCIe 插槽卡榫通常不容易按壓釋放顯卡,PCIe EZ-Latch Plus 可以解決這個問題,直接將按壓釋放鈕延伸到記憶體旁邊,這樣就不會有干涉的問題。
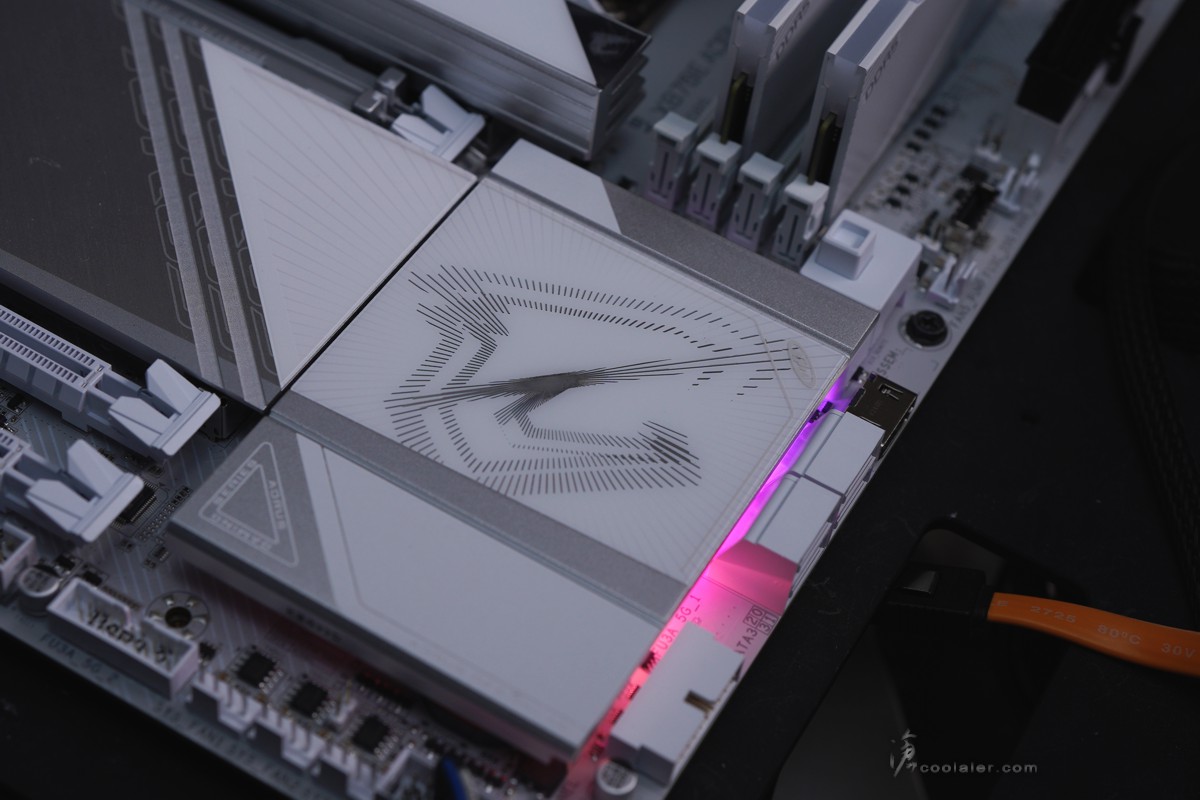
晶片組上面有斜紋狀組成的 AORUS 老鷹標圖案。
散熱片表面有採用髮絲紋處理。
主板下方 IO 是相當齊全,有燈效接點、USB 2.0、USB 3.2 Gen1、風扇電源、前置 IO 等。
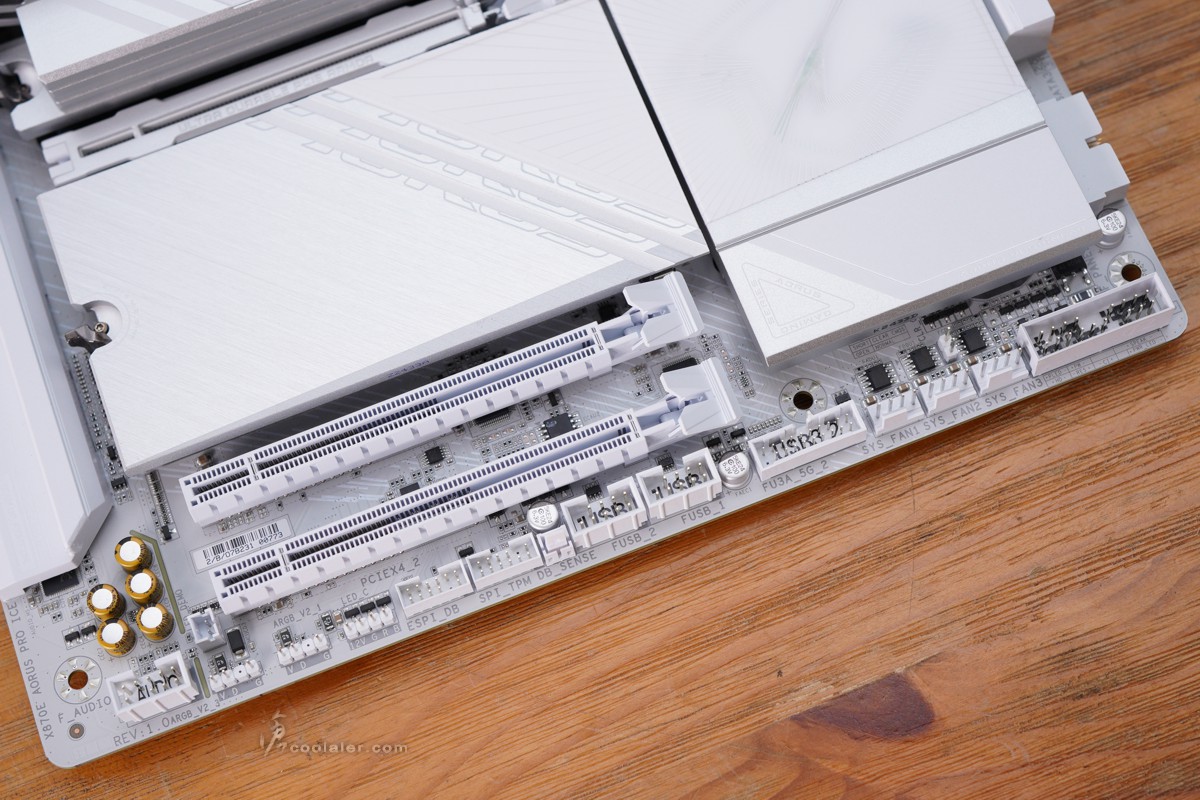
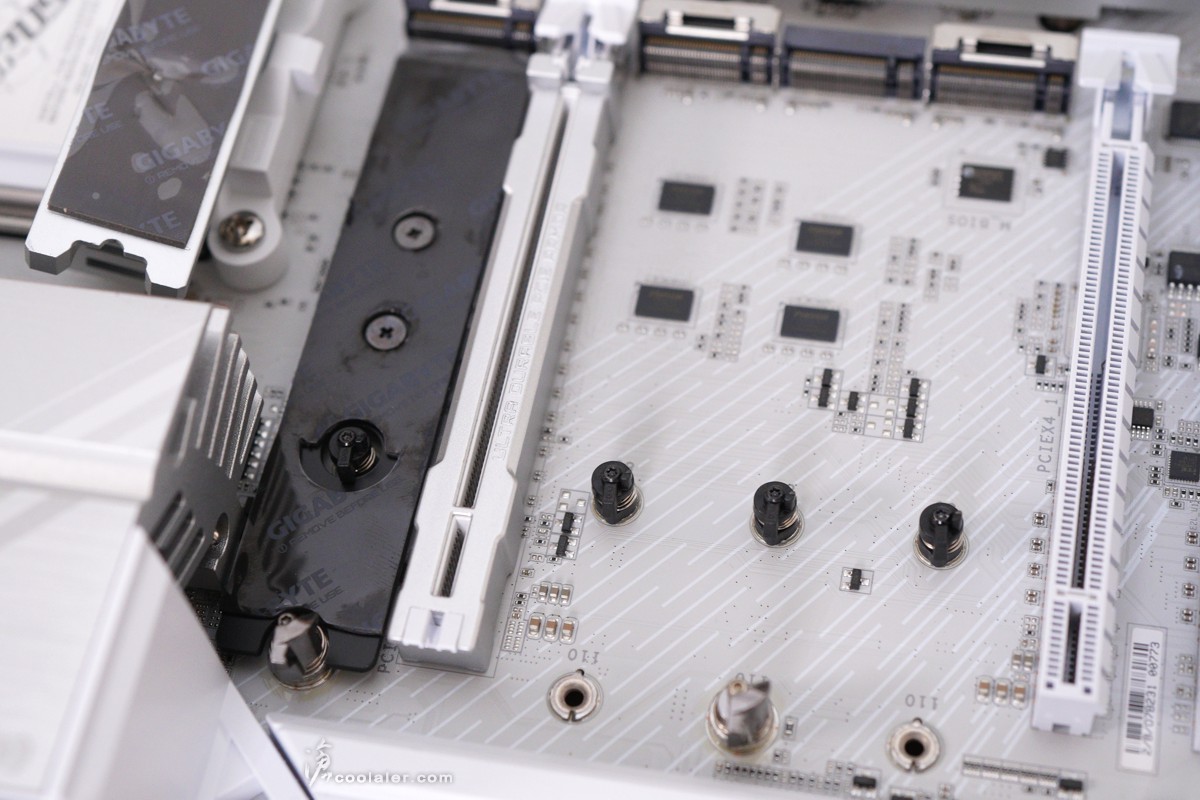
3個 PCIe x16 插槽,由右至左規格 PCIe 5.0 x16、PCIe 4.0 x4、PCIe 3.0 x4。
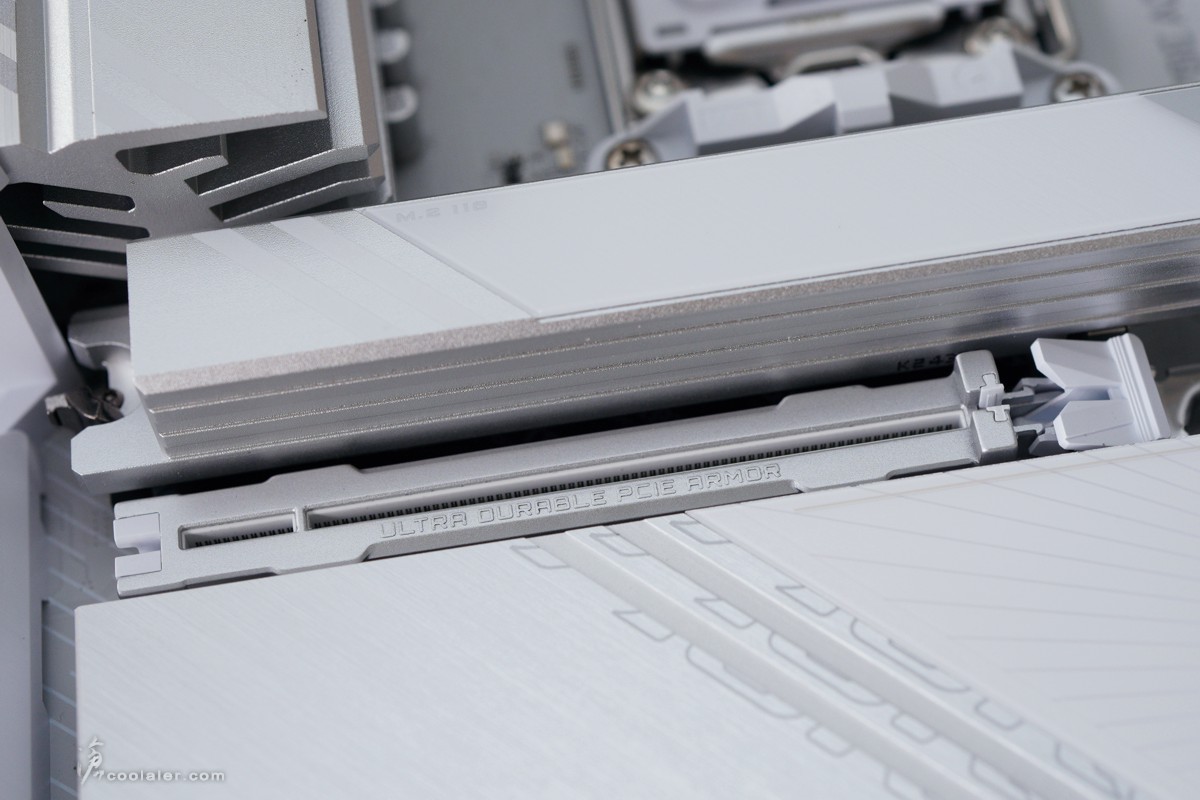
CPU 下方的 M.2 搭配比較高效能較好的散熱片,畢竟是 PCIe 5.0 x4 的介面。
在右側有三角反射面的設計,不同角度可以看不同老鷹標。
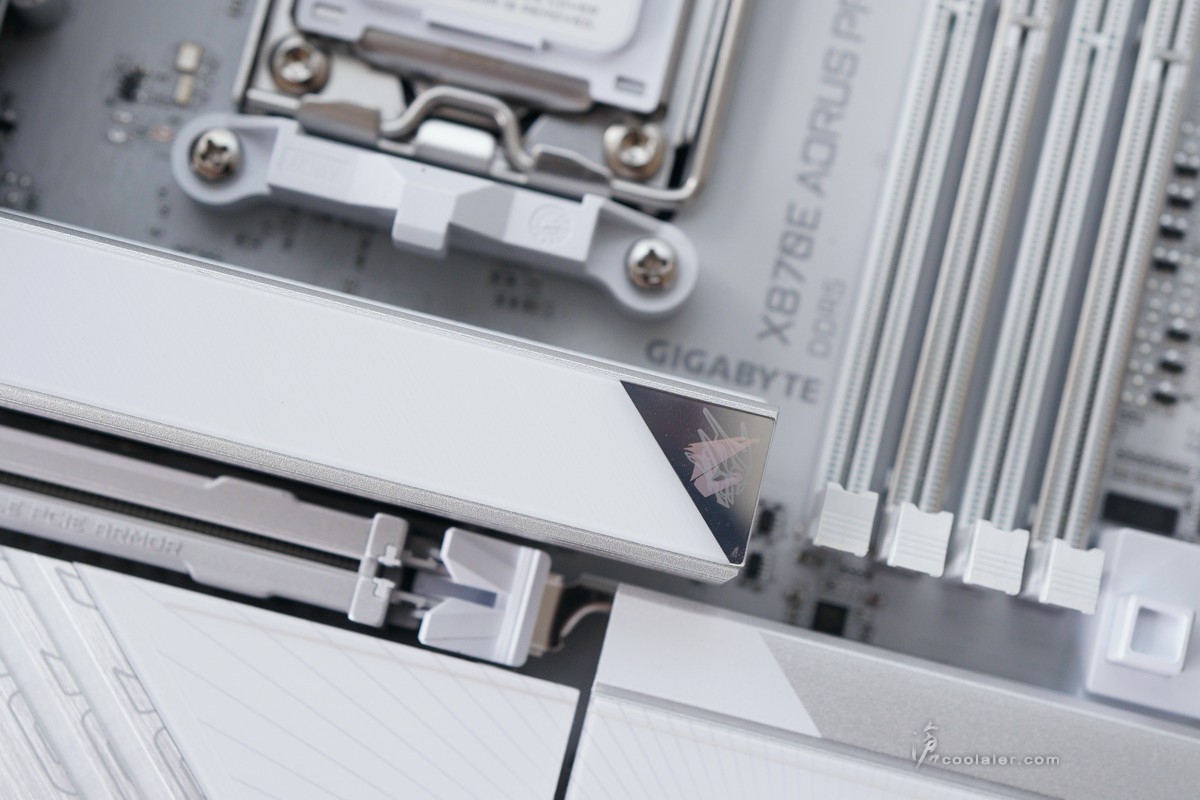
第一根的 PCIe x16 採用了 PCIe UD Slot X 插槽設計,並加上 Ultra Durable PCIe Armor 背部強化金屬板,避免顯卡太重插槽撐不住。
在 M.2 安裝拆卸也有 DIY 友善設計,散熱片的部分在尾段有 EZ-Latch Click 快速拆卸,側邊有個卡環,往反方向扳即可拆下,安裝往下扣壓自動會固定。
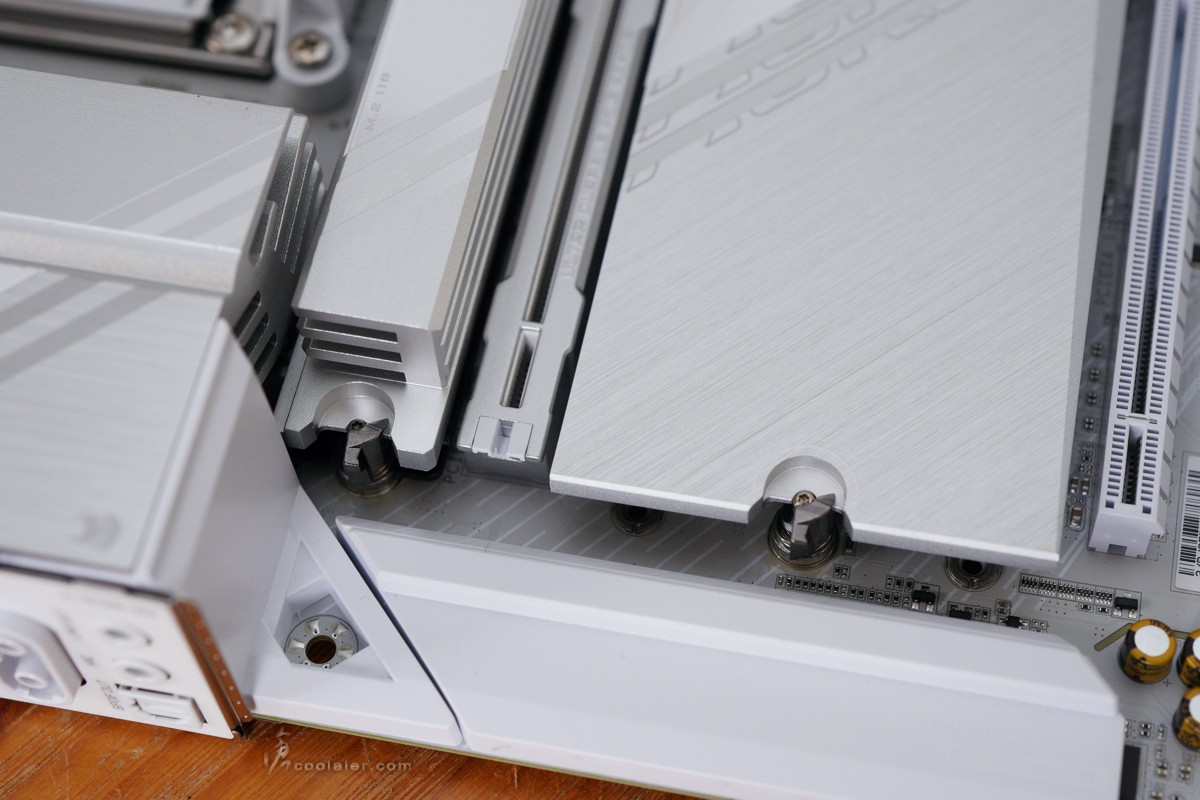
共有4個 M.2 插槽,散熱片內側都貼有導熱墊,另外第一根在底部也加上導熱墊強化散熱。M.2 插槽有金屬護甲的為 PCIe 5.0 x4,也就是1、2、4,第3槽為 PCIe 4.0×4 。
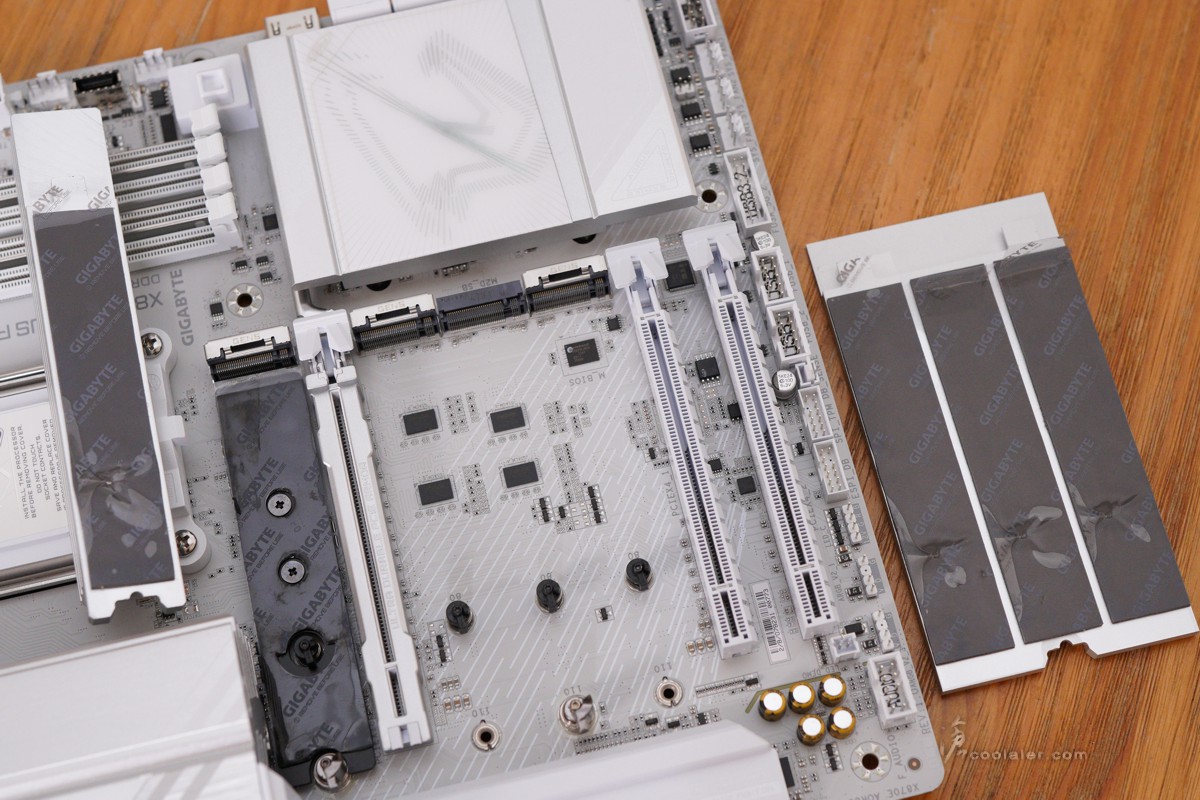
4個槽皆有 EZ-Latch Plus 快速安裝拆卸設計,原理與 EZ-Latch Click 相同,安裝只要將 M.2 下壓即可固定,拆卸則是扳動撥桿。
音效採用獨立區域設計,採用 Realtek ALC1220 晶片,搭配音效專用電容。
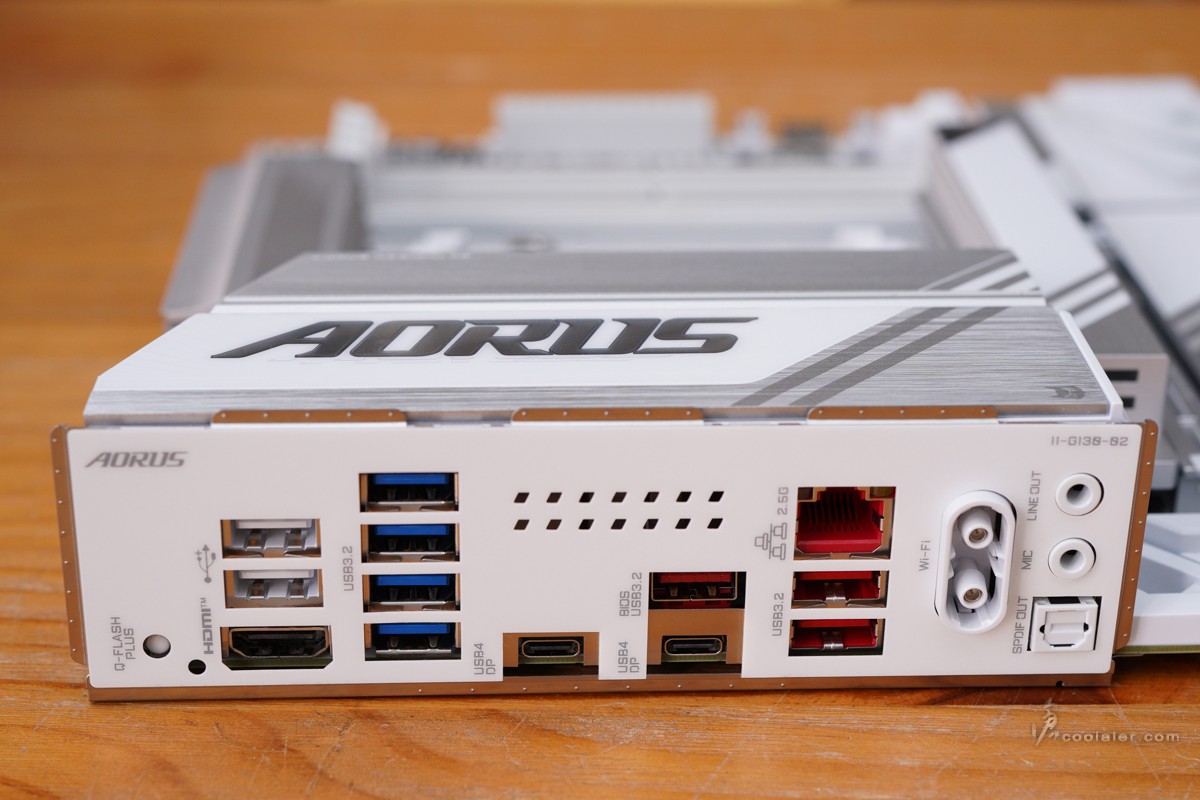
後方 IO 埠,1個 Q-Flach Plus 按鈕、2個 USB 2.0、1個 HDMI、4個 USB 3.2 Gen 1、2個 USB 4 Type-C、3個 USB 3.2 Gen2、RJ-45 網路接口、EZ-Plug 天線接頭、2個音源輸出入、S/PDIF 光纖輸出。另外可看到在擋板上 AORUS 字樣下方有7×2個小平行四邊形開孔,這部分是輔助供電散熱之用。
背部 PCB 板也有 AORUS 刷紋設計,另外對應第一根 PCIe x16 插槽底部則有 Ultra Durable PCIe Armor 強化背板。
目前最強遊戲處理器!Ryzen 7 9800X3D
燈效的部分在供電散熱片上面 AORUS 字樣以及晶片組散熱片下方間接燈。
BIOS 簡介
BIOS 畫面也是白色風格,基本上介面與之前差不多,下方為簡易模式,左側可見硬體資訊,中間上方即時時脈、溫度、電壓,當然一樣支援快速調整,例如 X3D Turbo Mode 套用、Smart Fan 6 風扇轉速、XMP / EXPO 套用等等。
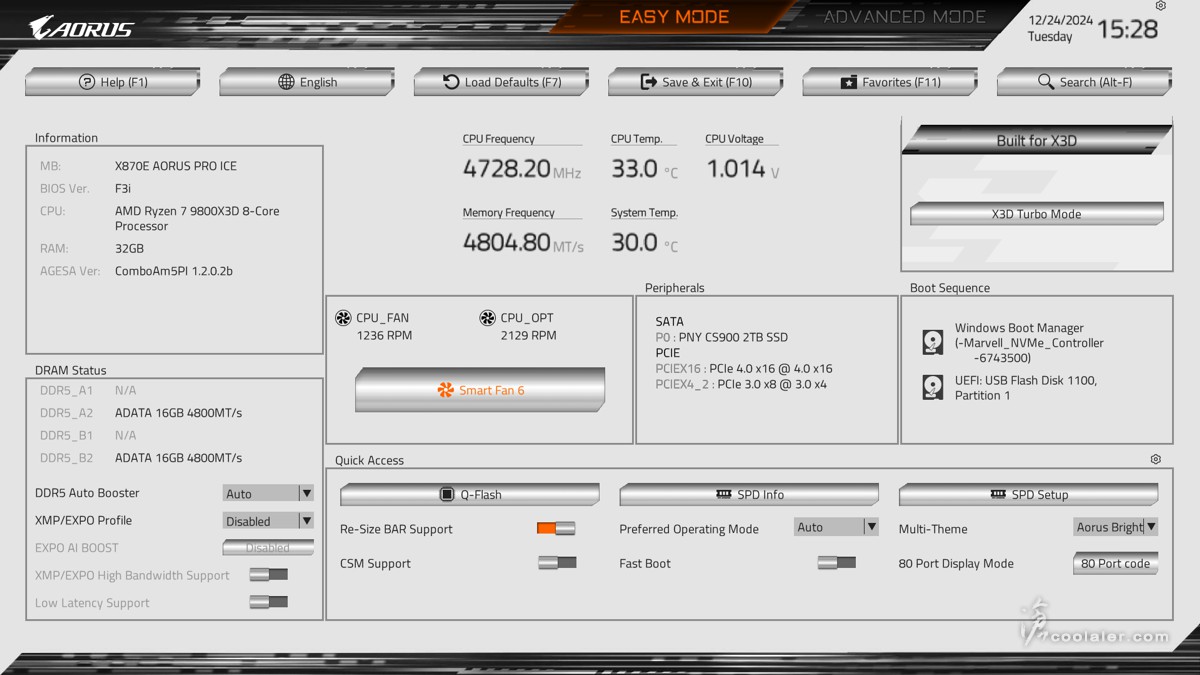
Smart Fan 6 ,風扇轉速與溫度對應設定,也可以直接套用安靜、效能、全轉速模式。

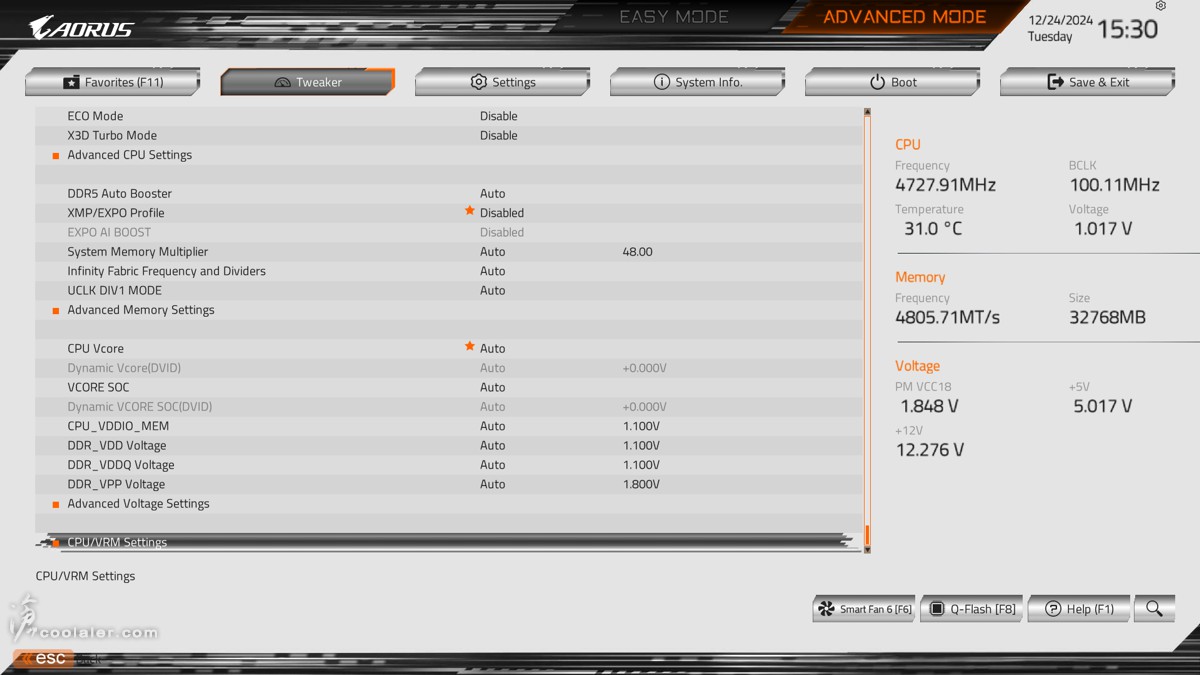
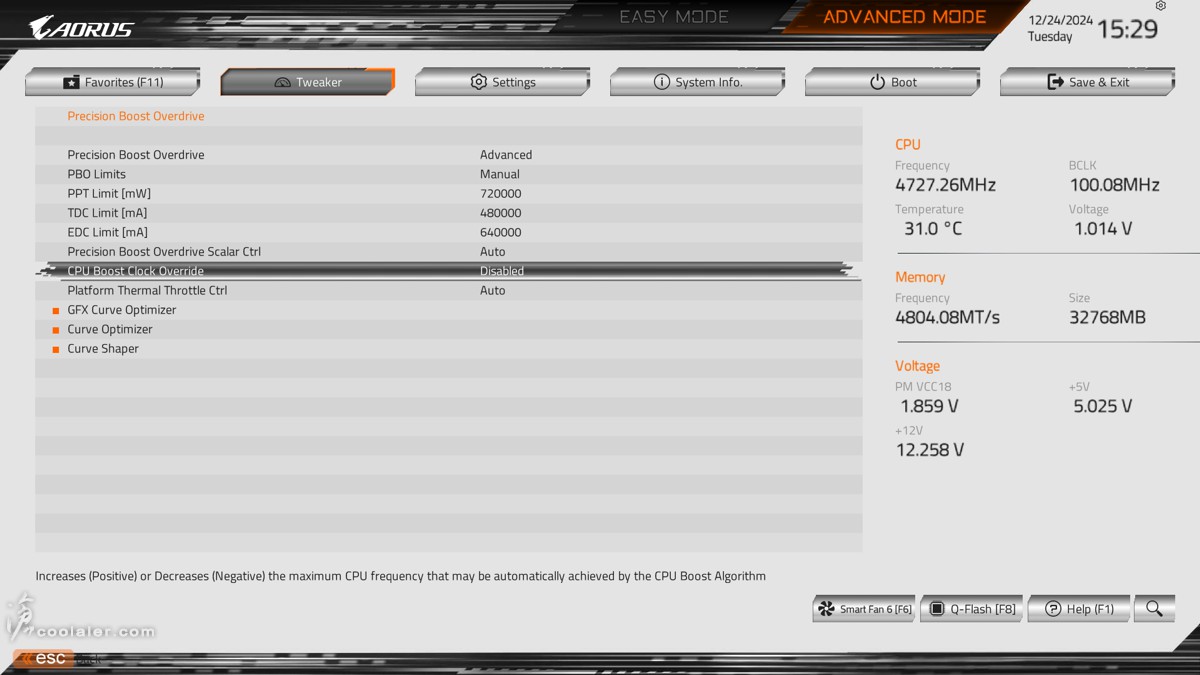
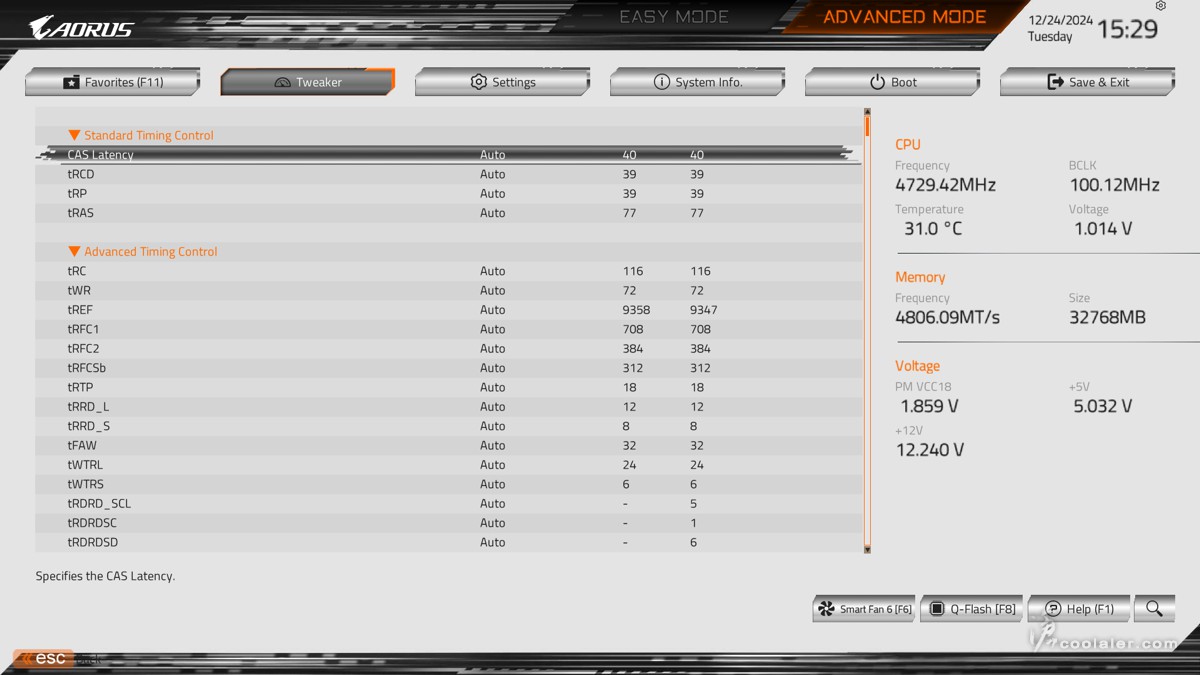
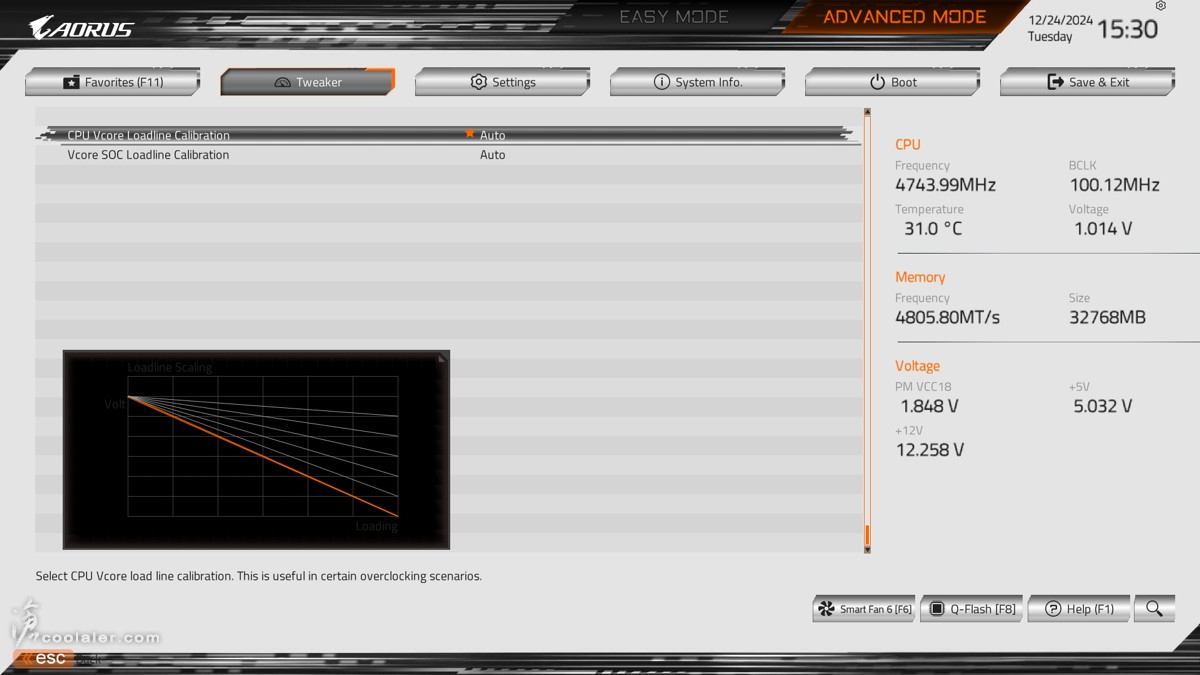
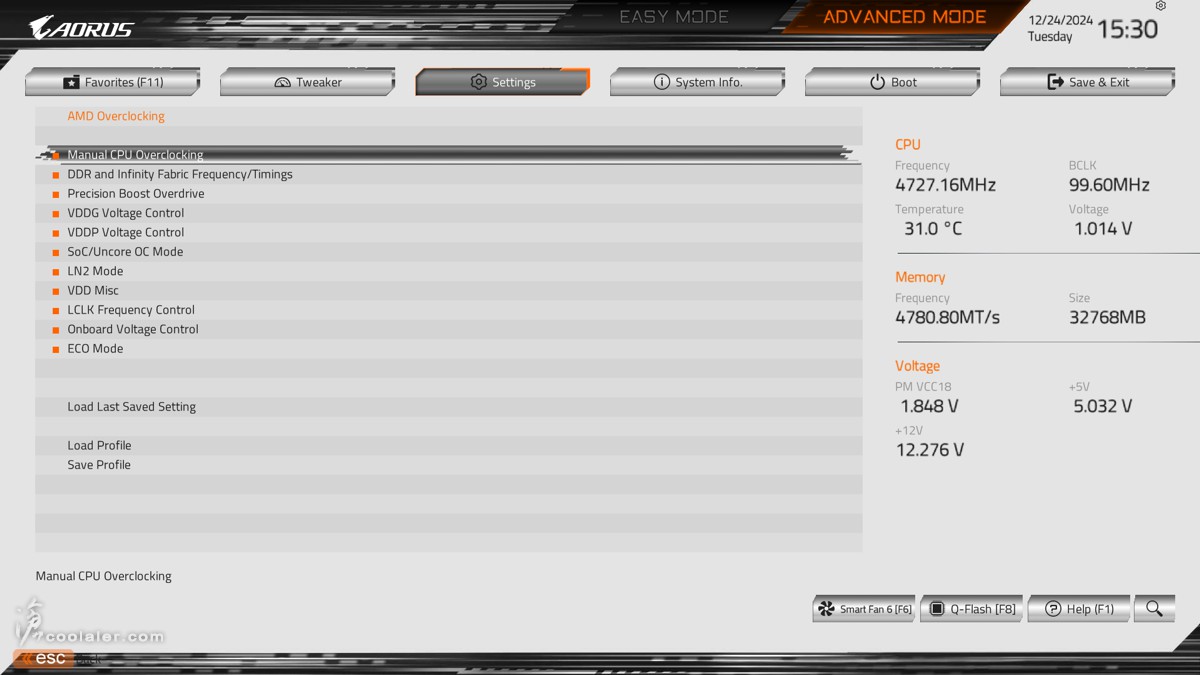
進階模式,Tweaker 超頻選項,裡面一樣有相當多的超頻選項,包括 CPU、記憶體、電壓調整。這邊也可以透過 ECO Mode 選擇功耗,或是開啟 X3D Turbo Mode 增加遊戲效能。
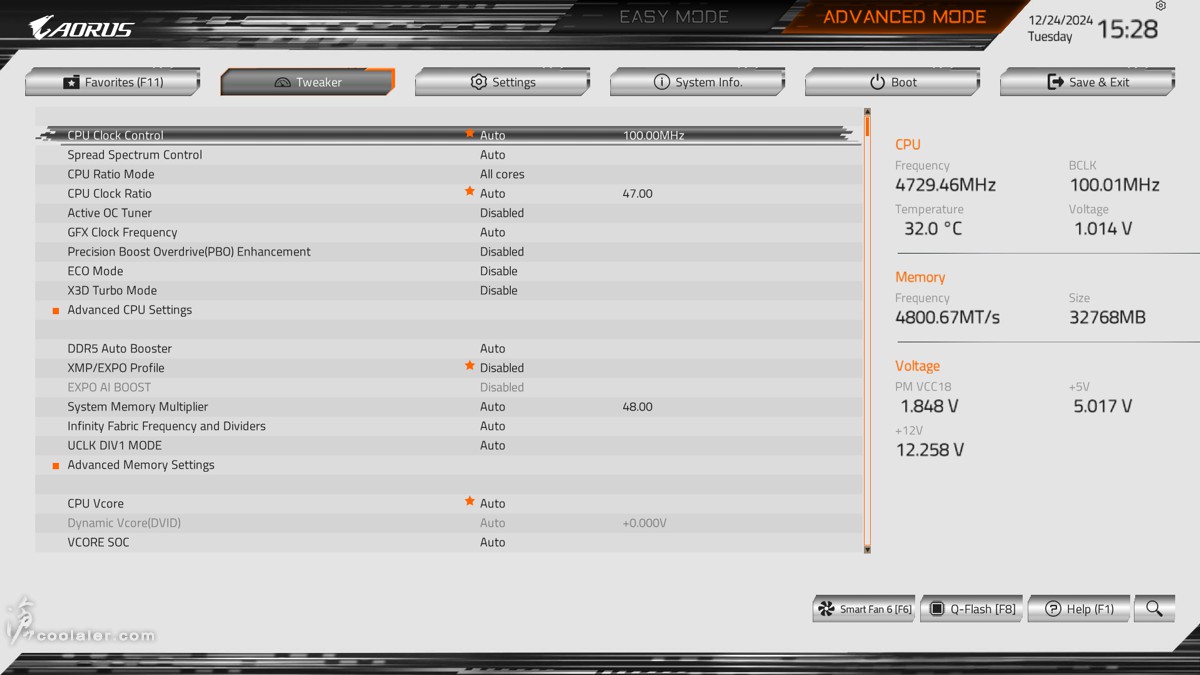
PBO 超頻選項。
記憶體時序參數調整。
CPU / VRM 電壓模式。
AMD 超頻選項。
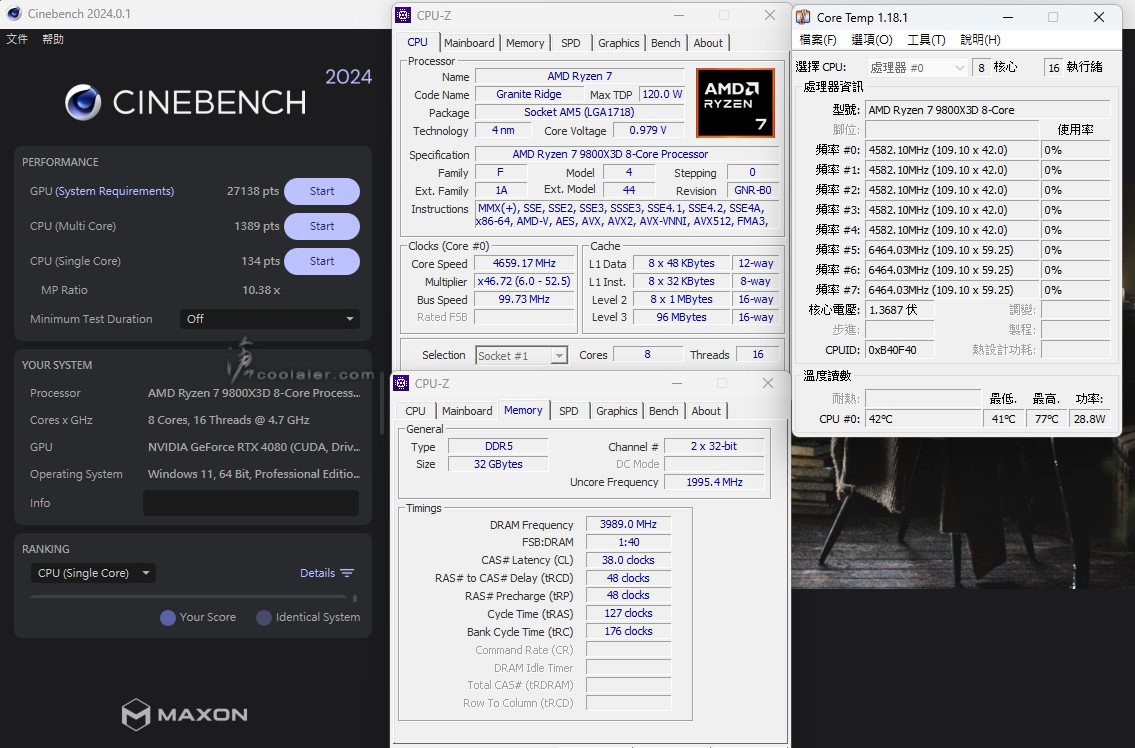
測試平台
CPU: AMD Ryzen 7 9800X3D
CPU Cooler: MSI MAG CORELIQUID E360 AIO
RAM: ADATA LANCER RGB DDR5-8000 16GBx2
MB: GIGABYTE X870E AORUS PRO ICE
VGA: GIGABYTE RTX 4080 GAMING OC
SSD: GIGABYTE AORUS Gen4 SSD 1TB
PSU: InWin 1065W
OS: Windows 11
記憶體使用 ADATA LANCER RGB DDR5-8000 套用直上
CPU-Z
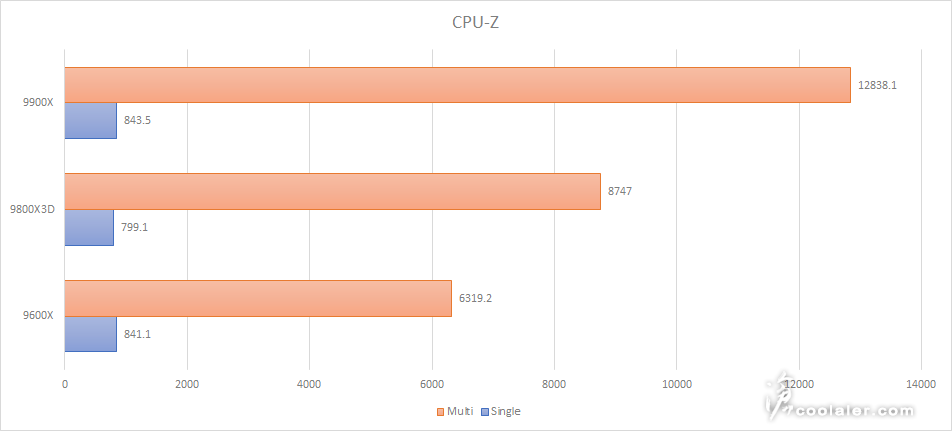
CPU Single:799.1
CPU Multi:8747.0

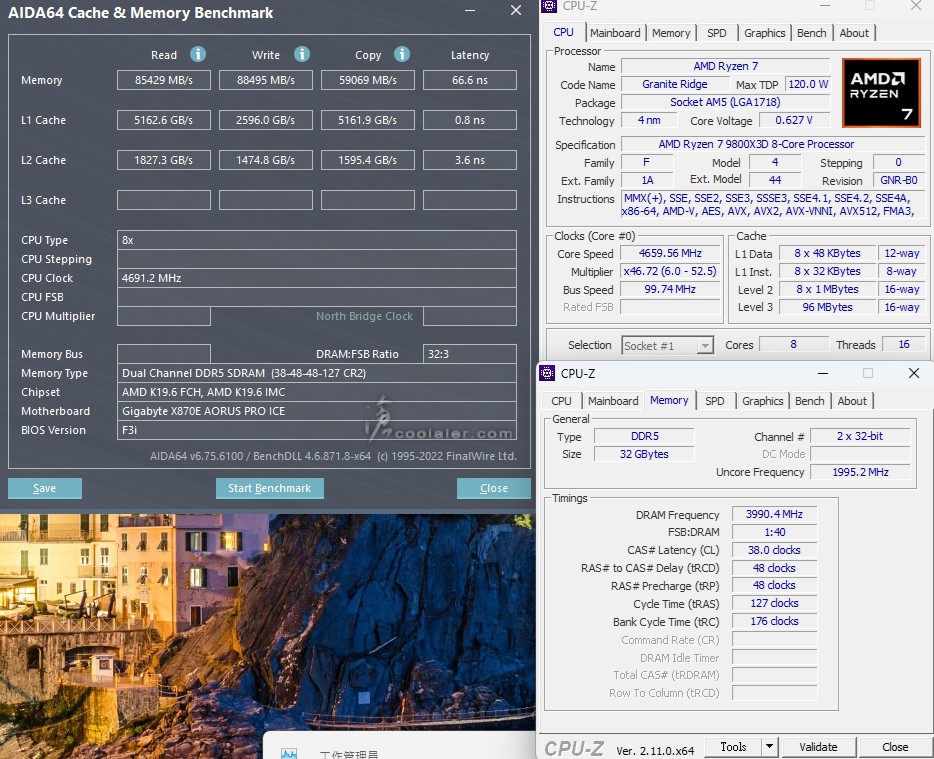
Memory Benchmark
Read:85429 MB/s
Write:88495 MB/s
Copy:59069 MB/s
Latency:66.6 ns
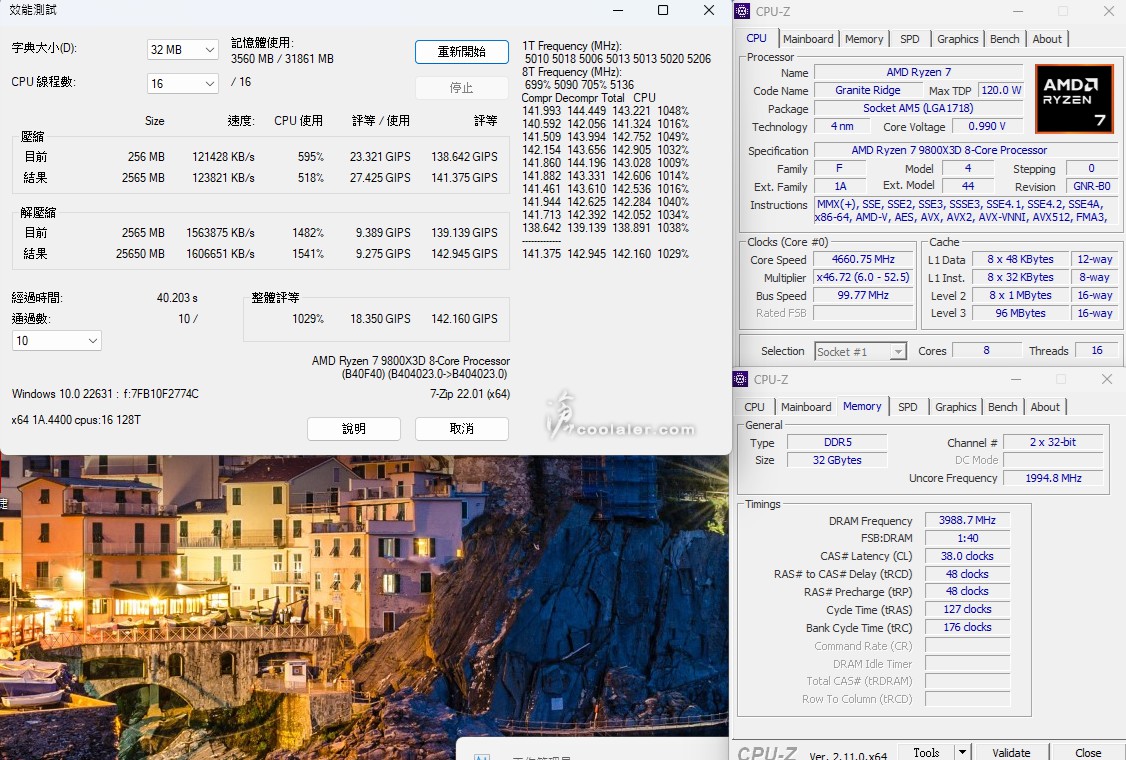
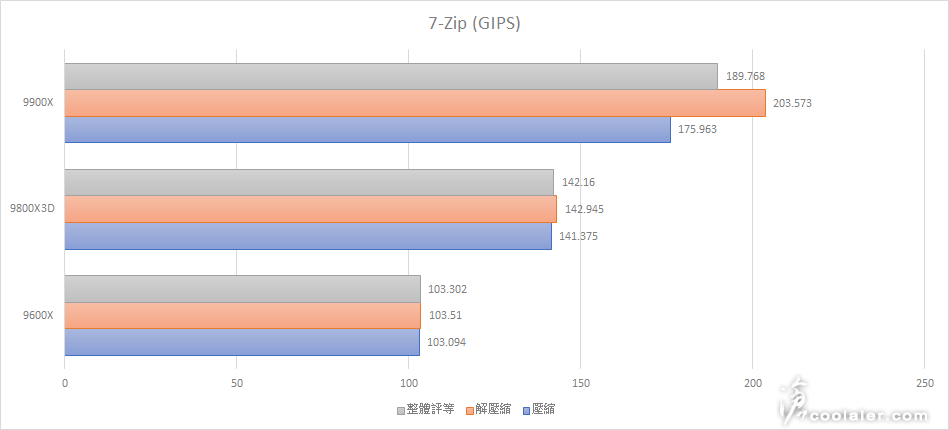
7-Zip 22.01
壓縮:141.375 GIPS
解壓縮:142.945 GIPS
整體評等:142.160 GIPS
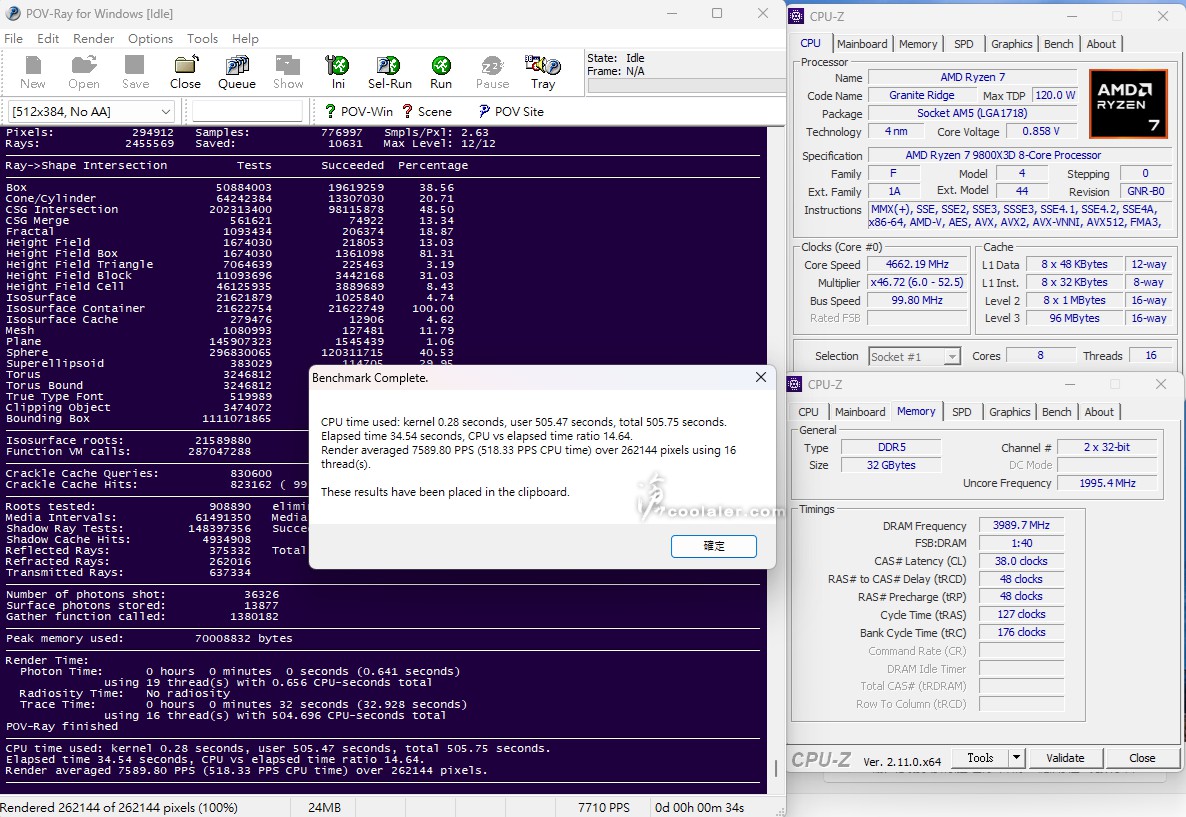
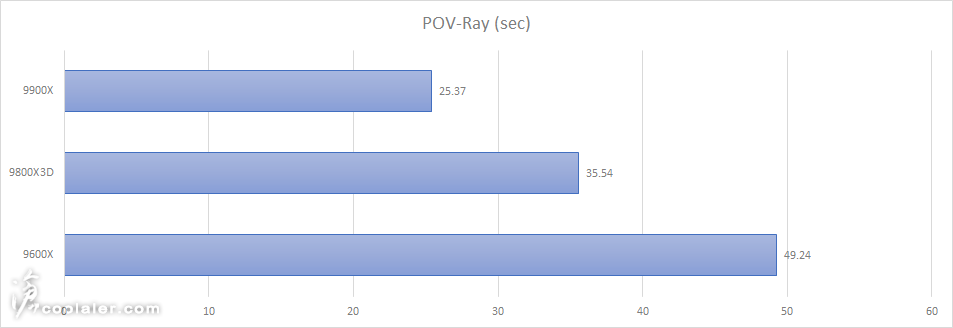
POV-Ray:35.54s
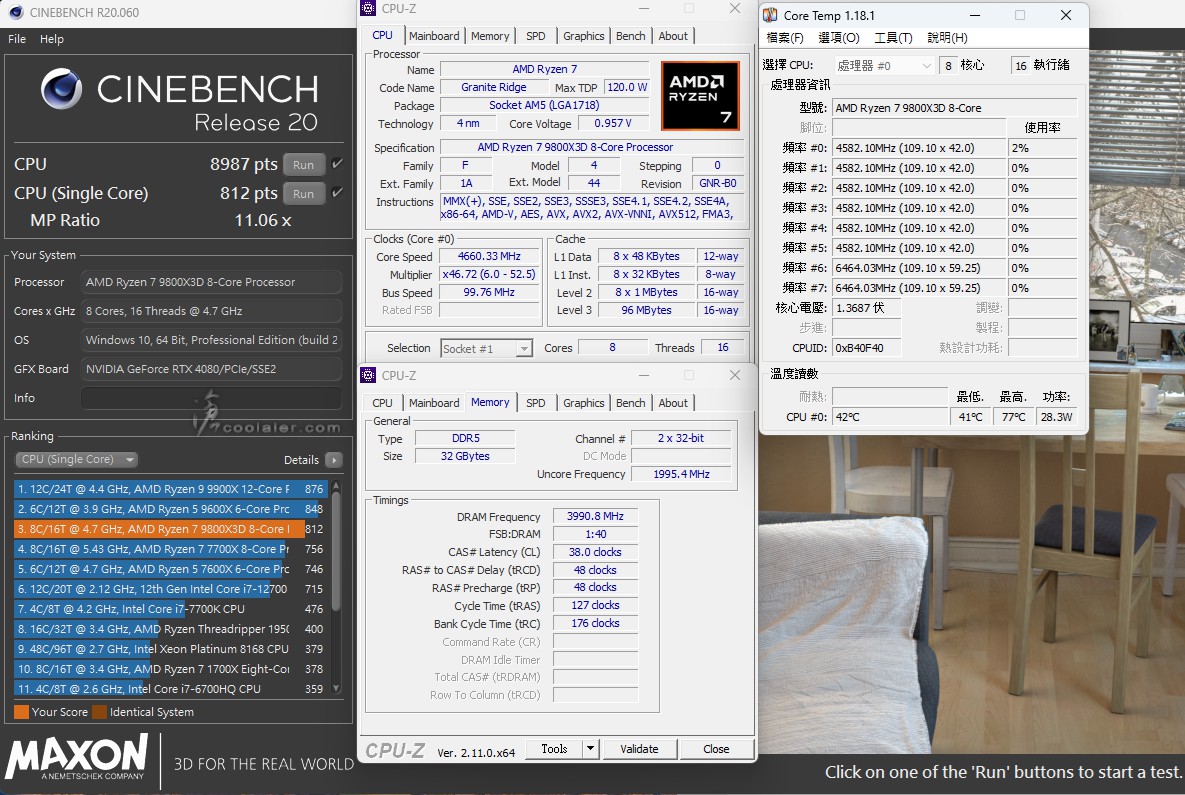
CINEBENCH R20
CPU:8987 pts
CPU 單核心:812 pts

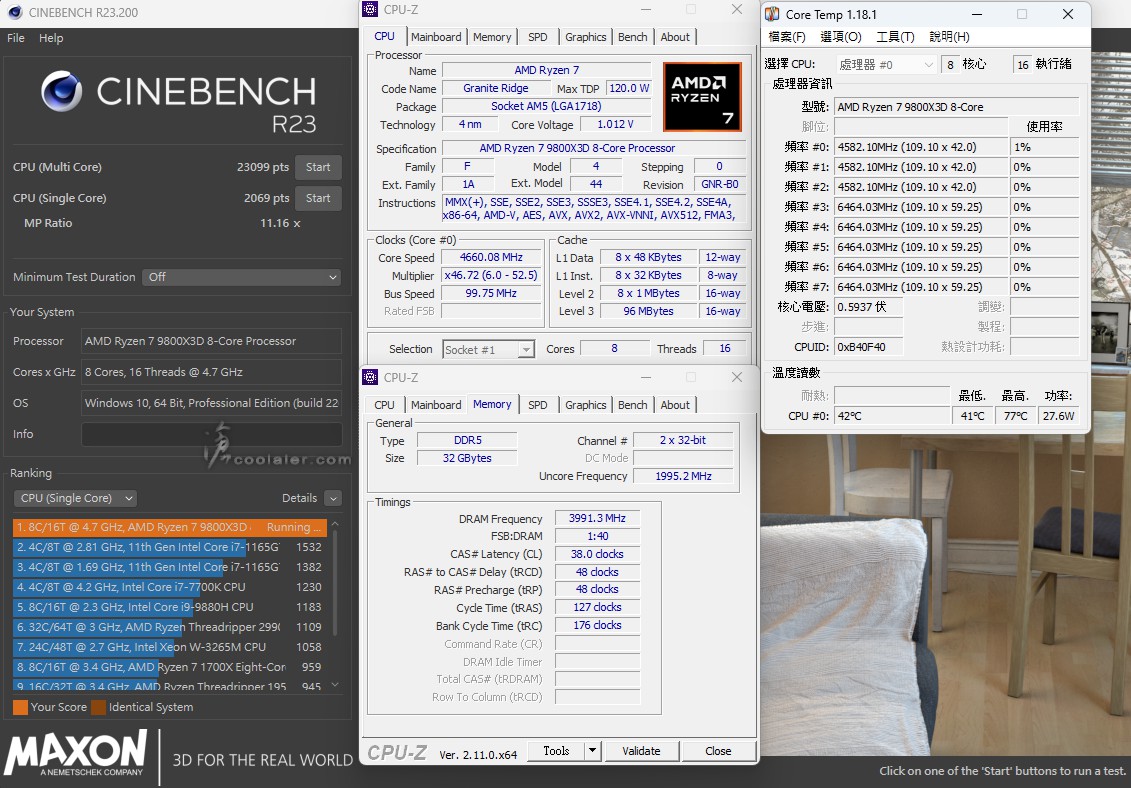
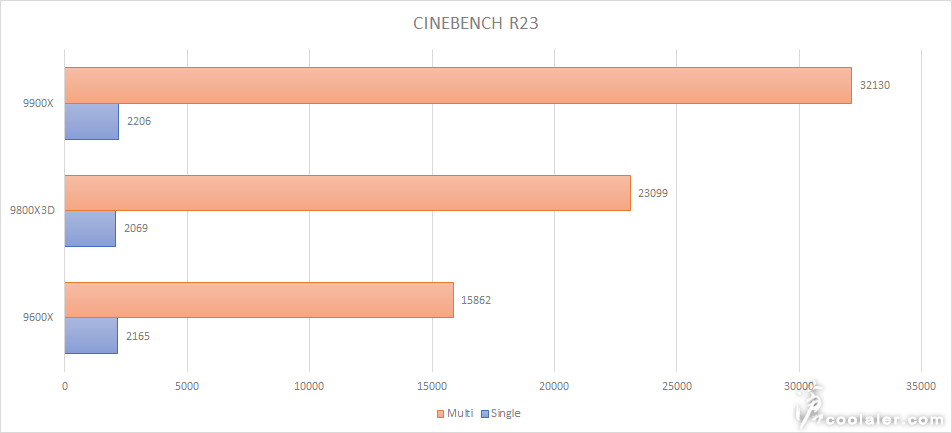
CINEBENCH R23
CPU:23099 pts
CPU 單核心:2069 pts
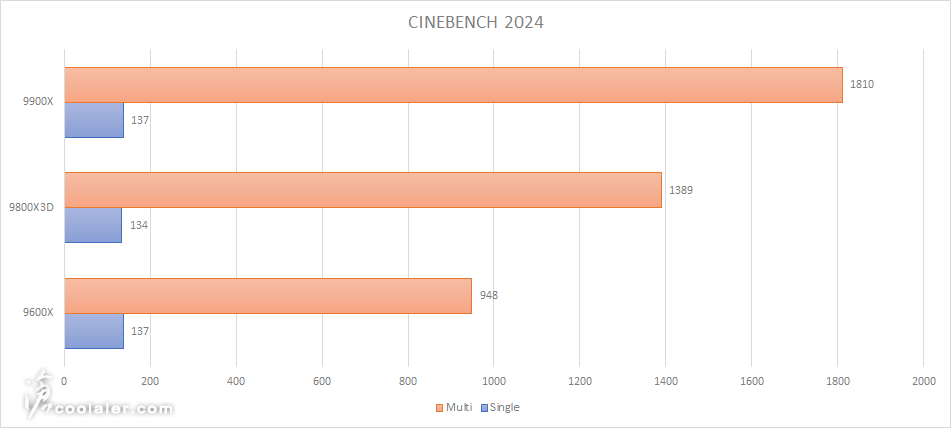
CINEBENCH 2024
GPU:27138 pts
CPU:1389 pts
CPU 單核心:134 pts
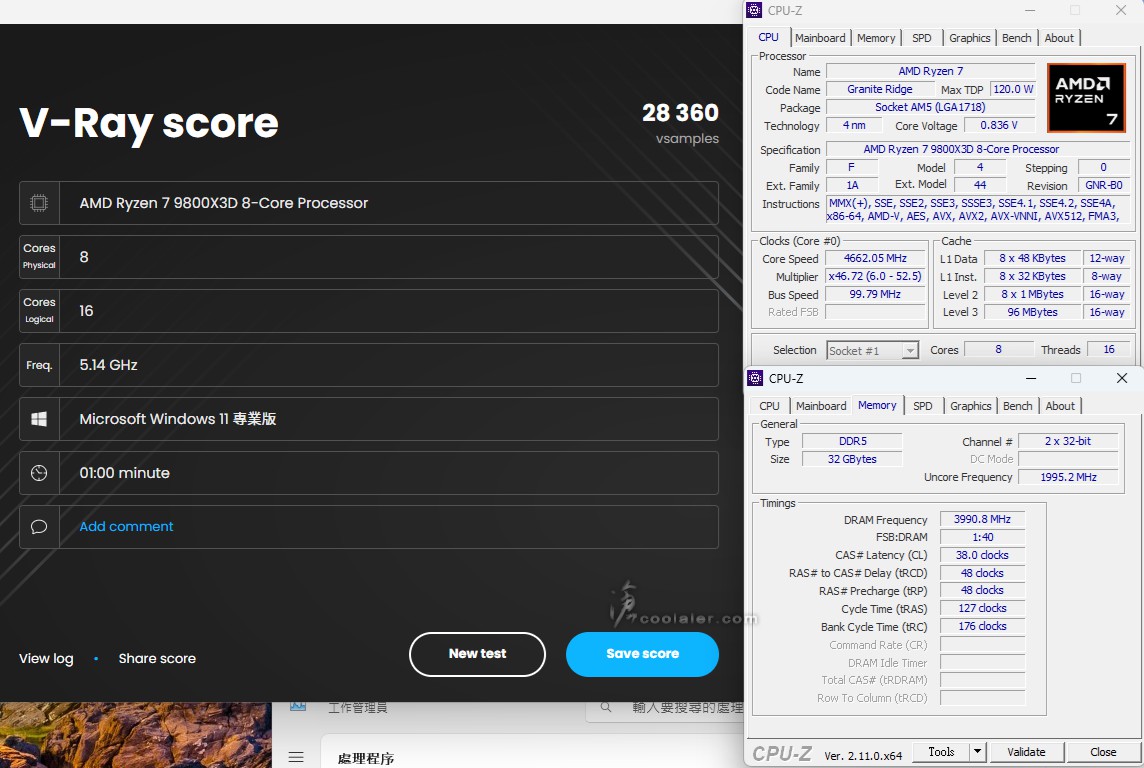
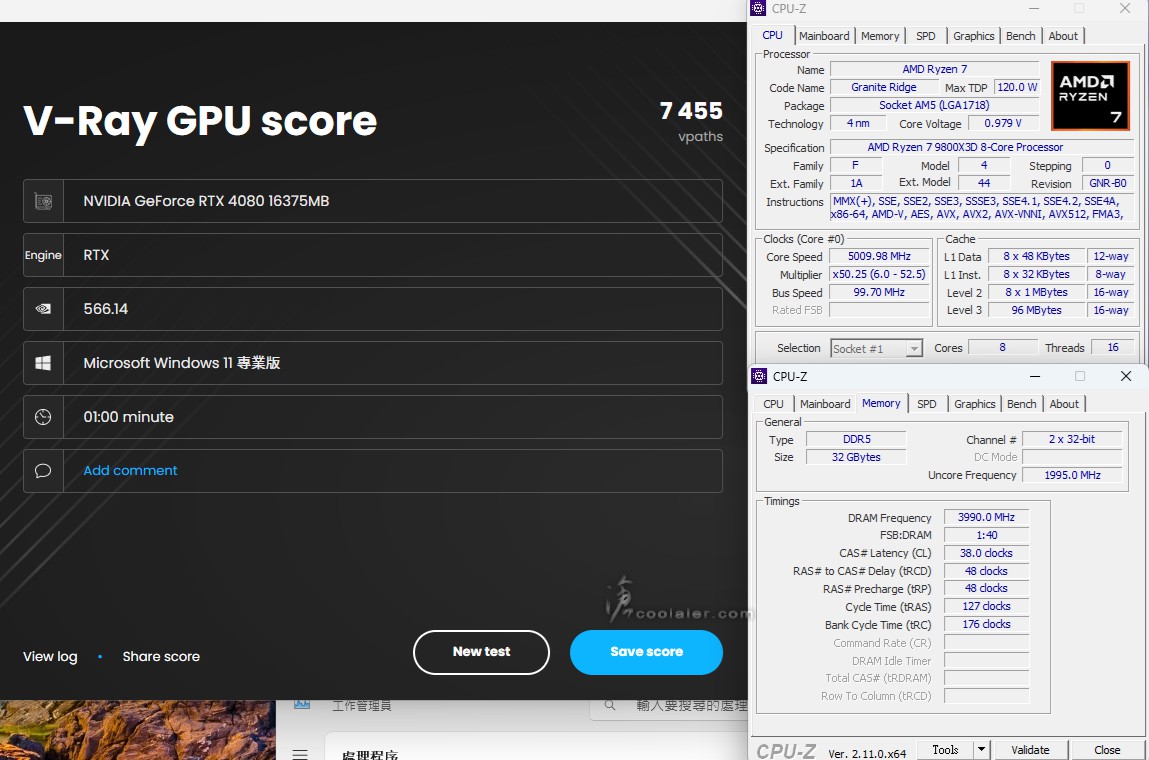
V-Ray:28360
V-Ray GPU CUDA:4995

V-Ray GPU RTX:7455

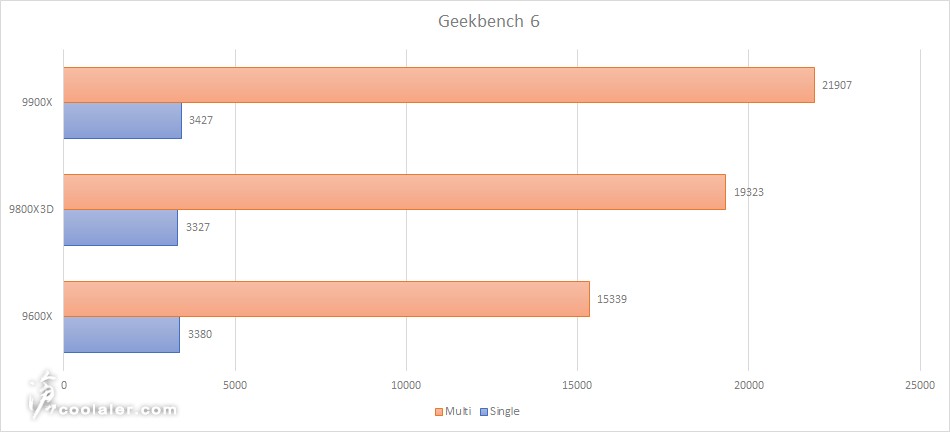
Geekbench 6
Single-Core:3327
Multi-Core:19323

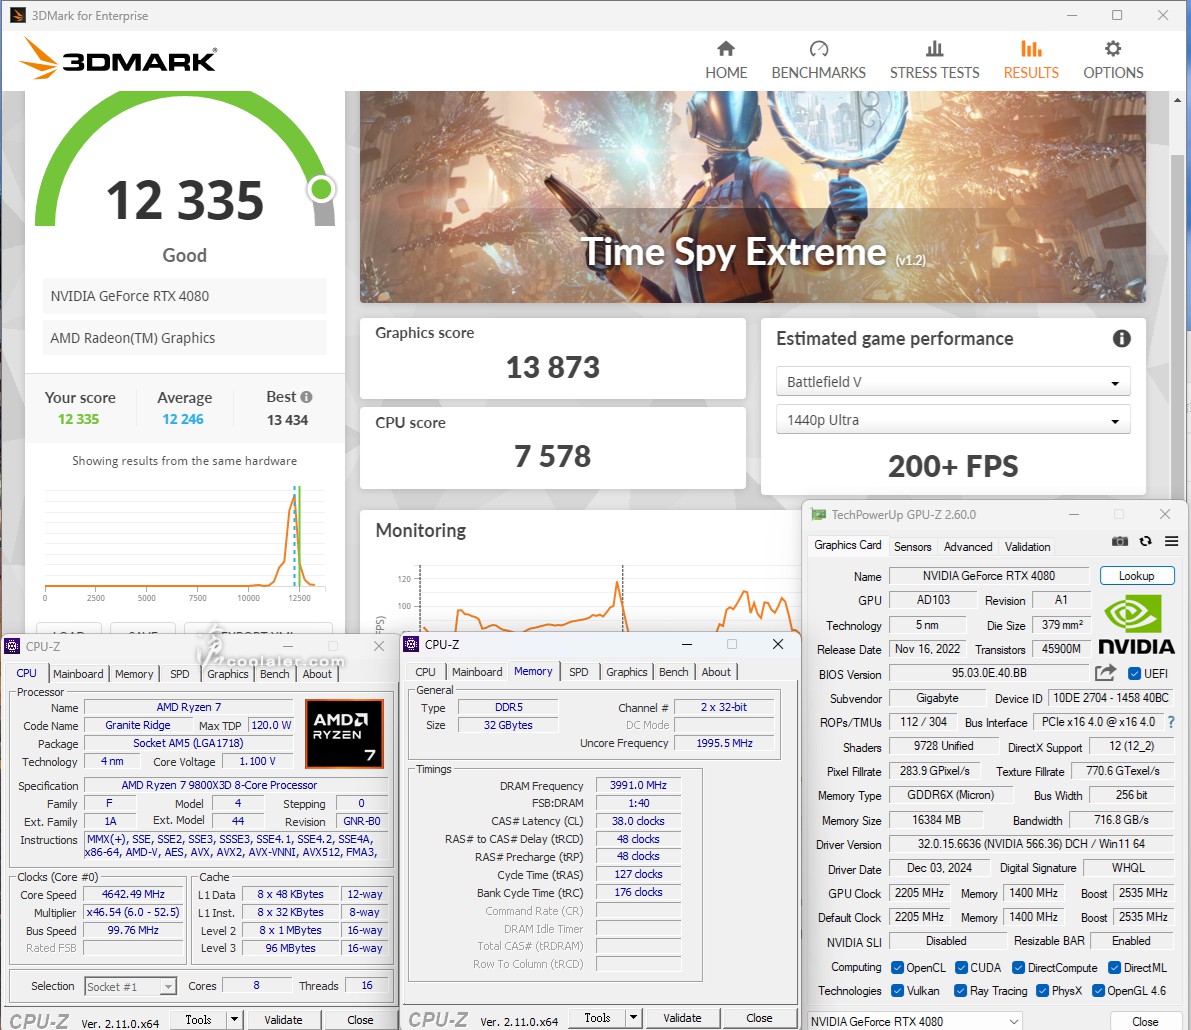
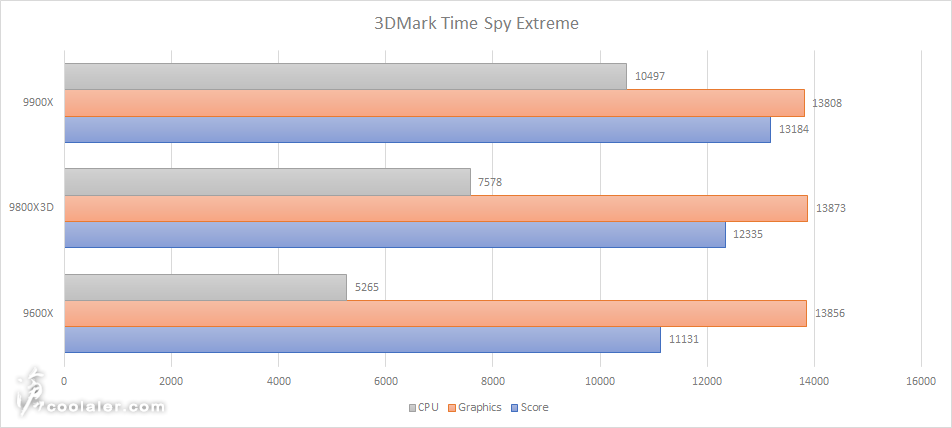
3DMark Time Spy Extreme:12335
Graphics score:13873
CPU score:7578
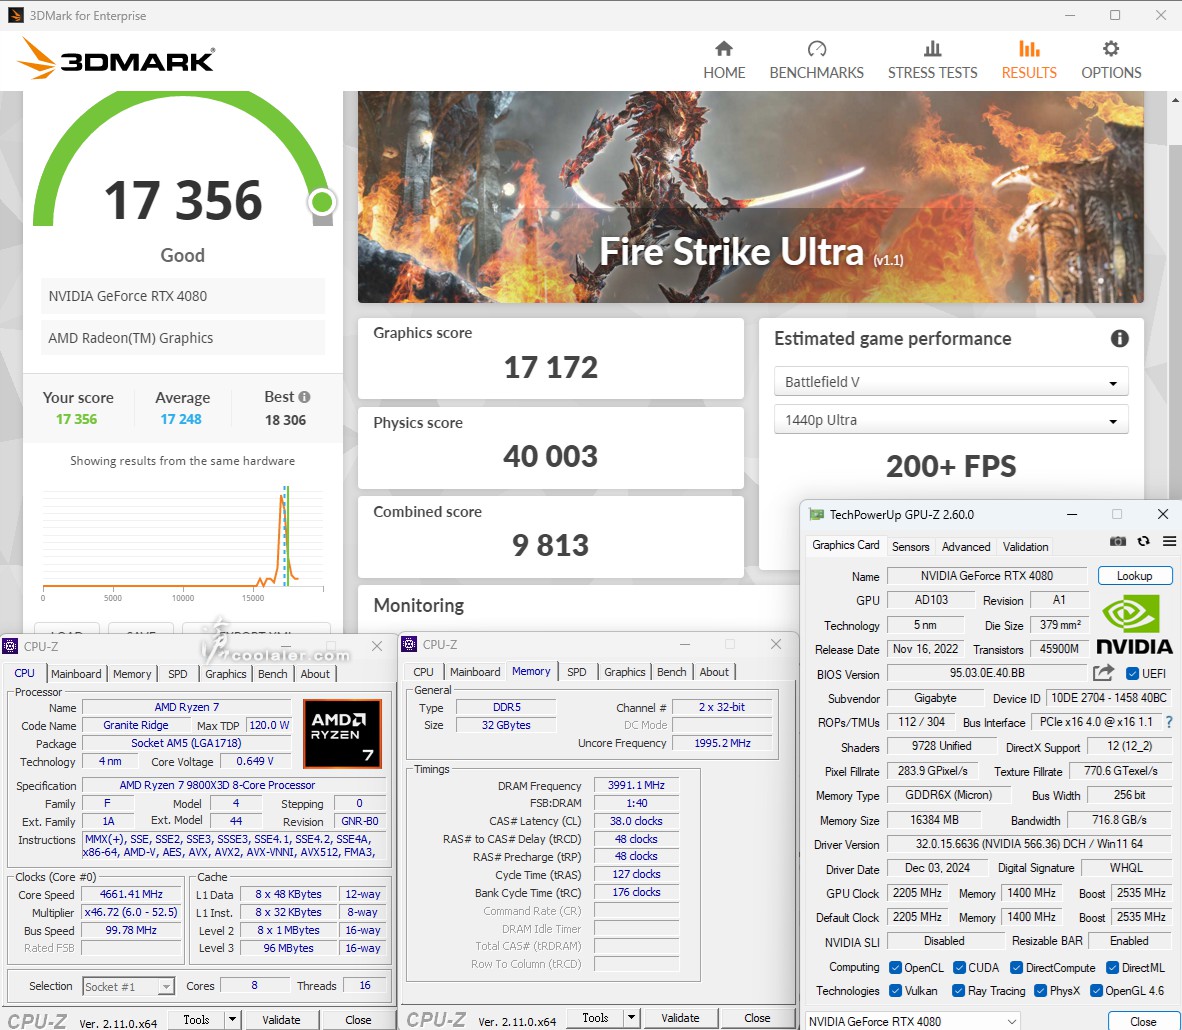
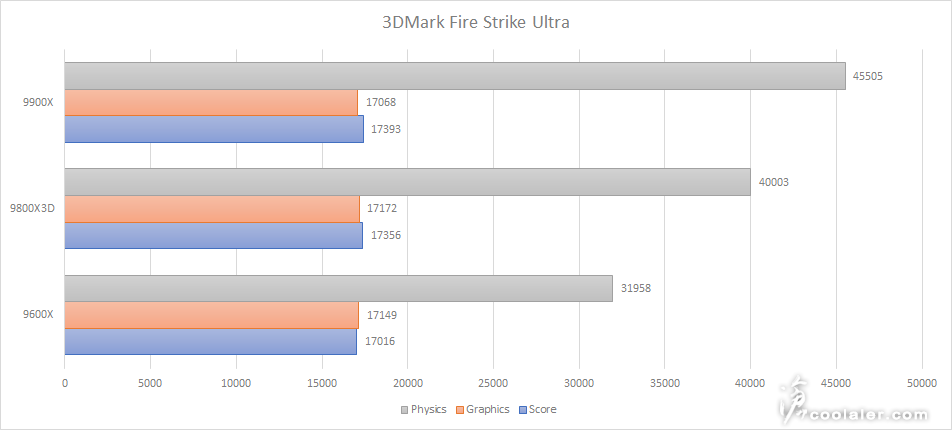
3DMark Fire Strike Ultra:17356
Graphics score:17172
Physics score:40003
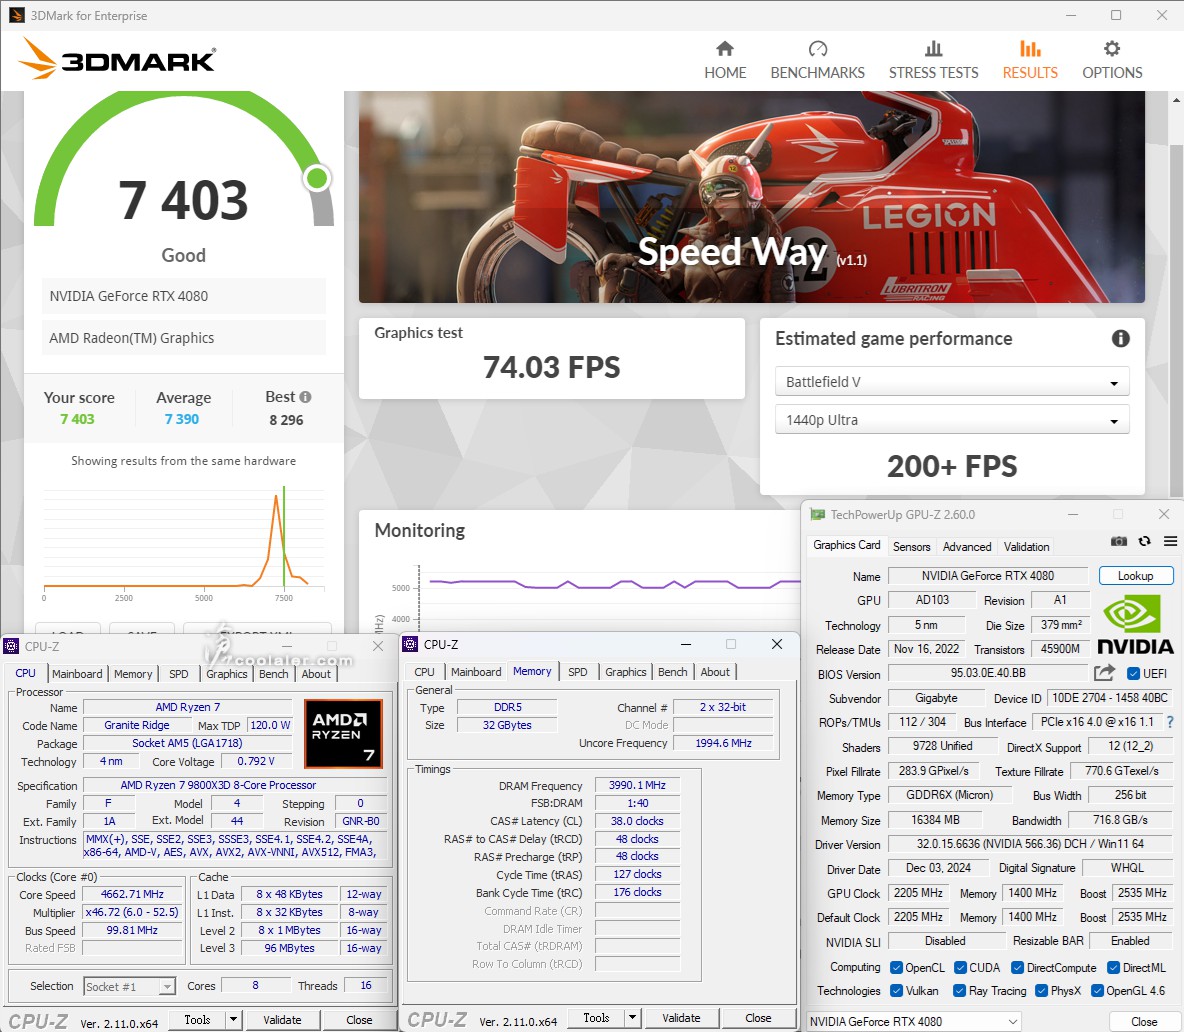
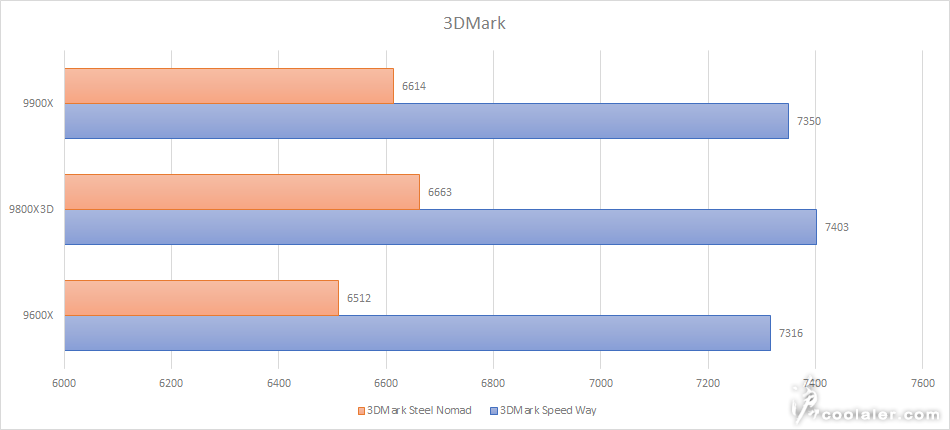
3DMark Speed Way:7403
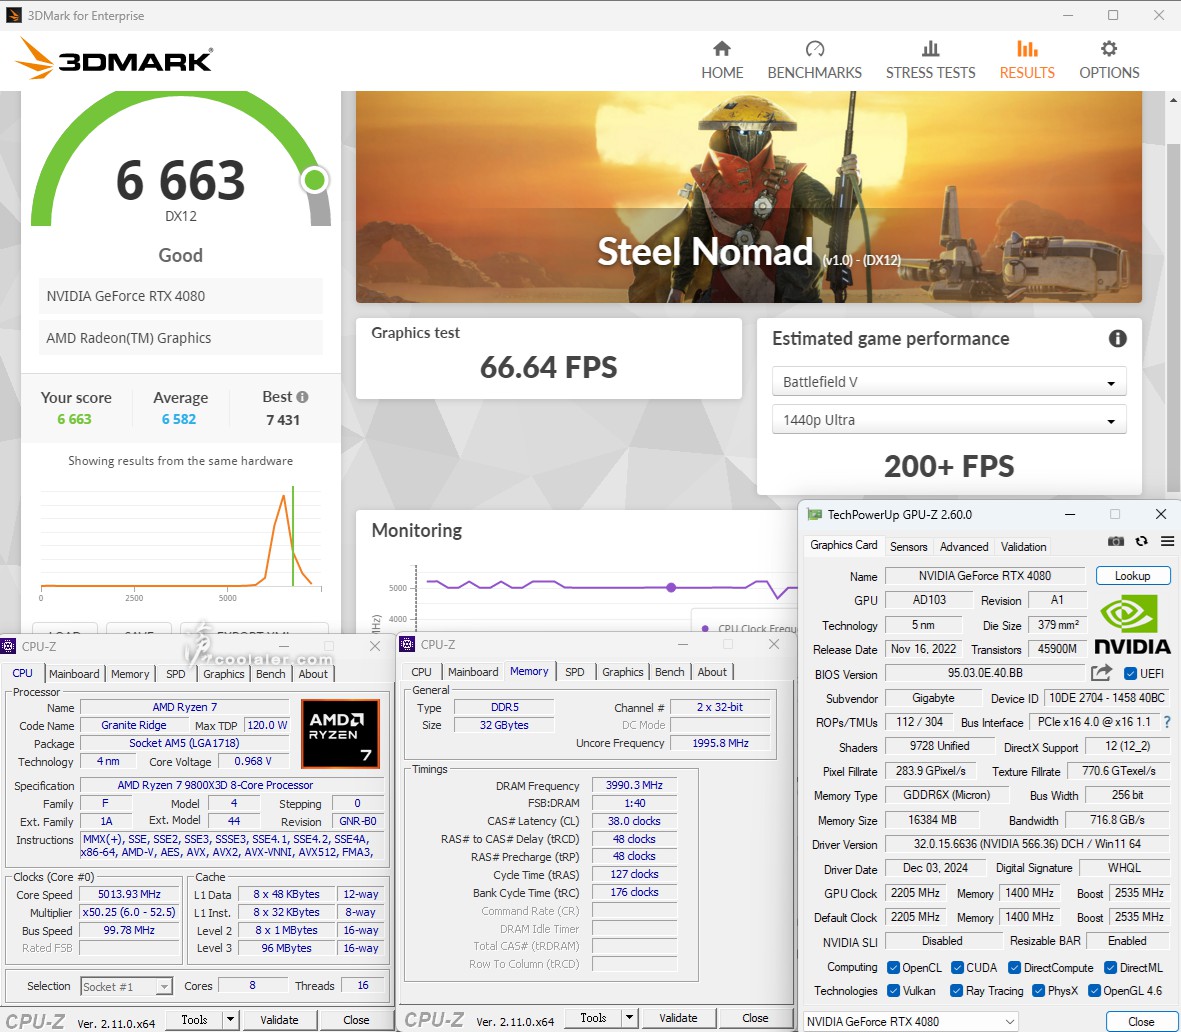
3DMark Steel Nomad:6663
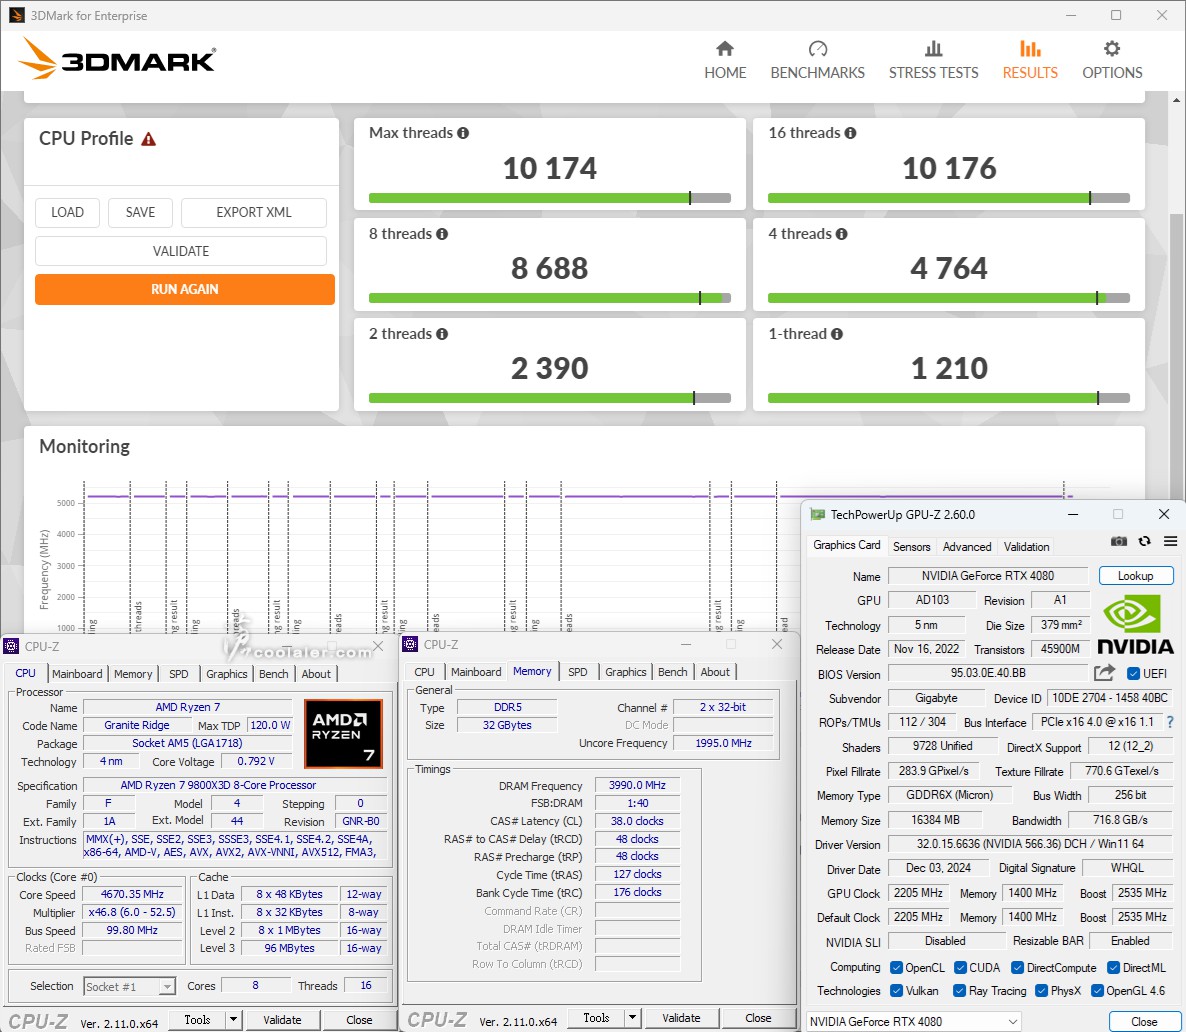
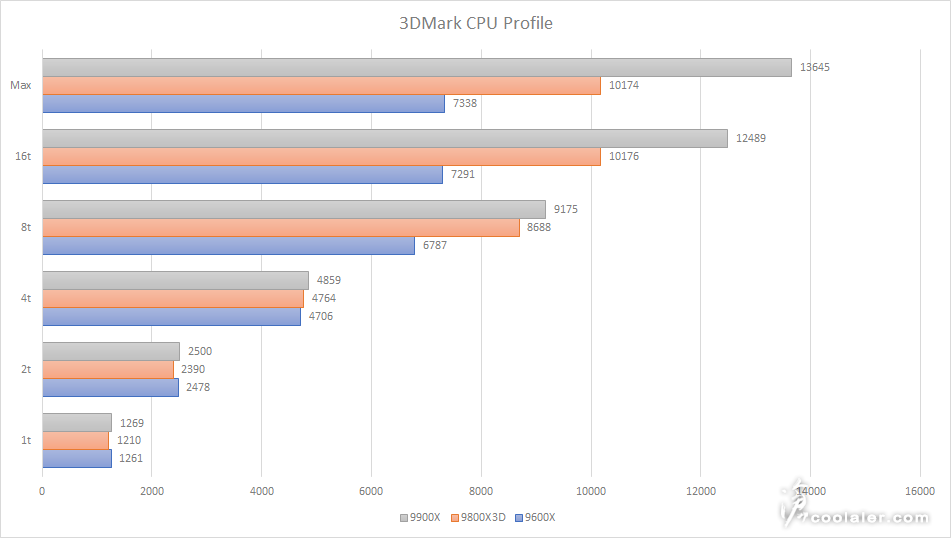
3DMark CPU Profile
1 thread:1210
2 threads:2390
4 threads:4764
8 threads:8688
16 threads:10176
Max threads:10174
遊戲測試
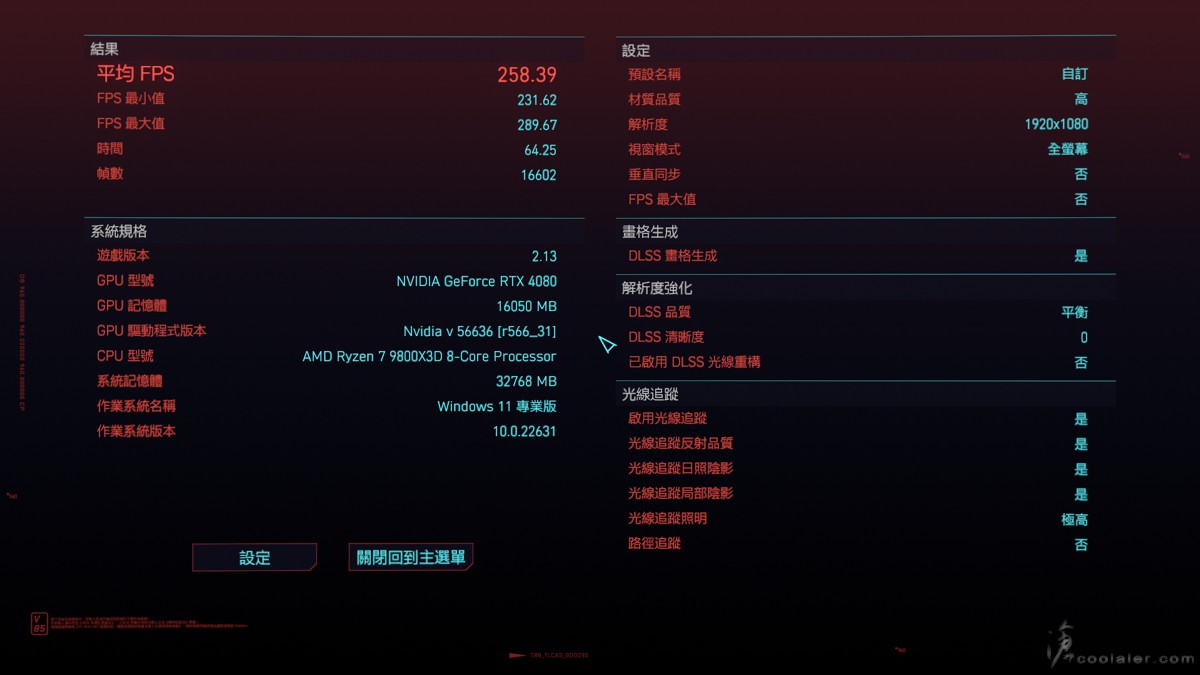
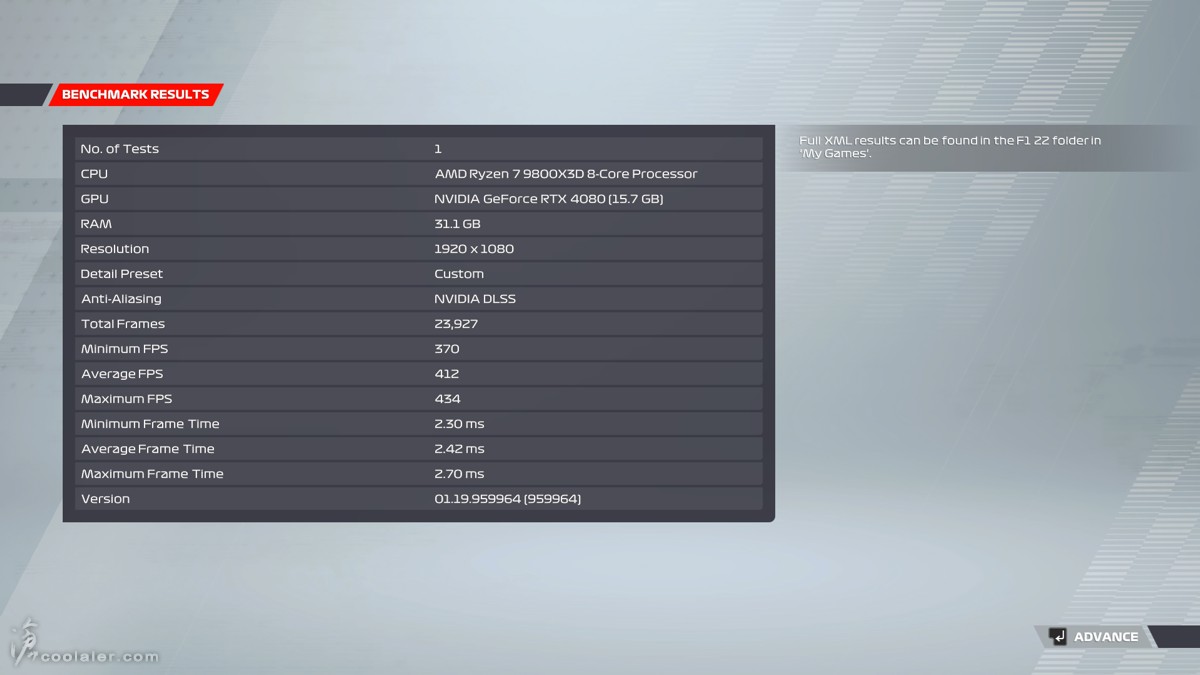
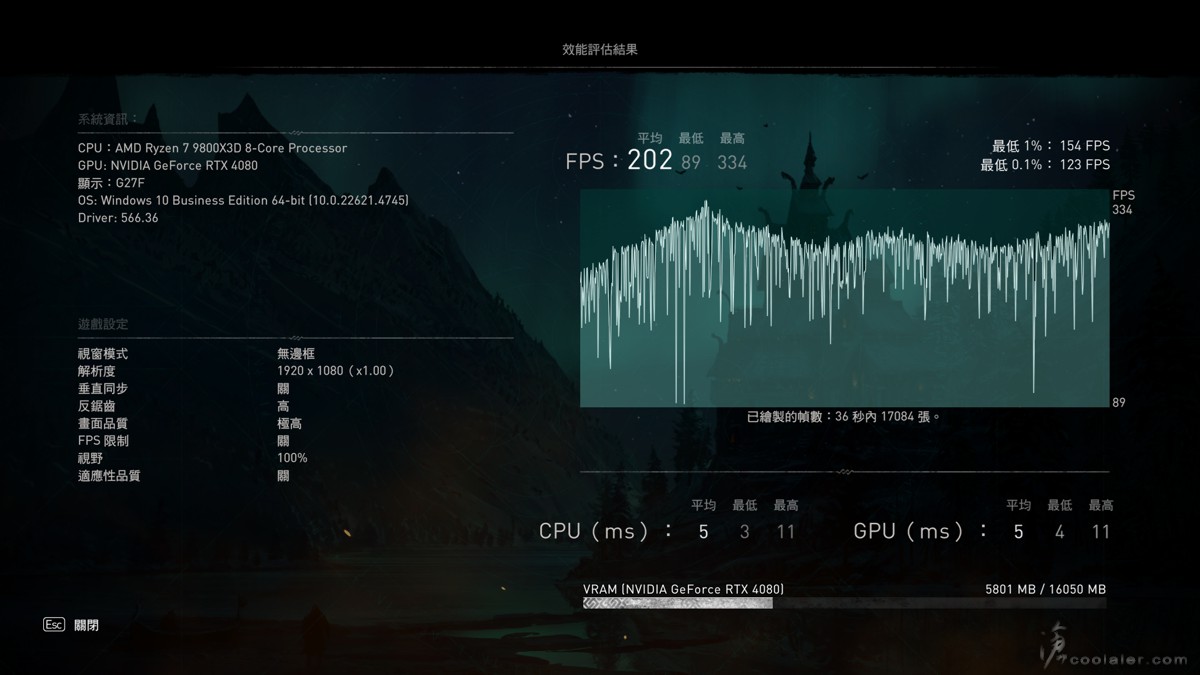
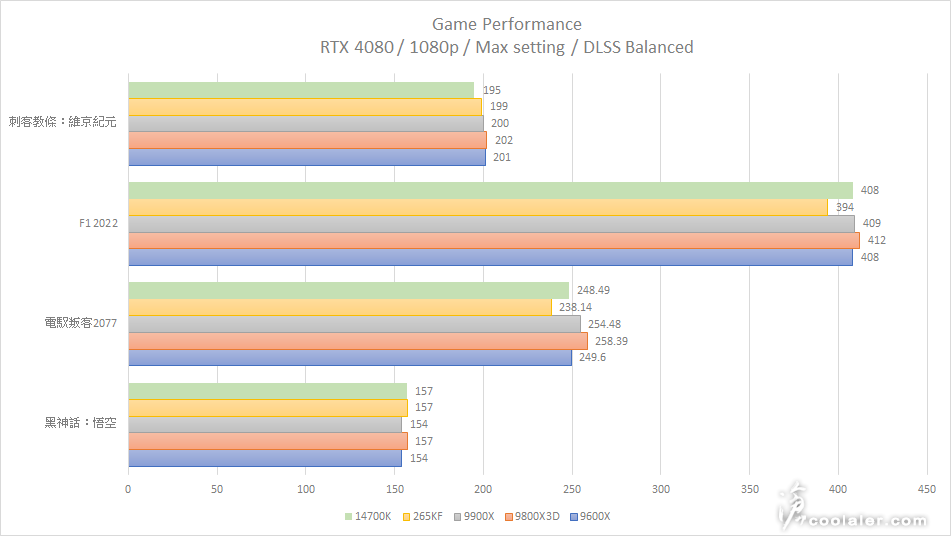
測試幾款有自帶 Benchmark 的遊戲,解析度為 1920×1080,特效全開最高,有支援 DLSS 3 的開均衡。
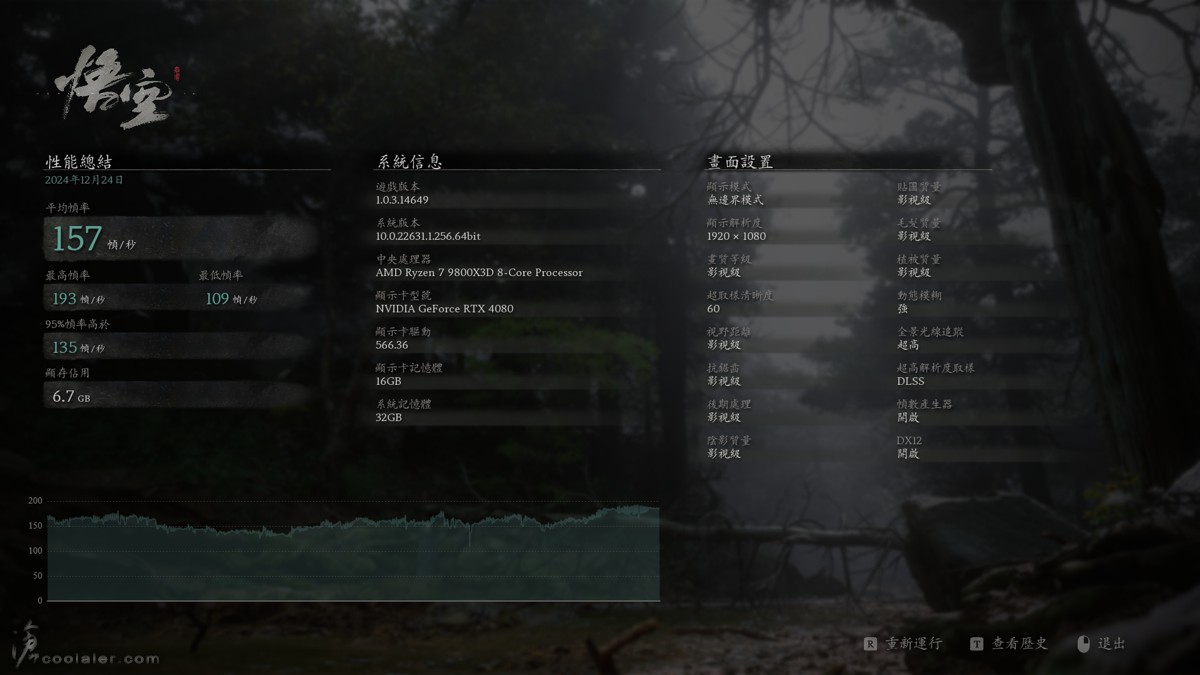
《黑神話:悟空》:157
《電馭叛客2077》:258.39
《F1 2022》:412
《刺客教條:維京紀元》:202
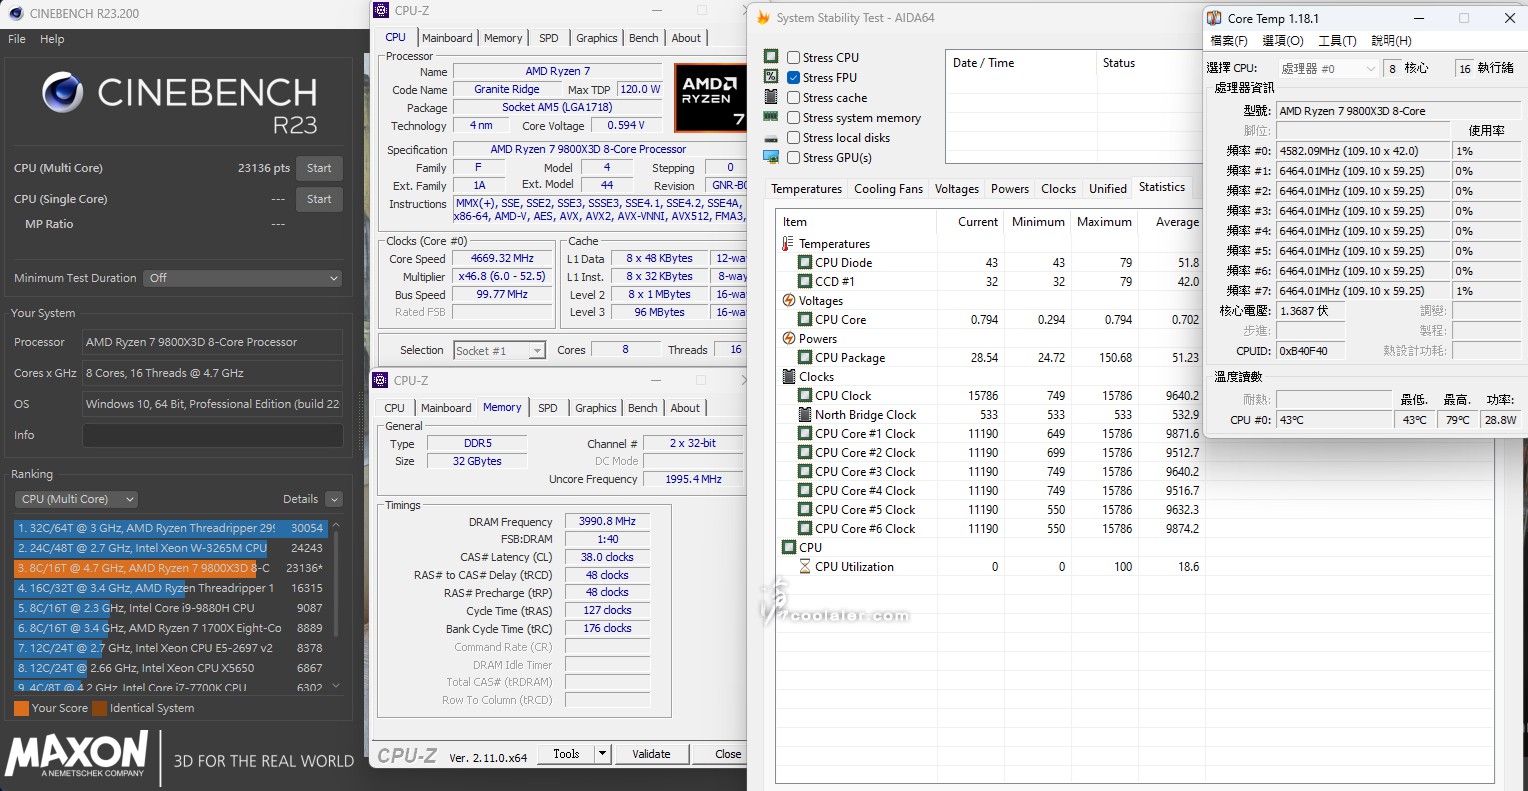
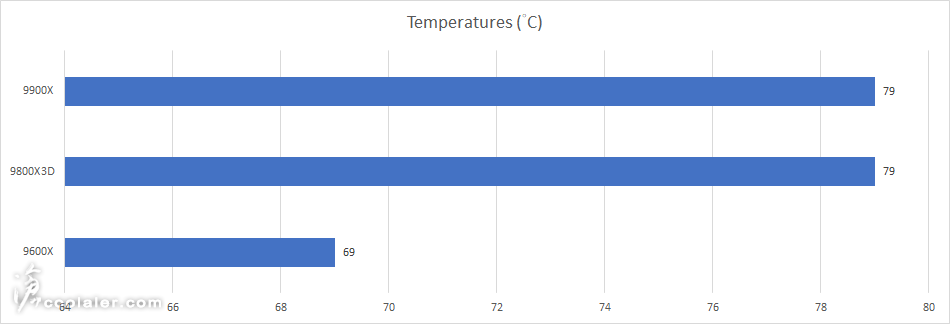
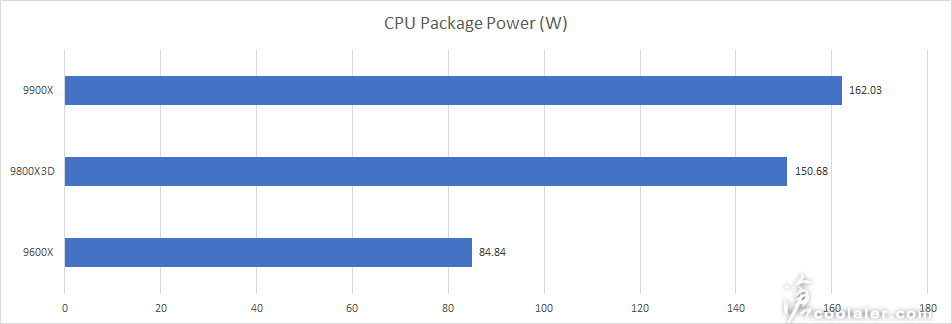
功耗與溫度
以 CINEBENCH R23 進行測試
最高溫:79度
最高功耗:150.68W
小結
Ryzen 7 9800X3D 無疑對於遊戲玩家來說是最好的選擇,當然前提是不溢價的情況,前陣子沒貨的狀態下,黃牛價都要賣到22000元。目前店家貨都還是比較少,某屋是不漲價,維持16450元的初始售價,不過前提是需要搭 X870 主機板販售,如果你是要裝機應該就沒差,但如果原有 600 主機板想要升級可能就得等一等,明年初也會有 9900X3D 、 9950X3D 可供選擇。還有其實搭 9900X 也不錯,在生產力效能是高出 9800X3D 許多,遊戲也還不錯,價格更便宜。
如果你想要搭配一張白色主機板,那 GIGABYTE X870E AORUS PRO ICE 是不錯的選擇,有高規格的擴充性與用料,16+2+2 數位供電設計、強化供電與 M.2 散熱、Wi-Fi 7 無線 + 2.5G 有線、3個 PCIe 5.0 x4 M.2、2個 USB 4 Type-C,以及一些 DIY 友善設計。這張板子目前售價為12990元,而另一張白色版 X870 AORUS ELITE WIFI7 ICE 則比較便一點,售價是10490元,而 Mini-ITX 的 X870I AORUS PRO ICE 則是10990元,以上供各位入手參考。
最近白化正夯?總之你想要搭配個白色主機板選擇性是越來越多了,GIGABYTE 在新的 AM5 平台 X870E 、 X870 晶片組上面目前有三款可選,X870E AORUS PRO ICE、X870 AORUS ELITE WIFI7 ICE 以及一張 mini-ITX 的 X870I AORUS PRO ICE ,一如既往都是 ICE 後綴字樣為白色代表。
此次要開箱介紹的也是白色版最高階的 X870E AORUS PRO ICE ,與 X870E AORUS PRO 其實是相同,差在黑白顏色。ICE 版也用上了白色的外盒包裝。
規格
Chipset:AMD X870E
CPU Support:Ryzen 7000 / 8000 / 9000
CPU Socket:AM5
Form Factor:ATX 305 x 244mm
VRD :16+2+2
Memory:4 x DIMM DDR5
PCIe :1 x PCIe 5.0×16、1 x PCIe 4.0×4 (x16插槽)、1 x PCIe 3.0×4 (x16插槽)
M.2:3 x PCIe 5.0×4、1 x PCIe 4.0×4
SATA:4 x SATAIII
Display Interface:2 x HDMI(1前置)、2 xUSB Type-C
USB:2 x USB-C 4 、1 x USB-C 3.2 Gen2x2、3 x USB 3.2 Gen2、8 x USB 3.2 Gen1、6 x USB 2.0
Audio:Realtek ALC1220
LAN:Realtek 2.5GbE
Wireless / Bluetooth:Qualcomm Wi-Fi 7 QCNCM865 + BT 5.3
採用 16+2+2 相數位供電設計並加強散熱、有 DIY 友善設計、強化的 PCIe UD Slot X 插槽、Wi-Fi 7 無線網路以及 EZ-Plug 天線接頭設計。基本上的這些新加入元素都與同期 Z890 高階產品是相同的。
配件有說明書、帶有 EZ-Plug 的無線天線座、2條 SATA、噪音偵測線、1個白色快速前置 IO 接頭、AORUS 老鷹風格貼紙、AORUS 銘板貼紙。
X870E AORUS PRO ICE在白化的部分是相當徹底,除了 PCB、散熱片之外,在插槽、AM5 扣具上也直接改用白色。
標準的 ATX 9孔尺寸,可以看到晶片組散熱片、M.2 散熱片以及供電散熱片上有刷上連貫的灰色斜紋點綴。
搭配高階的供電散熱片,從側邊可以看到有鋁擠鰭片增加散熱面積。
供電散熱延伸到後 IO 上,而上面也有 AORUS 的字樣,這部分有 ARGB 燈效。
表面上有髮絲紋處理,另外在左下側邊有個小小的 AORUS 老鷹標。
供電散熱片有採用熱導管強化散熱。
16+2+2相 80A 數位供電設計。
2個 CPU 8pin 供電。
支援 AM5 腳位處理器。
4個 DDR5 記憶體插槽,最高可擴充至 256GB。速度支援 DDR5-8200(OC)。
在主板的右上角有快速電源、重置鍵、Debug 燈。
1組 USB 3.2 Gen1、4個 SATA、1個 HDMI、1個 USB 3.2 Gen2x2 Type-C。
板子上面也搭載了各種 DIY 友善設計,第一根 PCIe 插槽卡榫通常不容易按壓釋放顯卡,PCIe EZ-Latch Plus 可以解決這個問題,直接將按壓釋放鈕延伸到記憶體旁邊,這樣就不會有干涉的問題。
晶片組上面有斜紋狀組成的 AORUS 老鷹標圖案。
散熱片表面有採用髮絲紋處理。
主板下方 IO 是相當齊全,有燈效接點、USB 2.0、USB 3.2 Gen1、風扇電源、前置 IO 等。
3個 PCIe x16 插槽,由右至左規格 PCIe 5.0 x16、PCIe 4.0 x4、PCIe 3.0 x4。
CPU 下方的 M.2 搭配比較高效能較好的散熱片,畢竟是 PCIe 5.0 x4 的介面。
在右側有三角反射面的設計,不同角度可以看不同老鷹標。
第一根的 PCIe x16 採用了 PCIe UD Slot X 插槽設計,並加上 Ultra Durable PCIe Armor 背部強化金屬板,避免顯卡太重插槽撐不住。
在 M.2 安裝拆卸也有 DIY 友善設計,散熱片的部分在尾段有 EZ-Latch Click 快速拆卸,側邊有個卡環,往反方向扳即可拆下,安裝往下扣壓自動會固定。
共有4個 M.2 插槽,散熱片內側都貼有導熱墊,另外第一根在底部也加上導熱墊強化散熱。M.2 插槽有金屬護甲的為 PCIe 5.0 x4,也就是1、2、4,第3槽為 PCIe 4.0×4 。
4個槽皆有 EZ-Latch Plus 快速安裝拆卸設計,原理與 EZ-Latch Click 相同,安裝只要將 M.2 下壓即可固定,拆卸則是扳動撥桿。
音效採用獨立區域設計,採用 Realtek ALC1220 晶片,搭配音效專用電容。
後方 IO 埠,1個 Q-Flach Plus 按鈕、2個 USB 2.0、1個 HDMI、4個 USB 3.2 Gen 1、2個 USB 4 Type-C、3個 USB 3.2 Gen2、RJ-45 網路接口、EZ-Plug 天線接頭、2個音源輸出入、S/PDIF 光纖輸出。另外可看到在擋板上 AORUS 字樣下方有7×2個小平行四邊形開孔,這部分是輔助供電散熱之用。
背部 PCB 板也有 AORUS 刷紋設計,另外對應第一根 PCIe x16 插槽底部則有 Ultra Durable PCIe Armor 強化背板。
目前最強遊戲處理器!Ryzen 7 9800X3D
燈效的部分在供電散熱片上面 AORUS 字樣以及晶片組散熱片下方間接燈。
BIOS 簡介
BIOS 畫面也是白色風格,基本上介面與之前差不多,下方為簡易模式,左側可見硬體資訊,中間上方即時時脈、溫度、電壓,當然一樣支援快速調整,例如 X3D Turbo Mode 套用、Smart Fan 6 風扇轉速、XMP / EXPO 套用等等。
Smart Fan 6 ,風扇轉速與溫度對應設定,也可以直接套用安靜、效能、全轉速模式。
進階模式,Tweaker 超頻選項,裡面一樣有相當多的超頻選項,包括 CPU、記憶體、電壓調整。這邊也可以透過 ECO Mode 選擇功耗,或是開啟 X3D Turbo Mode 增加遊戲效能。
PBO 超頻選項。
記憶體時序參數調整。
CPU / VRM 電壓模式。
AMD 超頻選項。
測試平台
CPU: AMD Ryzen 7 9800X3D
CPU Cooler: MSI MAG CORELIQUID E360 AIO
RAM: ADATA LANCER RGB DDR5-8000 16GBx2
MB: GIGABYTE X870E AORUS PRO ICE
VGA: GIGABYTE RTX 4080 GAMING OC
SSD: GIGABYTE AORUS Gen4 SSD 1TB
PSU: InWin 1065W
OS: Windows 11
記憶體使用 ADATA LANCER RGB DDR5-8000 套用直上
CPU-Z
CPU Single:799.1
CPU Multi:8747.0
Memory Benchmark
Read:85429 MB/s
Write:88495 MB/s
Copy:59069 MB/s
Latency:66.6 ns
7-Zip 22.01
壓縮:141.375 GIPS
解壓縮:142.945 GIPS
整體評等:142.160 GIPS
POV-Ray:35.54s
CINEBENCH R20
CPU:8987 pts
CPU 單核心:812 pts
CINEBENCH R23
CPU:23099 pts
CPU 單核心:2069 pts
CINEBENCH 2024
GPU:27138 pts
CPU:1389 pts
CPU 單核心:134 pts
V-Ray:28360
V-Ray GPU CUDA:4995
V-Ray GPU RTX:7455
Geekbench 6
Single-Core:3327
Multi-Core:19323
3DMark Time Spy Extreme:12335
Graphics score:13873
CPU score:7578
3DMark Fire Strike Ultra:17356
Graphics score:17172
Physics score:40003
3DMark Speed Way:7403
3DMark Steel Nomad:6663
3DMark CPU Profile
1 thread:1210
2 threads:2390
4 threads:4764
8 threads:8688
16 threads:10176
Max threads:10174
遊戲測試
測試幾款有自帶 Benchmark 的遊戲,解析度為 1920×1080,特效全開最高,有支援 DLSS 3 的開均衡。
《黑神話:悟空》:157
《電馭叛客2077》:258.39
《F1 2022》:412
《刺客教條:維京紀元》:202
功耗與溫度
以 CINEBENCH R23 進行測試
最高溫:79度
最高功耗:150.68W
小結
Ryzen 7 9800X3D 無疑對於遊戲玩家來說是最好的選擇,當然前提是不溢價的情況,前陣子沒貨的狀態下,黃牛價都要賣到22000元。目前店家貨都還是比較少,某屋是不漲價,維持16450元的初始售價,不過前提是需要搭 X870 主機板販售,如果你是要裝機應該就沒差,但如果原有 600 主機板想要升級可能就得等一等,明年初也會有 9900X3D 、 9950X3D 可供選擇。還有其實搭 9900X 也不錯,在生產力效能是高出 9800X3D 許多,遊戲也還不錯,價格更便宜。
如果你想要搭配一張白色主機板,那 GIGABYTE X870E AORUS PRO ICE 是不錯的選擇,有高規格的擴充性與用料,16+2+2 數位供電設計、強化供電與 M.2 散熱、Wi-Fi 7 無線 + 2.5G 有線、3個 PCIe 5.0 x4 M.2、2個 USB 4 Type-C,以及一些 DIY 友善設計。這張板子目前售價為12990元,而另一張白色版 X870 AORUS ELITE WIFI7 ICE 則比較便一點,售價是10490元,而 Mini-ITX 的 X870I AORUS PRO ICE 則是10990元,以上供各位入手參考。